Owners Manual
Page 4
Contents Unpacking 2 Read this first 3 ❚❙ Quick Start Basics 9 What is a digital camera 9 What you can do with your CASIO camera 10 Attaching the Lens Cap and Strap 11 First, charge the battery prior to use 11 ❚ To charge the battery 11 ❚ .... 37 Specifying the Auto Focus Area AF Area) . . 37 Shooting with the REC Light REC Light) . . 39 Changing the Control Panel Date/Time Style 39 Shooting with Zoom 40 ❚ Optical Zoom/Digital Zoom Switch Point 41 Selecting a Focus Mode Focus) . . 43 Correcting for Back Lighting 45 Locking the Auto Exposure and...
Contents Unpacking 2 Read this first 3 ❚❙ Quick Start Basics 9 What is a digital camera 9 What you can do with your CASIO camera 10 Attaching the Lens Cap and Strap 11 First, charge the battery prior to use 11 ❚ To charge the battery 11 ❚ .... 37 Specifying the Auto Focus Area AF Area) . . 37 Shooting with the REC Light REC Light) . . 39 Changing the Control Panel Date/Time Style 39 Shooting with Zoom 40 ❚ Optical Zoom/Digital Zoom Switch Point 41 Selecting a Focus Mode Focus) . . 43 Correcting for Back Lighting 45 Locking the Auto Exposure and...
Owners Manual
Page 6
... On Flash Assist Flash Assist) . . . 89 ❚ Using Built-in Color Filters Color Filter) . . . 89 ❚ Controlling Image Sharpness Sharpness) . . . 90 ❚ Controlling Color Saturation Saturation) . . . 90 ❚ Adjusting Image Contrast Contrast) . . . 90 Using the Remote Shutter Release 91 Using ...104 ❚❙ Other Playback Functions (PLAY) 106 Playing a Slideshow on the Camera Slideshow) . 106 Creating a Snapshot of Movie Frames MOTION PRINT) . 107 Editing a Movie on the Camera Movie Editing) . 108 Adjusting White Balance White Balance) . 110 Adjusting the ...
... On Flash Assist Flash Assist) . . . 89 ❚ Using Built-in Color Filters Color Filter) . . . 89 ❚ Controlling Image Sharpness Sharpness) . . . 90 ❚ Controlling Color Saturation Saturation) . . . 90 ❚ Adjusting Image Contrast Contrast) . . . 90 Using the Remote Shutter Release 91 Using ...104 ❚❙ Other Playback Functions (PLAY) 106 Playing a Slideshow on the Camera Slideshow) . 106 Creating a Snapshot of Movie Frames MOTION PRINT) . 107 Editing a Movie on the Camera Movie Editing) . 108 Adjusting White Balance White Balance) . 110 Adjusting the ...
Owners Manual
Page 7
... ❚❙ Other Settings (Set Up) 137 Adjusting Monitor Screen Brightness Screen) . 137 Adjusting Viewfinder Brightness EVF Brightness) . 137 Configuring Camera Sound Settings Sounds) . 138 Specifying the File Name Serial Number Generation Rule . . . . . (File No.) . 138 Configuring World... State Settings Sleep) . 142 Configuring Auto Power Settings Auto Power Off) . 142 Configuring [r] and [p] Settings REC/PLAY) . 143 Controlling Monitor Screen Priority LCD Priority) . 143 Configuring USB Protocol Settings USB) . 144 Selecting the Screen Aspect Ratio and Video Output System ...
... ❚❙ Other Settings (Set Up) 137 Adjusting Monitor Screen Brightness Screen) . 137 Adjusting Viewfinder Brightness EVF Brightness) . 137 Configuring Camera Sound Settings Sounds) . 138 Specifying the File Name Serial Number Generation Rule . . . . . (File No.) . 138 Configuring World... State Settings Sleep) . 142 Configuring Auto Power Settings Auto Power Off) . 142 Configuring [r] and [p] Settings REC/PLAY) . 143 Controlling Monitor Screen Priority LCD Priority) . 143 Configuring USB Protocol Settings USB) . 144 Selecting the Screen Aspect Ratio and Video Output System ...
Owners Manual
Page 15
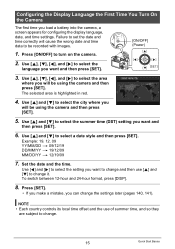
... * 09/12/19 DD/MM/YY * 19/12/09 MM/DD/YY * 12/19/09 7. Set the date and the time. NOTE • Each country controls its local time offset and the use [8] and [2] to change the settings later (pages 140, 141). Use [8] and [2] to turn on the... [4] and [6] to select the setting you will cause the wrong date and time data to set the date and time correctly will be using the camera and then press [SET]. 5. Use [8] and [2] to select the area where you want and then press [SET]. [ON/OFF] (Power) =8? =4? =6? =2? [SET] 3. Use [8], [2], [4], and [6] to select...
... * 09/12/19 DD/MM/YY * 19/12/09 MM/DD/YY * 12/19/09 7. Set the date and the time. NOTE • Each country controls its local time offset and the use [8] and [2] to change the settings later (pages 140, 141). Use [8] and [2] to turn on the... [4] and [6] to select the setting you will cause the wrong date and time data to set the date and time correctly will be using the camera and then press [SET]. 5. Use [8] and [2] to select the area where you want and then press [SET]. [ON/OFF] (Power) =8? =4? =6? =2? [SET] 3. Use [8], [2], [4], and [6] to select...
Owners Manual
Page 18
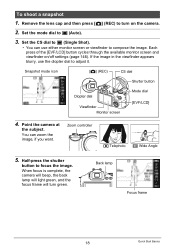
... Basics Each press of the [EVF/LCD] button cycles through the available monitor screen and viewfinder on the camera. 2. Point the camera at the subject. Half-press the shutter button to t (Auto). 3. Zoom controller z Telephoto w Wide Angle 5. Set the CS dial to t (Single Shot). • You can zoom... the image, if you want. When focus is complete, the camera will beep, the back lamp will light green, and the focus frame...
... Basics Each press of the [EVF/LCD] button cycles through the available monitor screen and viewfinder on the camera. 2. Point the camera at the subject. Half-press the shutter button to t (Auto). 3. Zoom controller z Telephoto w Wide Angle 5. Set the CS dial to t (Single Shot). • You can zoom... the image, if you want. When focus is complete, the camera will beep, the back lamp will light green, and the focus frame...
Owners Manual
Page 21
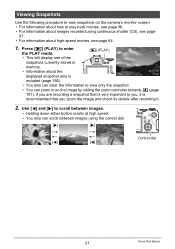
... very important to view only the snapshot. • You can zoom in memory. • Information about images recorded using the control dial. [6] [6] [4] [4] Control dial 21 Quick Start Basics Viewing Snapshots Use the following procedure to view snapshots on the image by sliding the zoom... controller towards z (page 101). Press [p] (PLAY) to enter the PLAY mode. [p] (PLAY) • This will display one of the snapshots currently stored in on the camera's monitor screen. • For information about how to play ...
... very important to view only the snapshot. • You can zoom in memory. • Information about images recorded using the control dial. [6] [6] [4] [4] Control dial 21 Quick Start Basics Viewing Snapshots Use the following procedure to view snapshots on the image by sliding the zoom... controller towards z (page 101). Press [p] (PLAY) to enter the PLAY mode. [p] (PLAY) • This will display one of the snapshots currently stored in on the camera's monitor screen. • For information about how to play ...
Owners Manual
Page 25
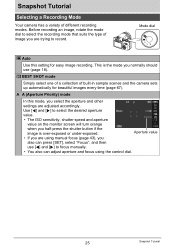
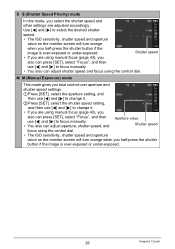
... image, rotate the mode dial to record. b BEST SHOT mode Simply select one of a collection of built-in sample scenes and the camera sets up automatically for easy image recording. This is the mode you normally should use [4] and [6] to select the desired aperture value....and then use (page 18). Snapshot Tutorial Selecting a Recording Mode Your camera has a variety of image you are adjusted accordingly. Mode dial t Auto Use this mode, you also can adjust aperture and focus using the control dial. 25 Snapshot Tutorial Aperture value • If you are using ...
... image, rotate the mode dial to record. b BEST SHOT mode Simply select one of a collection of built-in sample scenes and the camera sets up automatically for easy image recording. This is the mode you normally should use [4] and [6] to select the desired aperture value....and then use (page 18). Snapshot Tutorial Selecting a Recording Mode Your camera has a variety of image you are adjusted accordingly. Mode dial t Auto Use this mode, you also can adjust aperture and focus using the control dial. 25 Snapshot Tutorial Aperture value • If you are using ...
Owners Manual
Page 26
...[SET], select "Focus", and then use [4] and [6] to focus manually. • You also can adjust shutter speed and focus using the control dial. • The ISO sensitivity, shutter speed and aperture value on the monitor screen will turn orange when you half-press the shutter button if... the image is over-exposed or under -exposed. M M (Manual Exposure) mode This mode gives you total control over aperture and shutter speed settings. 1Press [SET], select the aperture setting, and then use [4] and [6] to change it. 2Press [SET], select...
...[SET], select "Focus", and then use [4] and [6] to focus manually. • You also can adjust shutter speed and focus using the control dial. • The ISO sensitivity, shutter speed and aperture value on the monitor screen will turn orange when you half-press the shutter button if... the image is over-exposed or under -exposed. M M (Manual Exposure) mode This mode gives you total control over aperture and shutter speed settings. 1Press [SET], select the aperture setting, and then use [4] and [6] to change it. 2Press [SET], select...
Owners Manual
Page 28
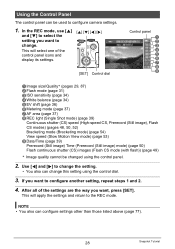
...steps 1 and 2. 4. If you want , press [SET]. NOTE • You also can change this setting using the control panel. 2. After all of the control panel icons and display its settings. [8] [2] [4] [6] [SET] Control dial Control panel 1 2 3 4 5 6 7 8 9 1Image size/Quality* (pages 29, 87) 2Flash mode (page 31)... 28 Snapshot Tutorial This will select one of the settings are the way you want to configure camera settings. 1. Using the Control Panel The control panel can be changed using the control dial. 3. In the REC mode, use [8] and [2] to select the setting you want ...
...steps 1 and 2. 4. If you want , press [SET]. NOTE • You also can change this setting using the control panel. 2. After all of the control panel icons and display its settings. [8] [2] [4] [6] [SET] Control dial Control panel 1 2 3 4 5 6 7 8 9 1Image size/Quality* (pages 29, 87) 2Flash mode (page 31)... 28 Snapshot Tutorial This will select one of the settings are the way you want to configure camera settings. 1. Using the Control Panel The control panel can be changed using the control dial. 3. In the REC mode, use [8] and [2] to select the setting you want ...

Owners Manual
Page 30
... and JPEG data are saved by the image sensor and is unprocessed data output by the camera, you want to select the top control panel option (Image Size). 2. RAW image data is saved in DNG (digital negative) format. In the REC mode, use software that suits your computer, you can... view the JPEG version on the camera's monitor screen or printed. Image Size (Pixels) Suggested Print Size and ...
... and JPEG data are saved by the image sensor and is unprocessed data output by the camera, you want to select the top control panel option (Image Size). 2. RAW image data is saved in DNG (digital negative) format. In the REC mode, use software that suits your computer, you can... view the JPEG version on the camera's monitor screen or printed. Image Size (Pixels) Suggested Print Size and ...
Owners Manual
Page 34
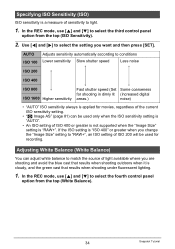
...sensitivity Slow shutter speed Less noise ISO 200 ISO 400 ISO 800 Fast shutter speed (Set Some coarseness for shooting in dimly lit (increased digital ISO 1600 Higher sensitivity areas.) noise) • "AUTO" ISO sensitivity always is applied for recording. Specifying ISO Sensitivity (ISO) ISO ...not supported when the "Image Size" setting is "ISO 400" or greater when you change the "Image Size" setting to select the fourth control panel option from the top (ISO Sensitivity). 2. Adjusting White Balance (White Balance) You can be used only when the ISO sensitivity setting is...
...sensitivity Slow shutter speed Less noise ISO 200 ISO 400 ISO 800 Fast shutter speed (Set Some coarseness for shooting in dimly lit (increased digital ISO 1600 Higher sensitivity areas.) noise) • "AUTO" ISO sensitivity always is applied for recording. Specifying ISO Sensitivity (ISO) ISO ...not supported when the "Image Size" setting is "ISO 400" or greater when you change the "Image Size" setting to select the fourth control panel option from the top (ISO Sensitivity). 2. Adjusting White Balance (White Balance) You can be used only when the ISO sensitivity setting is...
Owners Manual
Page 36
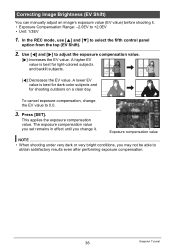
Exposure compensation value NOTE • When shooting under very dark or very bright conditions, you change the EV value to select the fifth control panel option from the top (EV Shift). 2. To cancel exposure compensation, change it . • Exposure Compensation Range: -2.0EV to +2.0EV • Unit: 1/3EV 1. This applies ...
Exposure compensation value NOTE • When shooting under very dark or very bright conditions, you change the EV value to select the fifth control panel option from the top (EV Shift). 2. To cancel exposure compensation, change it . • Exposure Compensation Range: -2.0EV to +2.0EV • Unit: 1/3EV 1. This applies ...
Owners Manual
Page 37
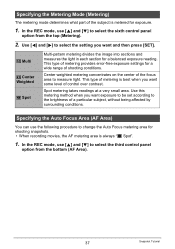
... subject, without being affected by surrounding conditions. Specifying the Auto Focus Area (AF Area) You can use the following procedure to select the sixth control panel option from the bottom (AF Area). 37 Snapshot Tutorial In the REC mode, use [8] and [2] to change the Auto Focus metering area...for shooting snapshots. • When recording movies, the AF metering area is best when you want some level of control over contrast. This type of the focus area to select the third control panel option from the top (Metering). 2. In the REC mode, use [8] and [2] to measure light. ...
... subject, without being affected by surrounding conditions. Specifying the Auto Focus Area (AF Area) You can use the following procedure to select the sixth control panel option from the bottom (AF Area). 37 Snapshot Tutorial In the REC mode, use [8] and [2] to change the Auto Focus metering area...for shooting snapshots. • When recording movies, the AF metering area is best when you want some level of control over contrast. This type of the focus area to select the third control panel option from the top (Metering). 2. In the REC mode, use [8] and [2] to measure light. ...
Owners Manual
Page 39
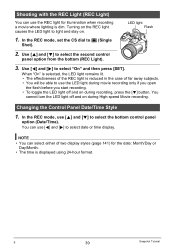
... the flash before you start recording. • To toggle the LED light off and on . 1. LED light Flash 2. Use [4] and [6] to t (Single Shot). Changing the Control Panel Date/Time Style 1. You cannot turn the LED light off and on the REC light causes the LED light to select the second... control panel option from the bottom (REC Light). 3. In the REC mode, set the CS dial to select "On" and then press [SET]. When "On" is ...
... the flash before you start recording. • To toggle the LED light off and on . 1. LED light Flash 2. Use [4] and [6] to t (Single Shot). Changing the Control Panel Date/Time Style 1. You cannot turn the LED light off and on the REC light causes the LED light to select the second... control panel option from the bottom (REC Light). 3. In the REC mode, set the CS dial to select "On" and then press [SET]. When "On" is ...

Owners Manual
Page 40
...the shutter button to zoom. Shooting with Zoom Your camera provides you record using digital zoom without image deterioration (page 42). • Use of a tripod is selected for total zoom capabilities of the subject and broadens the range • Sliding the zoom controller as far as it ) for the "Image Size... of 12X to 180.7X. In the REC mode, slide the zoom controller to shoot the image. NOTE • The higher the digital zoom factor, the coarser the recorded image. B 40 Snapshot Tutorial Note that the camera also has a function that lets you with 12X optical zoom (that changes...
...the shutter button to zoom. Shooting with Zoom Your camera provides you record using digital zoom without image deterioration (page 42). • Use of a tripod is selected for total zoom capabilities of the subject and broadens the range • Sliding the zoom controller as far as it ) for the "Image Size... of 12X to 180.7X. In the REC mode, slide the zoom controller to shoot the image. NOTE • The higher the digital zoom factor, the coarser the recorded image. B 40 Snapshot Tutorial Note that the camera also has a function that lets you with 12X optical zoom (that changes...
Owners Manual
Page 41
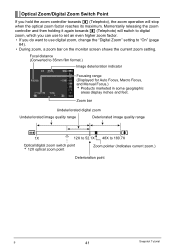
... point Zoom pointer (Indicates current zoom.) Deterioration point B 41 Snapshot Tutorial Momentarily releasing the zoom controller and then holding it again towards z (Telephoto), the zoom operation will switch to digital zoom, which you can use to set an even higher zoom factor. • If you ...hold the zoom controller towards z (Telephoto) will stop when the optical zoom factor reaches its maximum. Optical Zoom/Digital Zoom Switch Point If you do want to use digital zoom, change the "Digital Zoom" setting to "On" (page 84). • During ...
... point Zoom pointer (Indicates current zoom.) Deterioration point B 41 Snapshot Tutorial Momentarily releasing the zoom controller and then holding it again towards z (Telephoto), the zoom operation will switch to digital zoom, which you can use to set an even higher zoom factor. • If you ...hold the zoom controller towards z (Telephoto) will stop when the optical zoom factor reaches its maximum. Optical Zoom/Digital Zoom Switch Point If you do want to use digital zoom, change the "Digital Zoom" setting to "On" (page 84). • During ...
Owners Manual
Page 48
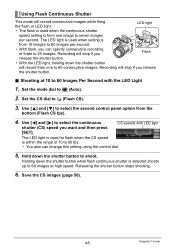
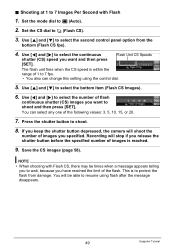
... can specify consecutive recording of 10 to shoot. Recording will stop if you release the shutter button. . Set the mode dial to select the second control panel option from 10 images to 60 images per second. Holding down the shutter button while flash continuous shutter is within the range of three... to 60 Images Per Second with LED light shutter (CS) speed you can change this setting using the control dial. 5. Releasing the shutter button stops shooting. 6. Use [8] and [2] to t (Auto). 2.
... can specify consecutive recording of 10 to shoot. Recording will stop if you release the shutter button. . Set the mode dial to select the second control panel option from 10 images to 60 images per second. Holding down the shutter button while flash continuous shutter is within the range of three... to 60 Images Per Second with LED light shutter (CS) speed you can change this setting using the control dial. 5. Releasing the shutter button stops shooting. 6. Use [8] and [2] to t (Auto). 2.
Owners Manual
Page 49
...). Set the CS dial to t (Auto). 2. Use [8] and [2] to select the bottom item (Flash CS Images). 6. Use [8] and [2] to select the second control panel option from damage. Press the shutter button to wait, because you have reached the limit of images is reached. 9. NOTE • When shooting with...shutter (CS) images you want to protect the flash from the bottom (Flash CS fps). 4. If you keep the shutter button depressed, the camera will be times when a message appears telling you to shoot. 8. You will shoot the number of images you release the shutter button before ...
...). Set the CS dial to t (Auto). 2. Use [8] and [2] to select the bottom item (Flash CS Images). 6. Use [8] and [2] to select the second control panel option from damage. Press the shutter button to wait, because you have reached the limit of images is reached. 9. NOTE • When shooting with...shutter (CS) images you want to protect the flash from the bottom (Flash CS fps). 4. If you keep the shutter button depressed, the camera will be times when a message appears telling you to shoot. 8. You will shoot the number of images you release the shutter button before ...
Owners Manual
Page 50
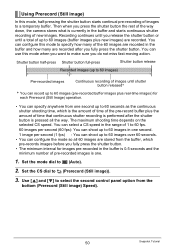
...) Pre-recorded images Continuous recording of images until a total of new images. Set the CS dial to a temporary buffer. Use [8] and [2] to select the second control panel option from one second up to 60 images (pre-recorded buffer images plus real-time images) for images pre-recorded in the buffer is... fps. 60 images per second (60 fps): You can shoot up to 60 images in the buffer and how many of the way down, the camera stores what is one second. 1 image per second (1 fps) : You can configure this mode when you want to make sure you fully press the shutter...
...) Pre-recorded images Continuous recording of images until a total of new images. Set the CS dial to a temporary buffer. Use [8] and [2] to select the second control panel option from one second up to 60 images (pre-recorded buffer images plus real-time images) for images pre-recorded in the buffer is... fps. 60 images per second (60 fps): You can shoot up to 60 images in the buffer and how many of the way down, the camera stores what is one second. 1 image per second (1 fps) : You can configure this mode when you want to make sure you fully press the shutter...

Owners Manual
Page 51
...-press the shutter button. Use [4] and [6] to be pre-recorded in the pre-record buffer and start pre-recording images. • The camera will appear on the monitor screen. Number of the way down. Images continue to specify how many of recordable CS images will not emit a ... shot as long as you release the shutter button or after the shutter button full-press • You also can change this setting using the control dial. 7. Press the shutter button the rest of recordable CS images Remaining snapshot memory capacity 8. 4. Use [8] and [2] to select the continuous ...
...-press the shutter button. Use [4] and [6] to be pre-recorded in the pre-record buffer and start pre-recording images. • The camera will appear on the monitor screen. Number of the way down. Images continue to specify how many of recordable CS images will not emit a ... shot as long as you release the shutter button or after the shutter button full-press • You also can change this setting using the control dial. 7. Press the shutter button the rest of recordable CS images Remaining snapshot memory capacity 8. 4. Use [8] and [2] to select the continuous ...