
Owners Manual
Page 2
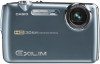
Attach strap here. Digital camera Rechargeable lithium ion battery (NP-60) Charger unit (BC-60L) To attach the strap to the camera * The shape of the power cord plug varies according to make sure that all items shown below are included. Power cord Strap USB cable AV cable CD-ROM Basic Reference 2 Unpacking As you unpack your original retailer. If anything is missing, contact your camera, check to country or geographic area.
Attach strap here. Digital camera Rechargeable lithium ion battery (NP-60) Charger unit (BC-60L) To attach the strap to the camera * The shape of the power cord plug varies according to make sure that all items shown below are included. Power cord Strap USB cable AV cable CD-ROM Basic Reference 2 Unpacking As you unpack your original retailer. If anything is missing, contact your camera, check to country or geographic area.

Owners Manual
Page 4
...;❙ Quick Start Basics 14 What is a digital camera 14 What you can do with your CASIO camera 15 First, charge the battery prior to use 16 ❚ To charge the battery 16 ❚ To load the battery 17 Configuring Basic Settings the First Time You Turn On the Camera 19 Preparing a Memory Card...
...;❙ Quick Start Basics 14 What is a digital camera 14 What you can do with your CASIO camera 15 First, charge the battery prior to use 16 ❚ To charge the battery 16 ❚ To load the battery 17 Configuring Basic Settings the First Time You Turn On the Camera 19 Preparing a Memory Card...

Owners Manual
Page 8
❚ To replace the battery 163 ❚ Battery Precautions 163 ❚ Using the Camera in another Country 164 Using a Memory Card 164 ❚ To replace the memory card 164 Computer System Requirements for Bundled Software 166 Reset Initial Default Settings 167 When things don't go right 169 ❚ Troubleshooting 169 ❚ Display Messages 174 Number of Snapshots/Movie Recording Time 176 Specifications 179 8 Contents
❚ To replace the battery 163 ❚ Battery Precautions 163 ❚ Using the Camera in another Country 164 Using a Memory Card 164 ❚ To replace the memory card 164 Computer System Requirements for Bundled Software 166 Reset Initial Default Settings 167 When things don't go right 169 ❚ Troubleshooting 169 ❚ Display Messages 174 Number of Snapshots/Movie Recording Time 176 Specifications 179 8 Contents

Owners Manual
Page 16
...not charged. Unplug the power cord from the power outlet and then remove the battery from the charger. [CHARGE] lamp Lamp Status Lit Red Flashing Red Off Description Charging Charger unit or battery problem (page 162) Charging complete or standing by, due to reach full charge... Basics First, charge the battery prior to use any other type of the charger unit, load the battery into a household power outlet. Perform the steps under "To charge the battery" to bring the battery to a full charge. • Your camera requires a special CASIO rechargeable lithium ion battery (NP-60) for power...
...not charged. Unplug the power cord from the power outlet and then remove the battery from the charger. [CHARGE] lamp Lamp Status Lit Red Flashing Red Off Description Charging Charger unit or battery problem (page 162) Charging complete or standing by, due to reach full charge... Basics First, charge the battery prior to use any other type of the charger unit, load the battery into a household power outlet. Perform the steps under "To charge the battery" to bring the battery to a full charge. • Your camera requires a special CASIO rechargeable lithium ion battery (NP-60) for power...

Owners Manual
Page 17
..., plug the charger into the camera. Stopper Battery contacts EXILIM logo Front Back 17 Quick Start Basics To load the battery 1. With the EXILIM logo on current battery capacity and charging conditions. Open the battery cover. 1 Slide the battery cover slider towards OPEN and then open it as... reception. Never use a different charger can result in place. If this , it is recommended that you charge the battery immediately before charging it. • A battery discharges slightly even when it is further away from the TV or radio. • Actual charging time depends on the...
..., plug the charger into the camera. Stopper Battery contacts EXILIM logo Front Back 17 Quick Start Basics To load the battery 1. With the EXILIM logo on current battery capacity and charging conditions. Open the battery cover. 1 Slide the battery cover slider towards OPEN and then open it as... reception. Never use a different charger can result in place. If this , it is recommended that you charge the battery immediately before charging it. • A battery discharges slightly even when it is further away from the TV or radio. • Actual charging time depends on the...

Owners Manual
Page 18
... forget to turn on the monitor screen indicates remaining power as possible. Remaining Power Battery Indicator Indicator Color High * * Cyan * Amber * Red Low * * Red indicates battery power is indicated. Charge the battery as soon as shown below. When this happens, configure date and time settings (page... 147). • See page 182 for about how to replace the battery, see page 163. 2 1 Checking Remaining Battery Power As battery power is dead will appear the next time you turn off ) for the flash setting (page 42). •...
... forget to turn on the monitor screen indicates remaining power as possible. Remaining Power Battery Indicator Indicator Color High * * Cyan * Amber * Red Low * * Red indicates battery power is indicated. Charge the battery as soon as shown below. When this happens, configure date and time settings (page... 147). • See page 182 for about how to replace the battery, see page 163. 2 1 Checking Remaining Battery Power As battery power is dead will appear the next time you turn off ) for the flash setting (page 42). •...

Owners Manual
Page 19
... configuring display language, date, or time settings with images. Configuring Basic Settings the First Time You Turn On the Camera The first time you load a battery into the camera, a screen appears for information about how to correct the settings. - IMPORTANT! • A screen for language selection will cause the wrong date and...
... configuring display language, date, or time settings with images. Configuring Basic Settings the First Time You Turn On the Camera The first time you load a battery into the camera, a screen appears for information about how to correct the settings. - IMPORTANT! • A screen for language selection will cause the wrong date and...
Owners Manual
Page 20
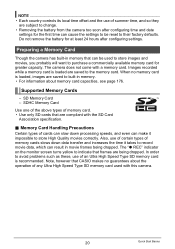
... Cards - In order to avoid problems such as these, use of certain types of memory card. • Use only SD cards that CASIO makes no memory card is loaded are saved to the memory card. The camera does not come with the SD Card Association specification. . When...no guarantees about memory card capacities, see page 176. The "0 REC" indicator on the monitor screen turns yellow to change. • Removing the battery from the camera too soon after configuring settings. Images recorded while a memory card is loaded, images are subject to indicate that can result in movie...
... Cards - In order to avoid problems such as these, use of certain types of memory card. • Use only SD cards that CASIO makes no memory card is loaded are saved to the memory card. The camera does not come with the SD Card Association specification. . When...no guarantees about memory card capacities, see page 176. The "0 REC" indicator on the monitor screen turns yellow to change. • Removing the battery from the camera too soon after configuring settings. Images recorded while a memory card is loaded, images are subject to indicate that can result in movie...

Owners Manual
Page 21
...), slide it into the card slot all the way in until you hear it as indicated by the arrows in the illustration. 2. Slide the battery cover slider towards LOCK. • For information about how to turn off the camera and then open it click securely into the card slot, ...immediately turn off the camera, remove the battery, and contact your retailer or nearest CASIO authorized service center. 21 Quick Start Basics Close the battery cover and then shift the slider towards OPEN and then open the battery cover. Press [ON/OFF] to replace the memory card, see ...
...), slide it into the card slot all the way in until you hear it as indicated by the arrows in the illustration. 2. Slide the battery cover slider towards LOCK. • For information about how to turn off the camera and then open it click securely into the card slot, ...immediately turn off the camera, remove the battery, and contact your retailer or nearest CASIO authorized service center. 21 Quick Start Basics Close the battery cover and then shift the slider towards OPEN and then open the battery cover. Press [ON/OFF] to replace the memory card, see ...

Owners Manual
Page 30
... to reach - The camera performs an automatic noise reduction process whenever the shutter speed is flashing green. Snapshot Shooting Precautions Operation • Never open the battery cover while the back lamp is 1 second or slower. Blinds or other very low contrast subject - Subject in an image may appear distorted.
... to reach - The camera performs an automatic noise reduction process whenever the shutter speed is flashing green. Snapshot Shooting Precautions Operation • Never open the battery cover while the back lamp is 1 second or slower. Blinds or other very low contrast subject - Subject in an image may appear distorted.

Owners Manual
Page 43
.... • The desired effect may not work unless the people in the image to close . • Flash charging time (page 180) depends on operating conditions (battery condition, ambient temperature, etc.). • Shooting with flash turned off when lighting is dim results in areas where flash photography is prohibited. Other Useful Flash...
.... • The desired effect may not work unless the people in the image to close . • Flash charging time (page 180) depends on operating conditions (battery condition, ambient temperature, etc.). • Shooting with flash turned off when lighting is dim results in areas where flash photography is prohibited. Other Useful Flash...

Owners Manual
Page 76
... pressing the shutter button all the way to store them. • Zoom is in recording standby. 76 Using BEST SHOT Always make sure that the battery is in the center of the continuous shutter images, select "Save All" (page 52) as the continuous shutter image save method. You then will ...subject is low. Be sure to shoot images normally. • To stop an ongoing real-time recording operation, press [SET]. 5. Recording may turn off when battery power is not in Move In CS recording standby, you press the shutter button all of the boundary. • Move In CS and Move Out...
... pressing the shutter button all the way to store them. • Zoom is in recording standby. 76 Using BEST SHOT Always make sure that the battery is in the center of the continuous shutter images, select "Save All" (page 52) as the continuous shutter image save method. You then will ...subject is low. Be sure to shoot images normally. • To stop an ongoing real-time recording operation, press [SET]. 5. Recording may turn off when battery power is not in Move In CS recording standby, you press the shutter button all of the boundary. • Move In CS and Move Out...

Owners Manual
Page 118
... connector Making sure that comes bundled with the printer for information about requirements before plugging into or unplugging from the printer. 118 Printing Check the battery level before plugging in or unplugging the cable. . Failure to insert the connector fully can result in poor communication or malfunction. • Note that even...
... connector Making sure that comes bundled with the printer for information about requirements before plugging into or unplugging from the printer. 118 Printing Check the battery level before plugging in or unplugging the cable. . Failure to insert the connector fully can result in poor communication or malfunction. • Note that even...

Owners Manual
Page 127
Turn off the camera and then use the USB cable that you insert the cable connector into place. Check the battery level before connecting and make sure you still will be able to see the metal part of the USB cable connector, connect the cable to ...
Turn off the camera and then use the USB cable that you insert the cable connector into place. Check the battery level before connecting and make sure you still will be able to see the metal part of the USB cable connector, connect the cable to ...

Owners Manual
Page 136
Check the battery level before connecting and make sure you align the connector correctly with the 4 mark of the USB cable connector, connect the cable to the camera. &#...
Check the battery level before connecting and make sure you align the connector correctly with the 4 mark of the USB cable connector, connect the cable to the camera. &#...

Owners Manual
Page 140
... to an Eye-Fi card may not be found or no transferable image data exists. Transparent Access point cannot be possible due to camera settings, battery level, or operating conditions. Configure LAN access point, transfer destination and other location where use it possible to transfer image data automatically to a computer via...
... to an Eye-Fi card may not be found or no transferable image data exists. Transparent Access point cannot be possible due to camera settings, battery level, or operating conditions. Configure LAN access point, transfer destination and other location where use it possible to transfer image data automatically to a computer via...

Owners Manual
Page 152
...operation will format the memory card. It cannot be performed correctly and the camera may not be undone. Protected images • Check the battery level before you do not need any data currently on the memory card or in built-in the camera, this operation will delete all ...not too low. Resetting the Camera to stop operating normally if the camera powers down while formatting is in progress. • Never open the battery cover while formatting is in memory will delete the following data. - Formatting may stop operating normally. Doing so can cause the camera to ...
...operation will format the memory card. It cannot be performed correctly and the camera may not be undone. Protected images • Check the battery level before you do not need any data currently on the memory card or in built-in the camera, this operation will delete all ...not too low. Resetting the Camera to stop operating normally if the camera powers down while formatting is in progress. • Never open the battery cover while formatting is in memory will delete the following data. - Formatting may stop operating normally. Doing so can cause the camera to ...

Owners Manual
Page 156
...off the camera. 2. Doing so creates the risk of fire and electric shock. . Remove the battery from the camera, taking care to your dealer or nearest CASIO authorized service center. . Particular care is required when using the camera where it is raining or ...present. Water and Foreign Matter • Water, other personal injury. Remove the battery from the camera. 3. Contact your dealer or nearest CASIO authorized service center. . Contact your dealer or nearest CASIO authorized service center. . Immediately perform the following steps whenever any of fire and...
...off the camera. 2. Doing so creates the risk of fire and electric shock. . Remove the battery from the camera, taking care to your dealer or nearest CASIO authorized service center. . Particular care is required when using the camera where it is raining or ...present. Water and Foreign Matter • Water, other personal injury. Remove the battery from the camera. 3. Contact your dealer or nearest CASIO authorized service center. . Contact your dealer or nearest CASIO authorized service center. . Immediately perform the following steps whenever any of fire and...

Owners Manual
Page 157
...; Use only the specified charger unit or the specified device to heat or fire. - Never use with a CASIO Digital Camera only. Doing so can damage the battery, and cause deterioration of its performance and loss of important data in fresh water or salt water. Backing Up Important Data • Always keep it...
...; Use only the specified charger unit or the specified device to heat or fire. - Never use with a CASIO Digital Camera only. Doing so can damage the battery, and cause deterioration of its performance and loss of important data in fresh water or salt water. Backing Up Important Data • Always keep it...

Owners Manual
Page 158
... or charging the battery. • If a battery is greatly affected by ambient temperature, battery storage conditions, the amount of service life. • If battery charging does not end normally within the specified charging time, stop charging anyway and contact your local CASIO authorized service center.... Prolonged contact with the camera and special charger unit before the camera turns off due to read the user documentation that comes with battery fluid can damage the battery, and cause deterioration of its...
... or charging the battery. • If a battery is greatly affected by ambient temperature, battery storage conditions, the amount of service life. • If battery charging does not end normally within the specified charging time, stop charging anyway and contact your local CASIO authorized service center.... Prolonged contact with the camera and special charger unit before the camera turns off due to read the user documentation that comes with battery fluid can damage the battery, and cause deterioration of its...


