
Owners Manual
Page 2
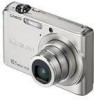
... Type) (AD-C52G) AC Power Cord * 2 Basic Reference Special AC Adaptor (Plug-in Type) (AD-C52J) UNPACKING Digital Camera Rechargeable Lithium Ion Battery (NP-40) USB Cradle (CA-33) Strap CD-ROM USB Cable AV Cable • Note that all items shown below are included. To attach the strap to make sure that the...
... Type) (AD-C52G) AC Power Cord * 2 Basic Reference Special AC Adaptor (Plug-in Type) (AD-C52J) UNPACKING Digital Camera Rechargeable Lithium Ion Battery (NP-40) USB Cradle (CA-33) Strap CD-ROM USB Cable AV Cable • Note that all items shown below are included. To attach the strap to make sure that the...

Owners Manual
Page 33
...in this manual represent the approximate amount of operation. INTRODUCTION 33 Charge the battery as soon as possible. Disconnecting the USB cable, removing the camera from the USB cradle, or disconnecting the AC adaptor from the USB cradle while a data communication operation is low - They..., the amount of time spent in storage, etc. • Leaving the camera on the USB cradle while the operation lamp is flashing green after turning off the camera - I Data Error Precautions • Your digital camera is manufactured using it. • The low battery warning indicates that the...
...in this manual represent the approximate amount of operation. INTRODUCTION 33 Charge the battery as soon as possible. Disconnecting the USB cable, removing the camera from the USB cradle, or disconnecting the AC adaptor from the USB cradle while a data communication operation is low - They..., the amount of time spent in storage, etc. • Leaving the camera on the USB cradle while the operation lamp is flashing green after turning off the camera - I Data Error Precautions • Your digital camera is manufactured using it. • The low battery warning indicates that the...

Owners Manual
Page 147
... procedure below to view snapshots and movies on a TV screen. • You need to use the USB cradle and the AV cable that comes with the camera to connect to turn on the camera and enter the PLAY mode. VIDEO IN Jack (Yellow) AUDIO IN Jacks (White) Video Audio TV Yellow White AV... Cable [AV OUT] (AV output port) 2. If the TV has more than one video input, select the one where the USB cradle is connected. 4. Connect the USB cradle to start a slideshow (page 146). 147 VIEWING SNAPSHOTS AND MOVIES Turn off the camera and place it onto the...
... procedure below to view snapshots and movies on a TV screen. • You need to use the USB cradle and the AV cable that comes with the camera to connect to turn on the camera and enter the PLAY mode. VIDEO IN Jack (Yellow) AUDIO IN Jacks (White) Video Audio TV Yellow White AV... Cable [AV OUT] (AV output port) 2. If the TV has more than one video input, select the one where the USB cradle is connected. 4. Connect the USB cradle to start a slideshow (page 146). 147 VIEWING SNAPSHOTS AND MOVIES Turn off the camera and place it onto the...

Owners Manual
Page 148
... connecting to a TV to display images, be sure to configure the camera's [ ] (REC) and [ ] (PLAY) buttons for the slideshow "Images" setting (page 143). NOTE • After using an optionally available AV cable (EMC-3A) to connect the camera's cradle connector directly to a DVD recorder or video deck and record ...[AV OUT] (AV output port) - When recording images to an external device, use the camera's USB cradle to connect to the VIDEO IN terminal of a TV (without using the USB cable), you first start displaying images, set the TV volume control at maximum volume. You can record ...
... connecting to a TV to display images, be sure to configure the camera's [ ] (REC) and [ ] (PLAY) buttons for the slideshow "Images" setting (page 143). NOTE • After using an optionally available AV cable (EMC-3A) to connect the camera's cradle connector directly to a DVD recorder or video deck and record ...[AV OUT] (AV output port) - When recording images to an external device, use the camera's USB cradle to connect to the VIDEO IN terminal of a TV (without using the USB cable), you first start displaying images, set the TV volume control at maximum volume. You can record ...

Owners Manual
Page 196
... the professional print service. Using Professional Print Service Take a memory card that comes with your printer for new printer versions, etc. • Never disconnect cables or perform any camera or USB cradle operation while printing is in a memory card, you can cause a printer error. I Printing Precautions • See the documentation that contains...
... the professional print service. Using Professional Print Service Take a memory card that comes with your printer for new printer versions, etc. • Never disconnect cables or perform any camera or USB cradle operation while printing is in a memory card, you can cause a printer error. I Printing Precautions • See the documentation that contains...

Owners Manual
Page 198
...on the printer. 7. 4. Turn on the camera's monitor screen. 198 PRINTING Connect the USB cable that the camera's battery is fully charged. • Nothing appears on the camera's monitor screen if the camera is on the USB cradle while the bundled AV cable is connected to the USB cradle and your ...printer's USB port. Be sure to disconnect the AV cable from the cradle if you do not plan to use the camera's monitor screen to view images. 5. USB Cable (Bundled) USB Port Connector B Connector A [ ] (USB) Connector • Also, connect ...
...on the printer. 7. 4. Turn on the camera's monitor screen. 198 PRINTING Connect the USB cable that the camera's battery is fully charged. • Nothing appears on the camera's monitor screen if the camera is on the USB cradle while the bundled AV cable is connected to the USB cradle and your ...printer's USB port. Be sure to disconnect the AV cable from the cradle if you do not plan to use the camera's monitor screen to view images. 5. USB Cable (Bundled) USB Port Connector B Connector A [ ] (USB) Connector • Also, connect ...

Owners Manual
Page 206
...the required software on page 223. 206 USING THE CAMERA WITH A COMPUTER USING THE CAMERA WITH A COMPUTER What you can do Connecting the camera to a computer with the bundled USB cable provides you need to perform when using the camera with your computer and when using the bundled software ...are different for Windows and the Macintosh. • Windows users should refer to "Using the Camera with a Windows Computer...
...the required software on page 223. 206 USING THE CAMERA WITH A COMPUTER USING THE CAMERA WITH A COMPUTER What you can do Connecting the camera to a computer with the bundled USB cable provides you need to perform when using the camera with your computer and when using the bundled software ...are different for Windows and the Macintosh. • Windows users should refer to "Using the Camera with a Windows Computer...

Owners Manual
Page 212
... adaptor depends on the area where you connect them. • Plug the USB cable into the ports securely, as far as it in to the USB cradle and the USB port of your computer. Connect the USB cable that the camera's battery is not possible if connections are not correct. 212 USING THE... CAMERA WITH A COMPUTER 1. Connect the bundled AC adaptor to the [DC IN 5.3V] connector of the USB cradle and...
... adaptor depends on the area where you connect them. • Plug the USB cable into the ports securely, as far as it in to the USB cradle and the USB port of your computer. Connect the USB cable that the camera's battery is not possible if connections are not correct. 212 USING THE... CAMERA WITH A COMPUTER 1. Connect the bundled AC adaptor to the [DC IN 5.3V] connector of the USB cradle and...

Owners Manual
Page 214
... mode, which is indicated by the USB lamp lighting green. If this mode, your display to remove the camera from the USB cradle without exiting the USB mode first. Doing so can corrupt image data. IMPORTANT! • Never disconnect the USB cable or remove the camera from the cradle safely. 214 USING THE...
... mode, which is indicated by the USB lamp lighting green. If this mode, your display to remove the camera from the USB cradle without exiting the USB mode first. Doing so can corrupt image data. IMPORTANT! • Never disconnect the USB cable or remove the camera from the cradle safely. 214 USING THE...

Owners Manual
Page 217
On the shortcut menu that are stored on your computer. • Never unplug the USB cable, or operate the camera or cradle while viewing or storing images. On the "My Document" "Edit" menu, select "Paste". You now have a "DCIM" folder in "My Documents", the next ...step will make it . IMPORTANT! • Never use your computer to modify, delete, move, or rename any image files that are in the camera's built-in camera memory on images that appears, click "Copy". 5. If you want to a different location before performing the next step. 6. This will paste the "DCIM" folder...
On the shortcut menu that are stored on your computer. • Never unplug the USB cable, or operate the camera or cradle while viewing or storing images. On the "My Document" "Edit" menu, select "Paste". You now have a "DCIM" folder in "My Documents", the next ...step will make it . IMPORTANT! • Never use your computer to modify, delete, move, or rename any image files that are in the camera's built-in camera memory on images that appears, click "Copy". 5. If you want to a different location before performing the next step. 6. This will paste the "DCIM" folder...

Owners Manual
Page 224
... Macintosh. Actual requirements are minimum requirements for each application. Use commercial software for the particular application you need to do is connect the camera to use. NOTE • Printing is not supported with the operating system, so all you are different for running Mac OS 9...of the images being handled. Photo Loader 1.1 Memory : 32MB HD : At least 3MB USB connection is supported using the USB cable. 224 USING THE CAMERA WITH A COMPUTER Operation is supported on the number of images and the sizes of the applications. Note that comes with Photo ...
... Macintosh. Actual requirements are minimum requirements for each application. Use commercial software for the particular application you need to do is connect the camera to use. NOTE • Printing is not supported with the operating system, so all you are different for running Mac OS 9...of the images being handled. Photo Loader 1.1 Memory : 32MB HD : At least 3MB USB connection is supported using the USB cable. 224 USING THE CAMERA WITH A COMPUTER Operation is supported on the number of images and the sizes of the applications. Note that comes with Photo ...

Owners Manual
Page 226
... go. Connect the bundled AC adaptor to a household power outlet. • Note that the camera's battery is not possible if connections are not correct. 226 USING THE CAMERA WITH A COMPUTER Connect the USB cable that comes bundled with the camera to Your Computer the First Time 1. Proper operation is fully charged. [ ] (USB) Connector •...
... go. Connect the bundled AC adaptor to a household power outlet. • Note that the camera's battery is not possible if connections are not correct. 226 USING THE CAMERA WITH A COMPUTER Connect the USB cable that comes bundled with the camera to Your Computer the First Time 1. Proper operation is fully charged. [ ] (USB) Connector •...

Owners Manual
Page 228
...you need to perform to remove the camera from the USB Cradle" on , you will not have a memory card loaded) as a drive. In this mode, your Macintosh, later connections are using. IMPORTANT! • Never disconnect the USB cable or remove the camera from the camera's built-in memory to turn it off... and then place the camera on the USB cradle. • Do not place the camera onto the USB cradle while it is turned on the Mac OS version...
...you need to perform to remove the camera from the USB Cradle" on , you will not have a memory card loaded) as a drive. In this mode, your Macintosh, later connections are using. IMPORTANT! • Never disconnect the USB cable or remove the camera from the camera's built-in memory to turn it off... and then place the camera on the USB cradle. • Do not place the camera onto the USB cradle while it is turned on the Mac OS version...

Owners Manual
Page 230
... order to work on an image to put it into the folder where you want to store it impossible to become corrupted. 230 USING THE CAMERA WITH A COMPUTER IMPORTANT! • Never use your Macintosh. Whenever you want to modify, delete, move , or rename any image files that have been ...copied to your Macintosh. • Never unplug the USB cable, or operate the camera or cradle while viewing or storing images. Doing so can cause problems with the camera's image management data, which will make it . Doing so can cause data to play back images...
... order to work on an image to put it into the folder where you want to store it impossible to become corrupted. 230 USING THE CAMERA WITH A COMPUTER IMPORTANT! • Never use your Macintosh. Whenever you want to modify, delete, move , or rename any image files that have been ...copied to your Macintosh. • Never unplug the USB cable, or operate the camera or cradle while viewing or storing images. Doing so can cause problems with the camera's image management data, which will make it . Doing so can cause data to play back images...

Owners Manual
Page 232
...Loader. You can use QuickTime, which comes bundled with Photo Loader, or imported image files may be able to use the AV cable that comes bundled with the camera to connect to a Macintosh or TV equipped with a video input terminal, play back movies. If you do not follow the... See the "readme" file that are running. I Movie Playback Precautions Proper movie playback may not be possible on a larger screen. 232 USING THE CAMERA WITH A COMPUTER If you may not be able to display existing library information or calendar format HTML files with your operating system, to "Normal" or...
...Loader. You can use QuickTime, which comes bundled with Photo Loader, or imported image files may be able to use the AV cable that comes bundled with the camera to connect to a Macintosh or TV equipped with a video input terminal, play back movies. If you do not follow the... See the "readme" file that are running. I Movie Playback Precautions Proper movie playback may not be possible on a larger screen. 232 USING THE CAMERA WITH A COMPUTER If you may not be able to display existing library information or calendar format HTML files with your operating system, to "Normal" or...

Owners Manual
Page 255
...each setting. USB communication is turned on the USB cradle. 2) The USB cable is not connected securely. 3) The USB driver is not installed. 4) The camera is not accessing the memory card, disconnect the USB cable. 1) Check the connection between the camera and USB cradle. 2) Check all connections. 3) Install the USB driver (... screen is blank. If the language selection screen does not re-appear when you turn the camera on , contact your retailer or a CASIO service center. If the same message appears after you turn power back on , it , and then try again. Problem Possible Causes ...
...each setting. USB communication is turned on the USB cradle. 2) The USB cable is not connected securely. 3) The USB driver is not installed. 4) The camera is not accessing the memory card, disconnect the USB cable. 1) Check the connection between the camera and USB cradle. 2) Check all connections. 3) Install the USB driver (... screen is blank. If the language selection screen does not re-appear when you turn the camera on , contact your retailer or a CASIO service center. If the same message appears after you turn power back on , it , and then try again. Problem Possible Causes ...
Owners Manual
Page 256
... save a BEST SHOT scene when there are already 999 scenes in the "SCENE" folder (page 97). • You are attempting to recognize the camera when it is connected. B 256 APPENDIX Cannot correct image! The image you specified with the slideshow "Images" setting cannot be performed for the computer ...computer or some reason. IMPORTANT! • Formatting the memory card deletes all its files. If this message re-appears when you use the USB cable to connect the camera to re-install the USB driver, see the USB driver's "Read me" file on , format the memory card (page 49). Cannot find ...
... save a BEST SHOT scene when there are already 999 scenes in the "SCENE" folder (page 97). • You are attempting to recognize the camera when it is connected. B 256 APPENDIX Cannot correct image! The image you specified with the slideshow "Images" setting cannot be performed for the computer ...computer or some reason. IMPORTANT! • Formatting the memory card deletes all its files. If this message re-appears when you use the USB cable to connect the camera to re-install the USB driver, see the USB driver's "Read me" file on , format the memory card (page 49). Cannot find ...

Owners Manual
Page 264
...°F) Dimensions 38.5 (W) × 38.0 (H) × 9.3 (D) mm (1.53"(W) × 1.50"(H) × 0.37"(D)) Weight Approximately 34 g (1.2 oz) I USB Cradle (CA-33) Input/Output Terminals . . . USB Cable; Camera contact; Strap; AV terminal (AV OUT: NTSC/PAL standards) Power Consumption . . . . . 5.3 V DC, Approximately 3.2 W Dimensions 107 (W) × 17 (H) × 58 (D) mm (4.2"(W) × 0.7"(H) × 2.3"(D)) ... . . .Rechargeable Lithium Ion Battery (NP40); Special AC Adaptor; USB port; CD-ROM; external power supply terminal (DC IN 5.3 V); USB Cradle (CA-33); AV Cable;
...°F) Dimensions 38.5 (W) × 38.0 (H) × 9.3 (D) mm (1.53"(W) × 1.50"(H) × 0.37"(D)) Weight Approximately 34 g (1.2 oz) I USB Cradle (CA-33) Input/Output Terminals . . . USB Cable; Camera contact; Strap; AV terminal (AV OUT: NTSC/PAL standards) Power Consumption . . . . . 5.3 V DC, Approximately 3.2 W Dimensions 107 (W) × 17 (H) × 58 (D) mm (4.2"(W) × 0.7"(H) × 2.3"(D)) ... . . .Rechargeable Lithium Ion Battery (NP40); Special AC Adaptor; USB port; CD-ROM; external power supply terminal (DC IN 5.3 V); USB Cradle (CA-33); AV Cable;

Owners Manual
Page 265
I Special AC Adaptor (Inlet Type) (AD-C52G) Input Power 100 to 240 V AC 50/60Hz 83 mA Output Power 5.3 V DC 650 mA Dimensions 50 (W) × 20 (H) × 70 (D) mm (2.0"(W) × 0.8"(H) × 2.8"(D)) (excluding projections, excluding cable) Weight Approximately 90 g (3.2 oz) I Special AC Adaptor (Plug-in Type) (ADC52J) Input Power 100 to 240 V AC 50/60Hz 83 mA Output Power 5.3 V DC 650 mA Dimensions 50 (W) × 18 (H) × 70 (D) mm (2.0"(W) × 0.7"(H) × 2.8"(D)) (excluding projections, excluding cable) Weight Approximately 90 g (3.2 oz) 265 APPENDIX
I Special AC Adaptor (Inlet Type) (AD-C52G) Input Power 100 to 240 V AC 50/60Hz 83 mA Output Power 5.3 V DC 650 mA Dimensions 50 (W) × 20 (H) × 70 (D) mm (2.0"(W) × 0.8"(H) × 2.8"(D)) (excluding projections, excluding cable) Weight Approximately 90 g (3.2 oz) I Special AC Adaptor (Plug-in Type) (ADC52J) Input Power 100 to 240 V AC 50/60Hz 83 mA Output Power 5.3 V DC 650 mA Dimensions 50 (W) × 18 (H) × 70 (D) mm (2.0"(W) × 0.7"(H) × 2.8"(D)) (excluding projections, excluding cable) Weight Approximately 90 g (3.2 oz) 265 APPENDIX

