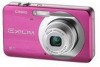
Owners Manual
Page 1
E Digital Camera User's Guide K1122PCM1DMX Thank you for purchasing this CASIO product. • Before using it, be sure to read the precautions contained in this User's Guide. • Keep the User's Guide in a safe place for future reference. • For the most up-to-date information about this product, visit the official EXILIM Website at http://www.exilim.com/ 1
E Digital Camera User's Guide K1122PCM1DMX Thank you for purchasing this CASIO product. • Before using it, be sure to read the precautions contained in this User's Guide. • Keep the User's Guide in a safe place for future reference. • For the most up-to-date information about this product, visit the official EXILIM Website at http://www.exilim.com/ 1
Owners Manual
Page 2
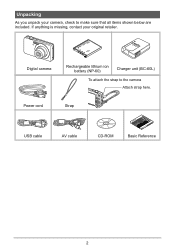
If anything is missing, contact your camera, check to the camera Attach strap here. Power cord Strap USB cable AV cable CD-ROM Basic Reference 2 Unpacking As you unpack your original retailer. Digital camera Rechargeable lithium ion battery (NP-60) Charger unit (BC-60L) To attach the strap to make sure that all items shown below are included.
If anything is missing, contact your camera, check to the camera Attach strap here. Power cord Strap USB cable AV cable CD-ROM Basic Reference 2 Unpacking As you unpack your original retailer. Digital camera Rechargeable lithium ion battery (NP-60) Charger unit (BC-60L) To attach the strap to make sure that all items shown below are included.
Owners Manual
Page 3
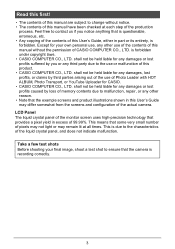
... somewhat from the screens and configuration of the liquid crystal panel, and does not indicate malfunction. shall not be held liable for CASIO. • CASIO COMPUTER CO., LTD. Take a few test shots Before shooting your own personal use or malfunction of this User's Guide may remain... is questionable, erroneous, etc. • Any copying of the contents of the monitor screen uses high-precision technology that the camera is forbidden under copyright laws. • CASIO COMPUTER CO., LTD. LCD Panel The liquid crystal panel of this manual have been checked at all times.
... somewhat from the screens and configuration of the liquid crystal panel, and does not indicate malfunction. shall not be held liable for CASIO. • CASIO COMPUTER CO., LTD. Take a few test shots Before shooting your own personal use or malfunction of this User's Guide may remain... is questionable, erroneous, etc. • Any copying of the contents of the monitor screen uses high-precision technology that the camera is forbidden under copyright laws. • CASIO COMPUTER CO., LTD. LCD Panel The liquid crystal panel of this manual have been checked at all times.
Owners Manual
Page 4
...digital camera 9 What you can do with your CASIO camera 10 First, charge the battery prior to use 11 ❚ To charge the battery 11 ❚ To load the battery 12 Configuring the Display Language the First Time You Turn On the Camera...card 14 ❚ To format (initialize) a new memory card 15 To shoot a snapshot 16 Holding the Camera Correctly 18 Viewing Snapshots 19 Deleting Images 20 ❚ To delete a single file 20 ❚ To delete...Changing the Control Panel Date/Time Style 42 Shooting with Zoom 42 ❚ Optical Zoom and Digital Zoom Switch Point 43 C 4 Contents
...digital camera 9 What you can do with your CASIO camera 10 First, charge the battery prior to use 11 ❚ To charge the battery 11 ❚ To load the battery 12 Configuring the Display Language the First Time You Turn On the Camera...card 14 ❚ To format (initialize) a new memory card 15 To shoot a snapshot 16 Holding the Camera Correctly 18 Viewing Snapshots 19 Deleting Images 20 ❚ To delete a single file 20 ❚ To delete...Changing the Control Panel Date/Time Style 42 Shooting with Zoom 42 ❚ Optical Zoom and Digital Zoom Switch Point 43 C 4 Contents
Owners Manual
Page 6
...; Turning On Flash Assist Flash Assist) . . . 74 ❚❙ Viewing Snapshots and Movies 75 Viewing Snapshots 75 Viewing a Movie 75 Zooming an On-screen Image 76 Displaying 12 Images on the Same Screen 76 Displaying Images in the Calendar Screen 77 Viewing Snapshots and Movies on... a TV Screen 78 ❚❙ Other Playback Functions (PLAY) 80 Playing a Slideshow on the Camera Slideshow) . . 80 ❚ Saving Music from Your Computer to Camera Memory 81 Laying Out Snapshots with Layout Print Layout Print) . . 83 Creating a Snapshot of Movie Frames MOTION ...
...; Turning On Flash Assist Flash Assist) . . . 74 ❚❙ Viewing Snapshots and Movies 75 Viewing Snapshots 75 Viewing a Movie 75 Zooming an On-screen Image 76 Displaying 12 Images on the Same Screen 76 Displaying Images in the Calendar Screen 77 Viewing Snapshots and Movies on... a TV Screen 78 ❚❙ Other Playback Functions (PLAY) 80 Playing a Slideshow on the Camera Slideshow) . . 80 ❚ Saving Music from Your Computer to Camera Memory 81 Laying Out Snapshots with Layout Print Layout Print) . . 83 Creating a Snapshot of Movie Frames MOTION ...

Owners Manual
Page 7
...Settings (Set Up) 121 Selecting a REC Mode Screen Layout R Panel) . 121 Selecting a PLAY Mode Screen Layout P Display) . 122 Configuring Camera Sound Settings Sounds) . 123 Changing the Menu Screen Color Menu Color) . 123 Configuring a Startup Image Startup) . 123 Specifying the File Name...Rule . . . . . (File No.) . 124 Configuring World Time Settings World Time) . 124 Time Stamping Snapshots Timestamp) . 125 Setting the Camera's Clock Adjust) . 126 Specifying the Date Style Date Style) . 126 Specifying the Display Language Language) . 127 Configuring Sleep State Settings Sleep) . ...
...Settings (Set Up) 121 Selecting a REC Mode Screen Layout R Panel) . 121 Selecting a PLAY Mode Screen Layout P Display) . 122 Configuring Camera Sound Settings Sounds) . 123 Changing the Menu Screen Color Menu Color) . 123 Configuring a Startup Image Startup) . 123 Specifying the File Name...Rule . . . . . (File No.) . 124 Configuring World Time Settings World Time) . 124 Time Stamping Snapshots Timestamp) . 125 Setting the Camera's Clock Adjust) . 126 Specifying the Date Style Date Style) . 126 Specifying the Display Language Language) . 127 Configuring Sleep State Settings Sleep) . ...
Owners Manual
Page 9
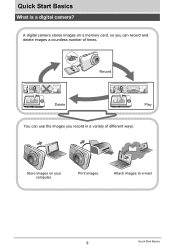
Attach images to e-mail. 9 Quick Start Basics Print images. Store images on a memory card, so you can use the images you record in a variety of times. Quick Start Basics What is a digital camera? A digital camera stores images on your computer. Record Delete Play You can record and delete images a countless number of different ways.
Attach images to e-mail. 9 Quick Start Basics Print images. Store images on a memory card, so you can use the images you record in a variety of times. Quick Start Basics What is a digital camera? A digital camera stores images on your computer. Record Delete Play You can record and delete images a countless number of different ways.
Owners Manual
Page 10
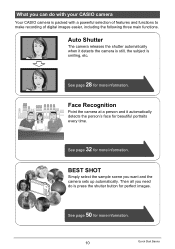
...more information. What you want and the camera sets up automatically. See page 32 for more information. Then all you need do with your CASIO camera Your CASIO camera is smiling, etc. Face Recognition Point the camera at a person and it detects the camera is still, the subject is packed ...with a powerful selection of features and functions to make recording of digital images easier, including the following ...
...more information. What you want and the camera sets up automatically. See page 32 for more information. Then all you need do with your CASIO camera Your CASIO camera is smiling, etc. Face Recognition Point the camera at a person and it detects the camera is still, the subject is packed ...with a powerful selection of features and functions to make recording of digital images easier, including the following ...

Owners Manual
Page 11
... low ambient temperature (page 142) Other Charging Precautions • Use the special charger (BC-60L) to a full charge. • Your camera requires a special CASIO rechargeable lithium ion battery (NP-60) for power. Because of this happens, plug the charger into an outlet that is still warm due to... normal use may cause interference with those of a newly purchased camera is complete. If this , it is recommended that the battery of...
... low ambient temperature (page 142) Other Charging Precautions • Use the special charger (BC-60L) to a full charge. • Your camera requires a special CASIO rechargeable lithium ion battery (NP-60) for power. Because of this happens, plug the charger into an outlet that is still warm due to... normal use may cause interference with those of a newly purchased camera is complete. If this , it is recommended that the battery of...

Owners Manual
Page 12
...128). 12 Quick Start Basics Pressing down at the arrow marked on the battery cover, slide it in place. 1 2 Battery Stopper 3. With the EXILIM logo on the monitor screen indicates remaining power as shown below. Battery Power Conservation Tips • When you do not need to use the flash,...restored. • See page 163 for the flash setting (page 26). • Enable the Auto Power Off and the Sleep features to protect against the camera, slide it closed. • For information about how to replace the battery, see page 142. 2 1 Checking Remaining Battery Power As battery power is...
...128). 12 Quick Start Basics Pressing down at the arrow marked on the battery cover, slide it in place. 1 2 Battery Stopper 3. With the EXILIM logo on the monitor screen indicates remaining power as shown below. Battery Power Conservation Tips • When you do not need to use the flash,...restored. • See page 163 for the flash setting (page 26). • Enable the Auto Power Off and the Sleep features to protect against the camera, slide it closed. • For information about how to replace the battery, see page 142. 2 1 Checking Remaining Battery Power As battery power is...

Owners Manual
Page 13
...MM/YY * 19/12/09 MM/DD/YY * 12/19/09 7. C 13 Quick Start Basics Use [8], [2], [4], and [6] to change. Use [8] and [2] to turn on the camera. [ON/OFF] [BS] =8? =4? =6? =2? [SET ] 2. Press [SET]. • If you make a mistake, you want to change and then use of summer time, and ... will cause the wrong date and time data to select the language you want and then press [SET]. 3. Use [8], [2], [4], and [6] to be using the camera and then press [SET]. 5. Use [8] and [2] to select the setting you can change it. Use [4] and [6] to select the summer time (DST) setting...
...MM/YY * 19/12/09 MM/DD/YY * 12/19/09 7. C 13 Quick Start Basics Use [8], [2], [4], and [6] to change. Use [8] and [2] to turn on the camera. [ON/OFF] [BS] =8? =4? =6? =2? [SET ] 2. Press [SET]. • If you make a mistake, you want to change and then use of summer time, and ... will cause the wrong date and time data to select the language you want and then press [SET]. 3. Use [8], [2], [4], and [6] to be using the camera and then press [SET]. 5. Use [8] and [2] to select the setting you can change it. Use [4] and [6] to select the summer time (DST) setting...
Owners Manual
Page 14
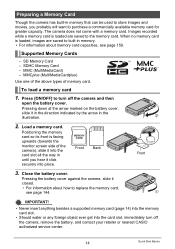
... card slot. • Should water or any foreign object ever get into the card slot, immediately turn off the camera, remove the battery, and contact your retailer or nearest CASIO authorized service center. 14 Quick Start Basics SD Memory Card - To load a memory card 1. Supported Memory Cards -... MMCplus (MultiMediaCardplus) Use one of the above types of the camera), slide it into the card slot all the way...
... card slot. • Should water or any foreign object ever get into the card slot, immediately turn off the camera, remove the battery, and contact your retailer or nearest CASIO authorized service center. 14 Quick Start Basics SD Memory Card - To load a memory card 1. Supported Memory Cards -... MMCplus (MultiMediaCardplus) Use one of the above types of the camera), slide it into the card slot all the way...

Owners Manual
Page 15
... To format (initialize) a new memory card You need to format a memory card again. Use [8] and [2] to format a memory card. Turn on it in the camera can result in non-conformity with the SD format, causing problems with compatibility, operation, etc. 15 Quick Start Basics Select the "Set Up" tab, select... "Format" and then press [6]. 3. Normally you notice any other files on the camera and press [MENU]. 2. In the case of an SD or SDHC memory card, formatting on a computer can slow down or if you do not need...
... To format (initialize) a new memory card You need to format a memory card again. Use [8] and [2] to format a memory card. Turn on it in the camera can result in non-conformity with the SD format, causing problems with compatibility, operation, etc. 15 Quick Start Basics Select the "Set Up" tab, select... "Format" and then press [6]. 3. Normally you notice any other files on the camera and press [MENU]. 2. In the case of an SD or SDHC memory card, formatting on a computer can slow down or if you do not need...
Owners Manual
Page 16
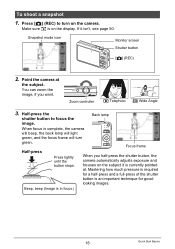
... pointed at the subject. Beep, beep (Image is an important technique for goodlooking images. You can zoom the image, if you half-press the shutter button, the camera automatically adjusts exposure and focuses on the subject it isn't, see page 50. Mastering how much pressure ... To shoot a snapshot 1. Snapshot mode icon Monitor screen Shutter button [r] (REC) 2. Back lamp When focus is on the camera. Half-press the shutter button to turn green. Zoom controller z Telephoto w Wide Angle 3. When you want. Press [r] (REC) to focus the image. Make sure R is ...
... pointed at the subject. Beep, beep (Image is an important technique for goodlooking images. You can zoom the image, if you half-press the shutter button, the camera automatically adjusts exposure and focuses on the subject it isn't, see page 50. Mastering how much pressure ... To shoot a snapshot 1. Snapshot mode icon Monitor screen Shutter button [r] (REC) 2. Back lamp When focus is on the camera. Half-press the shutter button to turn green. Zoom controller z Telephoto w Wide Angle 3. When you want. Press [r] (REC) to focus the image. Make sure R is ...
Owners Manual
Page 17
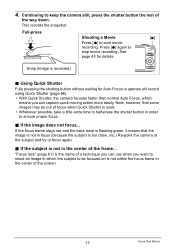
... the focus frame in order to ensure proper focus. . Snap (Image is not in which means you can use when you want to keep the camera still, press the shutter button the rest of the frame... Note, however, that the image is not in focus (because the subject is the name... shoot an image in the center of the way down. This records the snapshot. "Focus lock" (page 61) is too close, etc.) Re-point the camera at the subject and try to be out of the screen. 17 Quick Start Basics See page 45 for Auto Focus to operate will record...
... the focus frame in order to ensure proper focus. . Snap (Image is not in which means you can use when you want to keep the camera still, press the shutter button the rest of the frame... Note, however, that the image is not in focus (because the subject is the name... shoot an image in the center of the way down. This records the snapshot. "Focus lock" (page 61) is too close, etc.) Re-point the camera at the subject and try to be out of the screen. 17 Quick Start Basics See page 45 for Auto Focus to operate will record...
Owners Manual
Page 18
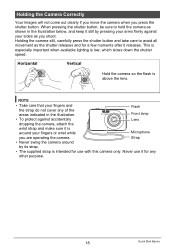
...pressing the shutter button, be sure to avoid all movement as you press the shutter button. Holding the camera still, carefully press the shutter button and take care to hold the camera as shown in the illustration. NOTE • Take care that your sides as the shutter releases and ...for any of the areas indicated in the illustration below, and keep it releases. Never use with this camera only. Flash Front lamp • To protect against accidentally dropping the camera, attach the Lens wrist strap and make sure it is intended for use it for a few moments after...
...pressing the shutter button, be sure to avoid all movement as you press the shutter button. Holding the camera still, carefully press the shutter button and take care to hold the camera as shown in the illustration. NOTE • Take care that your sides as the shutter releases and ...for any of the areas indicated in the illustration below, and keep it releases. Never use with this camera only. Flash Front lamp • To protect against accidentally dropping the camera, attach the Lens wrist strap and make sure it is intended for use it for a few moments after...
Owners Manual
Page 19
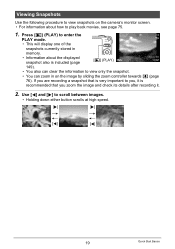
...is recommended that is included (page [p] (PLAY) 149). • You also can clear the information to view only the snapshot. • You can zoom in memory. • Information about how to play back movies, see page 75. 1. Press [p] (PLAY) to enter the PLAY mode. •... This will display one of the snapshots currently stored in on the camera's monitor screen. • For information about the displayed snapshot also is very important to scroll between images. • Holding down either button scrolls...
...is recommended that is included (page [p] (PLAY) 149). • You also can clear the information to view only the snapshot. • You can zoom in memory. • Information about how to play back movies, see page 75. 1. Press [p] (PLAY) to enter the PLAY mode. •... This will display one of the snapshots currently stored in on the camera's monitor screen. • For information about the displayed snapshot also is very important to scroll between images. • Holding down either button scrolls...

Owners Manual
Page 21
...; The image that appears on the monitor screen is shining directly onto the lens, shade the lens with a repeating horizontal pattern - Camera movement while shooting - Auto Focus Restrictions • Any of the following can affect the brightness or color of fluorescent lighting can make...cannot focus properly, try using focus lock (page 61) or Manual Focus (page 58). 21 Quick Start Basics Doing so can cause digital noise in a dark location - Fast-moving subject - Multiple subjects at the quality set for image composition. Snapshot Shooting Precautions Operation &#...
...; The image that appears on the monitor screen is shining directly onto the lens, shade the lens with a repeating horizontal pattern - Camera movement while shooting - Auto Focus Restrictions • Any of the following can affect the brightness or color of fluorescent lighting can make...cannot focus properly, try using focus lock (page 61) or Manual Focus (page 58). 21 Quick Start Basics Doing so can cause digital noise in a dark location - Fast-moving subject - Multiple subjects at the quality set for image composition. Snapshot Shooting Precautions Operation &#...
Owners Manual
Page 22
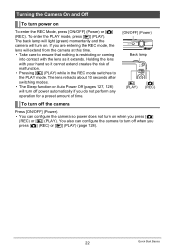
...• The Sleep function or Auto Power Off (pages 127, 128) will turn on when you press [r] (REC) or [p] (PLAY). You also can configure the camera so power does not turn on To enter the REC Mode, press [ON/OFF] (Power) or [r] (REC). Holding the lens with the lens as it... [r] (REC) To turn off when you press [r] (REC) or [p] (PLAY) (page 128). 22 Quick Start Basics The back lamp will light (green) momentarily and the camera will turn off power automatically if you do not perform any operation for a preset amount of malfunction. • Pressing [p] (PLAY) while in the REC mode...
...• The Sleep function or Auto Power Off (pages 127, 128) will turn on when you press [r] (REC) or [p] (PLAY). You also can configure the camera so power does not turn on To enter the REC Mode, press [ON/OFF] (Power) or [r] (REC). Holding the lens with the lens as it... [r] (REC) To turn off when you press [r] (REC) or [p] (PLAY) (page 128). 22 Quick Start Basics The back lamp will light (green) momentarily and the camera will turn off power automatically if you do not perform any operation for a preset amount of malfunction. • Pressing [p] (PLAY) while in the REC mode...
Owners Manual
Page 23
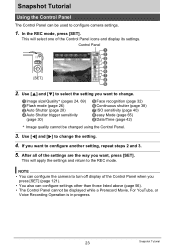
.... [SET] Control Panel 1 2 3 4 5 6 7 8 9 2. If you want to the REC mode. After all of the Control Panel when you want to configure camera settings. 1. NOTE • You can configure the camera to turn off display of the settings are the way you press [SET] (page 121). • You also can be used to...
.... [SET] Control Panel 1 2 3 4 5 6 7 8 9 2. If you want to the REC mode. After all of the Control Panel when you want to configure camera settings. 1. NOTE • You can configure the camera to turn off display of the settings are the way you press [SET] (page 121). • You also can be used to...


