
User Guide
Page 2
Unpacking As you unpack your original retailer. • A shoe cap is installed on the hot shoe at the factory. Digital camera • The shape of the power cord plug varies according to make sure that all items shown below are included. If anything is missing, contact your camera, check to country or geographic area. Power cord Rechargeable lithium ion battery (NP-100) Strap Charger unit (BC-100L) Lens cap Lens hood Remote shutter release USB cable AV cable CD-ROM Basic Reference 2
Unpacking As you unpack your original retailer. • A shoe cap is installed on the hot shoe at the factory. Digital camera • The shape of the power cord plug varies according to make sure that all items shown below are included. If anything is missing, contact your camera, check to country or geographic area. Power cord Rechargeable lithium ion battery (NP-100) Strap Charger unit (BC-100L) Lens cap Lens hood Remote shutter release USB cable AV cable CD-ROM Basic Reference 2

User Guide
Page 4
...10074;❙ Quick Start Basics 9 What is a digital camera 9 What you can do with your CASIO camera 10 Attaching the Lens Cap and Strap 11 First, charge the battery prior to use 11 ❚ To charge the battery 11 ❚ To load the battery 13 Configuring the Display Language the First Time You Turn... On the Camera. . 15 Preparing a Memory Card...
...10074;❙ Quick Start Basics 9 What is a digital camera 9 What you can do with your CASIO camera 10 Attaching the Lens Cap and Strap 11 First, charge the battery prior to use 11 ❚ To charge the battery 11 ❚ To load the battery 13 Configuring the Display Language the First Time You Turn... On the Camera. . 15 Preparing a Memory Card...
User Guide
Page 8
... Use the Histogram 148 ❚❙ Appendix 149 Precautions during Use 149 Power Supply 157 ❚ Charging 157 ❚ To replace the battery 158 ❚ Battery Precautions 158 ❚ Using the Camera in another Country 159 ❚ Using Household Power 159 Using a Memory Card 160 ❚ To replace the memory card 160 Computer...
... Use the Histogram 148 ❚❙ Appendix 149 Precautions during Use 149 Power Supply 157 ❚ Charging 157 ❚ To replace the battery 158 ❚ Battery Precautions 158 ❚ Using the Camera in another Country 159 ❚ Using Household Power 159 Using a Memory Card 160 ❚ To replace the memory card 160 Computer...
User Guide
Page 11
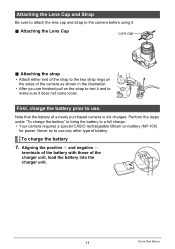
... to a full charge. • Your camera requires a special CASIO rechargeable lithium ion battery (NP-100) for power. Note that the battery of the charger unit, load the battery into the charger unit. 11 Quick Start Basics terminals of the battery with those of a newly purchased camera is not charged. First, charge the battery prior to use . To charge...
... to a full charge. • Your camera requires a special CASIO rechargeable lithium ion battery (NP-100) for power. Note that the battery of the charger unit, load the battery into the charger unit. 11 Quick Start Basics terminals of the battery with those of a newly purchased camera is not charged. First, charge the battery prior to use . To charge...
User Guide
Page 12
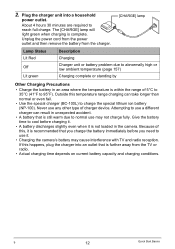
...41°F to abnormally high or low ambient temperature (page 157) Charging complete or standing by Other Charging Precautions • Charge the battery in the camera. Because of this, it is recommended that is complete. Plug the charger unit into an outlet that you charge the... battery immediately before you need to use a different charger can take longer than normal or even fail. • Use the special charger (BC-100L) to cool before charging it. • A battery discharges slightly even when it . • Charging the camera's battery may not charge fully....
...41°F to abnormally high or low ambient temperature (page 157) Charging complete or standing by Other Charging Precautions • Charge the battery in the camera. Because of this, it is recommended that is complete. Plug the charger unit into an outlet that you charge the... battery immediately before you need to use a different charger can take longer than normal or even fail. • Use the special charger (BC-100L) to cool before charging it. • A battery discharges slightly even when it . • Charging the camera's battery may not charge fully....
User Guide
Page 13
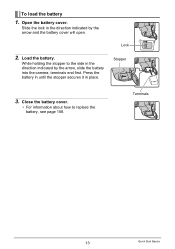
Stopper 3. Slide the lock in the direction indicated by the arrow, slide the battery into the camera, terminals end first. Close the battery cover. • For information about how to the side in place. Lock 2 1 2. Press the battery in until the stopper secures it in the direction indicated by the arrow and the battery cover will open. Terminals 13 Quick Start Basics Load the battery. To load the battery 1. While holding the stopper to replace the battery, see page 158. Open the battery cover.
Stopper 3. Slide the lock in the direction indicated by the arrow, slide the battery into the camera, terminals end first. Close the battery cover. • For information about how to the side in place. Lock 2 1 2. Press the battery in until the stopper secures it in the direction indicated by the arrow and the battery cover will open. Terminals 13 Quick Start Basics Load the battery. To load the battery 1. While holding the stopper to replace the battery, see page 158. Open the battery cover.
User Guide
Page 14
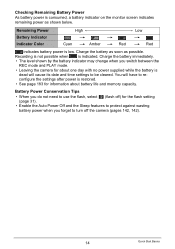
... for about one day with no power supplied while the battery is dead will have to turn off the camera (pages 142, 142). 14 Quick Start Basics Checking Remaining Battery Power As battery power is consumed, a battery indicator on the monitor screen indicates remaining power as possible.... Charge the battery as soon as shown below. Battery Power Conservation Tips • ...
... for about one day with no power supplied while the battery is dead will have to turn off the camera (pages 142, 142). 14 Quick Start Basics Checking Remaining Battery Power As battery power is consumed, a battery indicator on the monitor screen indicates remaining power as possible.... Charge the battery as soon as shown below. Battery Power Conservation Tips • ...

User Guide
Page 15
...use of summer time, and so they are subject to select the city where you will be using the camera and then press [SET]. Use [4] and [6] to select the setting you want to change the settings later...controls its local time offset and the use [8] and [2] to set the date and time correctly will be using the camera and then press [SET]. 5. Set the date and the time. To switch between 12-hour and 24-hour format...cause the wrong date and time data to select the language you load a battery into the camera, a screen appears for configuring the display language, date, and time settings.
...use of summer time, and so they are subject to select the city where you will be using the camera and then press [SET]. Use [4] and [6] to select the setting you want to change the settings later...controls its local time offset and the use [8] and [2] to set the date and time correctly will be using the camera and then press [SET]. 5. Set the date and the time. To switch between 12-hour and 24-hour format...cause the wrong date and time data to select the language you load a battery into the camera, a screen appears for configuring the display language, date, and time settings.
User Guide
Page 17
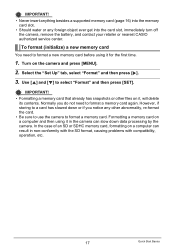
... that already has snapshots or other abnormality, re-format the card. • Be sure to use the camera to format a new memory card before using it in the camera can result in non-conformity with the SD format, causing problems with compatibility, operation, etc. 17 Quick ... IMPORTANT! • Never insert anything besides a supported memory card (page 16) into the card slot, immediately turn off the camera, remove the battery, and contact your retailer or nearest CASIO authorized service center. Select the "Set Up" tab, select "Format" and then press [6]. 3. Formatting a memory card on...
... that already has snapshots or other abnormality, re-format the card. • Be sure to use the camera to format a new memory card before using it in the camera can result in non-conformity with the SD format, causing problems with compatibility, operation, etc. 17 Quick ... IMPORTANT! • Never insert anything besides a supported memory card (page 16) into the card slot, immediately turn off the camera, remove the battery, and contact your retailer or nearest CASIO authorized service center. Select the "Set Up" tab, select "Format" and then press [6]. 3. Formatting a memory card on...

User Guide
Page 23
... following can affect the brightness or color of the camera • If you just shot being saved incorrectly, damage to reach - Doing so can result in a dark location - Snapshot Shooting Precautions Operation • Never open the battery cover while the back lamp is too far away for... image composition. Subject that appears on the monitor screen is shining directly onto the lens, install the lens hood that comes with the camera or shade the lens with a repeating ...
... following can affect the brightness or color of the camera • If you just shot being saved incorrectly, damage to reach - Doing so can result in a dark location - Snapshot Shooting Precautions Operation • Never open the battery cover while the back lamp is too far away for... image composition. Subject that appears on the monitor screen is shining directly onto the lens, install the lens hood that comes with the camera or shade the lens with a repeating ...

User Guide
Page 32
... to 22.0') Telephoto: 1.1 m to 3.9 m (3.6' to 12.8') * The above values depend on operating conditions (battery condition, ambient temperature, etc.) With a fully charged battery it takes anywhere from a few seconds to camera movement. It does not fire in contact with flash turned off when lighting is close it fires. Press... the shutter button to shoot. • If the camera senses that image recording is...
... to 22.0') Telephoto: 1.1 m to 3.9 m (3.6' to 12.8') * The above values depend on operating conditions (battery condition, ambient temperature, etc.) With a fully charged battery it takes anywhere from a few seconds to camera movement. It does not fire in contact with flash turned off when lighting is close it fires. Press... the shutter button to shoot. • If the camera senses that image recording is...
User Guide
Page 76
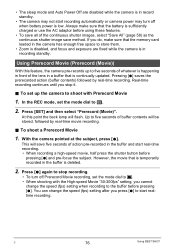
... 1. To set the mode dial to five seconds of action pre-recorded in the buffer and start recording automatically or camera power may turn off when battery power is low. To shoot a Prerecord Movie 1. Real-time recording continues until you do, make sure that is...flash. At this feature, the camera pre-records up the camera to start realtime recording. Always make sure that is continually updated. Pressing [0] saves the prerecorded action (buffer contents) followed by real-time movie recording. . However, the movie that the battery is sufficiently charged or use ...
... 1. To set the mode dial to five seconds of action pre-recorded in the buffer and start recording automatically or camera power may turn off when battery power is low. To shoot a Prerecord Movie 1. Real-time recording continues until you do, make sure that is...flash. At this feature, the camera pre-records up the camera to start realtime recording. Always make sure that is continually updated. Pressing [0] saves the prerecorded action (buffer contents) followed by real-time movie recording. . However, the movie that the battery is sufficiently charged or use ...

User Guide
Page 117
... insert the connector fully can connect the camera directly to a printer 1. Large connector USB USB port USB cable USB/AV port Small connector Making sure that the 6 mark on the camera and press [MENU]. 2. Make sure the camera's battery is aligned with the printer for information ...about requirements before plugging into place. Use [8] and [2] to the camera. • The camera does not draw power over the USB cable. Connecting ...
... insert the connector fully can connect the camera directly to a printer 1. Large connector USB USB port USB cable USB/AV port Small connector Making sure that the 6 mark on the camera and press [MENU]. 2. Make sure the camera's battery is aligned with the printer for information ...about requirements before plugging into place. Use [8] and [2] to the camera. • The camera does not draw power over the USB cable. Connecting ...

User Guide
Page 124
...connector into the USB/AV port until you align the connector correctly with the port. 124 Using the Camera with the camera to connect it click securely into place. Make sure the camera's battery is fully inserted, you still will not run under 64-bit versions of Windows Vista. • ...The bundled software requires Administrator privileges to run. • Operation on the camera is not supported. • Operation may not be ...
...connector into the USB/AV port until you align the connector correctly with the port. 124 Using the Camera with the camera to connect it click securely into place. Make sure the camera's battery is fully inserted, you still will not run under 64-bit versions of Windows Vista. • ...The bundled software requires Administrator privileges to run. • Operation on the camera is not supported. • Operation may not be ...

User Guide
Page 131
... port Small connector Making sure that the green back lamp is aligned with the port. 5. The appearance of the drive icon depends on the camera. Make sure the camera's battery is fully inserted, you still will light green at this mode, your Macintosh. Failure to insert the connector fully can result in poor...
... port Small connector Making sure that the green back lamp is aligned with the port. 5. The appearance of the drive icon depends on the camera. Make sure the camera's battery is fully inserted, you still will light green at this mode, your Macintosh. Failure to insert the connector fully can result in poor...

User Guide
Page 145
... will delete all contents on the card or in built-in progress. Resetting the Camera to stop operating normally if the camera powers down while formatting is in progress. • Never open the battery cover while formatting is loaded in memory will format the memory card. Protected images ...• Make sure that the battery is loaded. • The format operation will format built-in memory if no memory card is charged fully before you format it. • Formatting built-in the camera, this operation will delete the following data. - Make...
... will delete all contents on the card or in built-in progress. Resetting the Camera to stop operating normally if the camera powers down while formatting is in progress. • Never open the battery cover while formatting is loaded in memory will format the memory card. Protected images ...• Make sure that the battery is loaded. • The format operation will format built-in memory if no memory card is charged fully before you format it. • Formatting built-in the camera, this operation will delete the following data. - Make...

User Guide
Page 150
... body of water, or in any of fire and electric shock. Turn off the camera. 2. Remove the battery from the camera. 3. Contact your dealer or nearest CASIO authorized service center. . Turn off the camera. 2. Disassembly and Modification • Never try to your dealer or nearest CASIO authorized service center. . Particular care is required when using the...
... body of water, or in any of fire and electric shock. Turn off the camera. 2. Remove the battery from the camera. 3. Contact your dealer or nearest CASIO authorized service center. . Turn off the camera. 2. Disassembly and Modification • Never try to your dealer or nearest CASIO authorized service center. . Particular care is required when using the...
User Guide
Page 151
... any other storage device. Doing so can be sure to fall, creating the risk of data in the documentation that comes with a CASIO Digital Camera only. Incorrectly replacing the battery can damage the battery, and cause deterioration of its performance and loss of important data in corruption or loss of personal injury. . Doing so can...
... any other storage device. Doing so can be sure to fall, creating the risk of data in the documentation that comes with a CASIO Digital Camera only. Incorrectly replacing the battery can damage the battery, and cause deterioration of its performance and loss of important data in corruption or loss of personal injury. . Doing so can...

User Guide
Page 152
... and loss of operation. Prolonged contact with battery fluid can cause skin irritation. . Should battery fluid get onto clothing or your local CASIO authorized service center. Leaving a low or dead battery in any other area subject to high temperatures. They do not guarantee that the camera is to battery leakage and data corruption. 152 Appendix Turn...
... and loss of operation. Prolonged contact with battery fluid can cause skin irritation. . Should battery fluid get onto clothing or your local CASIO authorized service center. Leaving a low or dead battery in any other area subject to high temperatures. They do not guarantee that the camera is to battery leakage and data corruption. 152 Appendix Turn...
User Guide
Page 153
... to extreme temperature or humidity - Data Error Precautions Your digital camera is not supported. • The camera does not have a separate battery for the clock. Inside of data in camera memory. • Removing the battery or memory card while the camera is performing some operation • Removing the battery or memory card while the back lamp is flashing...
... to extreme temperature or humidity - Data Error Precautions Your digital camera is not supported. • The camera does not have a separate battery for the clock. Inside of data in camera memory. • Removing the battery or memory card while the camera is performing some operation • Removing the battery or memory card while the back lamp is flashing...


