
C450 Owner s Manual - English
Page 1
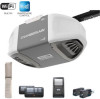
... and Keyless Entry 36 Homelink 36 To Erase the Memory 37 Maintenance 38 Troubleshooting 39-40 Accessories 41 Warranty 42 Repair Parts 43-44 www.chamberlain.com www.mychamberlain.com Owner's Manual C450 Chain Drive Garage Door Opener FOR RESIDENTIAL USE ONLY PRE-PROGRAMMED REMOTE CONTROL INCLUDED TO WATCH VIDEOS GO TO: tinyurl...
... and Keyless Entry 36 Homelink 36 To Erase the Memory 37 Maintenance 38 Troubleshooting 39-40 Accessories 41 Warranty 42 Repair Parts 43-44 www.chamberlain.com www.mychamberlain.com Owner's Manual C450 Chain Drive Garage Door Opener FOR RESIDENTIAL USE ONLY PRE-PROGRAMMED REMOTE CONTROL INCLUDED TO WATCH VIDEOS GO TO: tinyurl...

C450 Owner s Manual - English
Page 11
... locks and remove ALL ropes connected to garage door BEFORE installing opener to do so. 8. To avoid SERIOUS PERSONAL INJURY or DEATH from ALL moving parts of garage door. 12. DO NOT install on inside of the door. 10. l out of reach of 5 feet (1.5 m) above floor. 6. ALL repairs to garage door...
... locks and remove ALL ropes connected to garage door BEFORE installing opener to do so. 8. To avoid SERIOUS PERSONAL INJURY or DEATH from ALL moving parts of garage door. 12. DO NOT install on inside of the door. 10. l out of reach of 5 feet (1.5 m) above floor. 6. ALL repairs to garage door...

C450 Owner s Manual - English
Page 21
... from a closing garage door. NOTE: Your product may look different than the illustrations. Strip 7/16 inch (11 mm) of insulation from ALL moving parts of the door control. Mark the location of closing garage door: l Install door control within sight of the door at a minimum height of 5... Anchor 6ABx1" 6-32x1" 21 Position the bottom hole of the door control over the screw and slide down into place. 6. INTRODUCTION Older Chamberlain door controls and third party products are no obstructions to the garage door opener in a later step. 3. l Connect door control ONLY to...
... from a closing garage door. NOTE: Your product may look different than the illustrations. Strip 7/16 inch (11 mm) of insulation from ALL moving parts of the door control. Mark the location of closing garage door: l Install door control within sight of the door at a minimum height of 5... Anchor 6ABx1" 6-32x1" 21 Position the bottom hole of the door control over the screw and slide down into place. 6. INTRODUCTION Older Chamberlain door controls and third party products are no obstructions to the garage door opener in a later step. 3. l Connect door control ONLY to...

C450 Owner s Manual - English
Page 38
l DO NOT recharge, disassemble, heat above 212°F (100°C) or incinerate. The 3V CR2032 Lithium battery should produce power for up . Thisdevice complieswith Part 15 of old batteries properly. 3 1 2 NOTICE: To complywith FCC and/or IndustryCanada (IC) rules, adjustment or modificationsof thistransceiver are prohibited. Cet appareilest conforme auxdispositionsde la ...
l DO NOT recharge, disassemble, heat above 212°F (100°C) or incinerate. The 3V CR2032 Lithium battery should produce power for up . Thisdevice complieswith Part 15 of old batteries properly. 3 1 2 NOTICE: To complywith FCC and/or IndustryCanada (IC) rules, adjustment or modificationsof thistransceiver are prohibited. Cet appareilest conforme auxdispositionsde la ...

C450 Owner s Manual - English
Page 42
... STOP! This garage door opener WILL NOT work until the safety reversing sensors are ordering a repair part please have access to our service center for warranty repair, which upon receipt by this limited warranty, call : www.chamberlain.com 1-800-528-9131 Before calling, please have other rights, which this product, for a speci...
... STOP! This garage door opener WILL NOT work until the safety reversing sensors are ordering a repair part please have access to our service center for warranty repair, which upon receipt by this limited warranty, call : www.chamberlain.com 1-800-528-9131 Before calling, please have other rights, which this product, for a speci...

C450 Owner s Manual - English
Page 43
... Assembly 041C5141-1 3 includes Clevis Pin (1) and Ring (1) 6 "U" Bracket 041D0598-1 Not Shown 4 Wear Pads 041A7276 5 Hardware Bag 041A7920-1 6 Accessories Description Part Number 1 1 Multi-Function Control 041A7185-1 Panel 2 2 Remote Control 953ESTD Installation Parts Description Part Number 1 Curved Door Arm 041B0035B 2 Door Bracket with Clevis Pin and Fastener 041A5047-1 3 Emergency Release Rope and Handle 041A2828 4 Header...
... Assembly 041C5141-1 3 includes Clevis Pin (1) and Ring (1) 6 "U" Bracket 041D0598-1 Not Shown 4 Wear Pads 041A7276 5 Hardware Bag 041A7920-1 6 Accessories Description Part Number 1 1 Multi-Function Control 041A7185-1 Panel 2 2 Remote Control 953ESTD Installation Parts Description Part Number 1 Curved Door Arm 041B0035B 2 Door Bracket with Clevis Pin and Fastener 041A5047-1 3 Emergency Release Rope and Handle 041A2828 4 Header...

C450 Owner s Manual - English
Page 44
... 1 2 10 12 14 3 4 5 4 5 11 6 8 7 9 Description Part Number 1 Chain Spreader 041A5615 2 Gear and Sprocket 041C4220A 3 End Panel with Light Socket 041D0207 4 Light Socket 041C0279 5 Light Lens 041D7572 6 Capacitor 030B0532-1 7 Capacitor Bracket K012A0373 8 ... Socket 041D8214 12 Motor with Travel Module 041D7440 13 Line Cord 041B4245-1 14 Terminal Block 041A3150 Not Shown Wire Harness 041A7945 114A5238 © 2018, The Chamberlain Group, Inc. All Rights Reserved Wi-Fi® is a registered trademark of Wi-Fi Alliance The...
... 1 2 10 12 14 3 4 5 4 5 11 6 8 7 9 Description Part Number 1 Chain Spreader 041A5615 2 Gear and Sprocket 041C4220A 3 End Panel with Light Socket 041D0207 4 Light Socket 041C0279 5 Light Lens 041D7572 6 Capacitor 030B0532-1 7 Capacitor Bracket K012A0373 8 ... Socket 041D8214 12 Motor with Travel Module 041D7440 13 Line Cord 041B4245-1 14 Terminal Block 041A3150 Not Shown Wire Harness 041A7945 114A5238 © 2018, The Chamberlain Group, Inc. All Rights Reserved Wi-Fi® is a registered trademark of Wi-Fi Alliance The...