
User Guide
Page 1
Installation & User Guide SK01 EXTERNAL 2.5" DRIVE STORAGE KIT www.crucial.com
Installation & User Guide SK01 EXTERNAL 2.5" DRIVE STORAGE KIT www.crucial.com

User Guide
Page 4
Package contents • 2.5-inch USB 2.0 external enclosure • 3.5-inch hot-swappable SATA drive bay • 5.25-inch bracket • USB cable • Internal SATA cable • Internal power cable ...internal installation) 2 please purchase the SSD separately at Crucial.com. The SK01 storage kit is also compatible with a USB 2.0 connection (for external/standalone use) and SATA interface (for attaching the SSD to the PCB, plus 1 spare • Protective carrying case • User guide NOTE: The Crucial SK01 storage kit does NOT contain an SSD; Minimum system requirements ...
Package contents • 2.5-inch USB 2.0 external enclosure • 3.5-inch hot-swappable SATA drive bay • 5.25-inch bracket • USB cable • Internal SATA cable • Internal power cable ...internal installation) 2 please purchase the SSD separately at Crucial.com. The SK01 storage kit is also compatible with a USB 2.0 connection (for external/standalone use) and SATA interface (for attaching the SSD to the PCB, plus 1 spare • Protective carrying case • User guide NOTE: The Crucial SK01 storage kit does NOT contain an SSD; Minimum system requirements ...
User Guide
Page 5
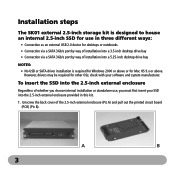
... • Connection via a SATA 3Gb/s port by way of installation into the 2.5-inch external enclosure Regardless of whether you choose internal installation or standalone use in this kit. 1.. Installation steps The SK01 external 2.5-inch storage kit is designed to house an internal 2.5-inch SSD for use , you must first insert your... above. A B 3 To insert the SSD into a 3.5-inch desktop drive bay • Connection via a SATA 3Gb/s port by way of the 2.5-inch external enclosure (Pic A) and pull out the printed circuit board (PCB) (Pic B). check with your SSD into the 2.5-inch...
... • Connection via a SATA 3Gb/s port by way of installation into the 2.5-inch external enclosure Regardless of whether you choose internal installation or standalone use in this kit. 1.. Installation steps The SK01 external 2.5-inch storage kit is designed to house an internal 2.5-inch SSD for use , you must first insert your... above. A B 3 To insert the SSD into a 3.5-inch desktop drive bay • Connection via a SATA 3Gb/s port by way of the 2.5-inch external enclosure (Pic A) and pull out the printed circuit board (PCB) (Pic B). check with your SSD into the 2.5-inch...
User Guide
Page 7
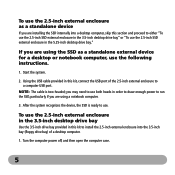
... the SSD internally into the 3.5-inch bay (floppy drive bay) of the 2.5-inch external enclosure to use both heads in this kit, connect the USB port of a desktop computer. 1. To use the 2.5-inch external enclosure in the 3.5-inch desktop drive bay Use the 3.5-inch drive bay provided in ...order to draw enough power to either "To use the 2.5-inch SSD external enclosure in the 3.5-inch...
... the SSD internally into the 3.5-inch bay (floppy drive bay) of the 2.5-inch external enclosure to use both heads in this kit, connect the USB port of a desktop computer. 1. To use the 2.5-inch external enclosure in the 3.5-inch desktop drive bay Use the 3.5-inch drive bay provided in ...order to draw enough power to either "To use the 2.5-inch SSD external enclosure in the 3.5-inch...
User Guide
Page 10
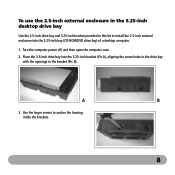
Place the 3.5-inch drive bay into the 5.25-inch bay (CD-ROM/DVD drive bay) of a desktop computer. 1. Use the larger screws to install the 2.5-inch external enclosure into the 5.25-inch bracket (Pic A), aligning the screw holes in the drive bay with the openings in this kit to anchor the housing inside the brackets. 8 A B 3. To use the 2.5-inch external enclosure in the 5.25-inch desktop drive bay Use the 3.5-inch drive bay and 5.25-inch bracket provided in the bracket (Pic B). Turn the computer power off, and then open the computer case. 2.
Place the 3.5-inch drive bay into the 5.25-inch bay (CD-ROM/DVD drive bay) of a desktop computer. 1. Use the larger screws to install the 2.5-inch external enclosure into the 5.25-inch bracket (Pic A), aligning the screw holes in the drive bay with the openings in this kit to anchor the housing inside the brackets. 8 A B 3. To use the 2.5-inch external enclosure in the 5.25-inch desktop drive bay Use the 3.5-inch drive bay and 5.25-inch bracket provided in the bracket (Pic B). Turn the computer power off, and then open the computer case. 2.