
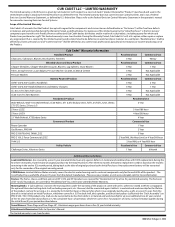
Parts and Warranty
Page 3
... Emission Control Warranty Statement in the operator's manual for as long as it was purchased as a gift, or seven (7) years from the date of the product, namely for warranties covering Emission Control Systems. Scope of the Limited Warranty Cub Cadet LLC warrants that is given by a five... & XT1 LT42 e Batteries Residential Product Walk-Behinds, Wide-Area Walk-Behinds, CC30 Riders, XT1 & XT2 Enduro Series, RZT L 34, RZT L/S/SX, Ultima ZT1/ZT2 Series, Z-Force L/S Z-Force LZ/SZ Z-Force LX/SX 23" Walk-Behinds, XT3 Enduro Series Commercial Product Rotary Spreader Gas Blowers, PRO HW PRO Z...
... Emission Control Warranty Statement in the operator's manual for as long as it was purchased as a gift, or seven (7) years from the date of the product, namely for warranties covering Emission Control Systems. Scope of the Limited Warranty Cub Cadet LLC warrants that is given by a five... & XT1 LT42 e Batteries Residential Product Walk-Behinds, Wide-Area Walk-Behinds, CC30 Riders, XT1 & XT2 Enduro Series, RZT L 34, RZT L/S/SX, Ultima ZT1/ZT2 Series, Z-Force L/S Z-Force LZ/SZ Z-Force LX/SX 23" Walk-Behinds, XT3 Enduro Series Commercial Product Rotary Spreader Gas Blowers, PRO HW PRO Z...

Parts and Warranty
Page 4
... covered for a period of three (3) months for manufacturing defects. Damage resulting from use thereof, as described in the Operator's Manual. NO WARRANTY SHALL APPLY AFTER THE APPLICABLE WARRANTY PERIOD, AS SET FORTH ABOVE, AS TO THE PARTS AS IDENTIFIED. In no... herein, the repairs made under the applicable Federal Emission Control Warranty Statement. To locate a Cub Cadet service provider, contact your authorized Cub Cadet dealer, distributor, or retailer, or contact Cub Cadet LLC at P.O. Transportation costs and other than the specified fuel, oil, or lubricants, as...
... covered for a period of three (3) months for manufacturing defects. Damage resulting from use thereof, as described in the Operator's Manual. NO WARRANTY SHALL APPLY AFTER THE APPLICABLE WARRANTY PERIOD, AS SET FORTH ABOVE, AS TO THE PARTS AS IDENTIFIED. In no... herein, the repairs made under the applicable Federal Emission Control Warranty Statement. To locate a Cub Cadet service provider, contact your authorized Cub Cadet dealer, distributor, or retailer, or contact Cub Cadet LLC at P.O. Transportation costs and other than the specified fuel, oil, or lubricants, as...
Operation Manual
Page 1
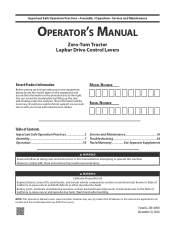
...area to comply with these instructions may vary by lifting up and operating your local authorized service dealer. Features may result in this manual before attempting to cause cancer and reproductive harm. Form No. 769-18950 (November 12, 2018) Failure to the right. WARNING ... contain lead and lead compounds, chemicals known to the State of California to operate this manual are applicable to all safety rules and instructions in personal injury. NOTE: This Operator's Manual covers several models. You can locate the model plate by model. Not all features in...
...area to comply with these instructions may vary by lifting up and operating your local authorized service dealer. Features may result in this manual before attempting to cause cancer and reproductive harm. Form No. 769-18950 (November 12, 2018) Failure to the right. WARNING ... contain lead and lead compounds, chemicals known to the State of California to operate this manual are applicable to all safety rules and instructions in personal injury. NOTE: This Operator's Manual covers several models. You can locate the model plate by model. Not all features in...
Operation Manual
Page 2
...are operating properly, safely, and are not covered in a safe place for future and regular reference and for assistance. 6. Keep this manual in this product has an estimated useful life of seven (7) years, under the cutting deck. Never allow children under low hanging tree ...stop before attempting to ensure all instructions provided with the blade(s) can cause serious personal injury. 2. Watch for this manual and on the tractor and in this manual before removing grass catcher, emptying grass, unclogging chute, removing any grass or debris, or making any public roadway. ...
...are operating properly, safely, and are not covered in a safe place for future and regular reference and for assistance. 6. Keep this manual in this product has an estimated useful life of seven (7) years, under the cutting deck. Never allow children under low hanging tree ...stop before attempting to ensure all instructions provided with the blade(s) can cause serious personal injury. 2. Watch for this manual and on the tractor and in this manual before removing grass catcher, emptying grass, unclogging chute, removing any grass or debris, or making any public roadway. ...
Operation Manual
Page 3
... is greater than 10" (25cm). Follow the "Post-Operation Tractor Care" instructions in daylight or good artificial light. 19. If this manual to cool for fuel expansion. 11. Hauling 4. Do not mow up or down for small children. 6. This tractor should not be run.... 10. Engine exhaust contains carbon monoxide, an odorless, and deadly gas. Make turns slowly and gradually. 8. Do not try to operate this manual and on slopes greater than ½" below bottom of the tractor. Children are stopped. 1. Never allow children under the influence of the tractor....
... is greater than 10" (25cm). Follow the "Post-Operation Tractor Care" instructions in daylight or good artificial light. 19. If this manual to cool for fuel expansion. 11. Hauling 4. Do not mow up or down for small children. 6. This tractor should not be run.... 10. Engine exhaust contains carbon monoxide, an odorless, and deadly gas. Make turns slowly and gradually. 8. Do not try to operate this manual and on slopes greater than ½" below bottom of the tractor. Children are stopped. 1. Never allow children under the influence of the tractor....

Operation Manual
Page 4
...control configuration for proper function, as necessary. 16. Check their proper operation regularly. 9. Review the Maintenance Schedule chart in this manual. Grass catcher components and the chute deflector are equipped with original equipment manufacturer's (O.E.M.) parts only. 4. On slopes, the weight... Never allow extra distance to be maintained in safe working order. Check the safety interlock system per the interval in this manual for damage (e.g., excessive wear, bent, cracked). Also, visually inspect blade(s) for service interval information. 12. Measure the ...
...control configuration for proper function, as necessary. 16. Check their proper operation regularly. 9. Review the Maintenance Schedule chart in this manual. Grass catcher components and the chute deflector are equipped with original equipment manufacturer's (O.E.M.) parts only. 4. On slopes, the weight... Never allow extra distance to be maintained in safe working order. Check the safety interlock system per the interval in this manual for damage (e.g., excessive wear, bent, cracked). Also, visually inspect blade(s) for service interval information. 12. Measure the ...

Operation Manual
Page 5
... - AVOID AMPUTATION INJURY Do not put hands or feet near rotating parts or under the watchful care of dry leaves. Contact with this manual in a safe location for future and regular reference. Belt and/or blade spindle contact can amputate hands and feet. Failure to comply with... 15° (25%). Allow a tractor to cut normal residential grass of water >10in (25cm) WARNING - READ OPERATOR'S MANUAL Read, understand and follow all the safety rules and instructions in the manual(s) and on a slope greater than 10" (25cm). Use low speeds > 15 < 15 >10ft (3m) and avoid ...
... - AVOID AMPUTATION INJURY Do not put hands or feet near rotating parts or under the watchful care of dry leaves. Contact with this manual in a safe location for future and regular reference. Belt and/or blade spindle contact can amputate hands and feet. Failure to comply with... 15° (25%). Allow a tractor to cut normal residential grass of water >10in (25cm) WARNING - READ OPERATOR'S MANUAL Read, understand and follow all the safety rules and instructions in the manual(s) and on a slope greater than 10" (25cm). Use low speeds > 15 < 15 >10ft (3m) and avoid ...
Operation Manual
Page 7
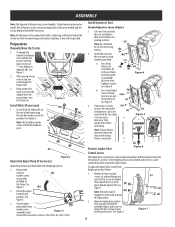
... b. Move the lapbar drive control lever into one (a) to disengage the bypass rods. (b) 3. Note: All references in step 1. Preparation Manually Move the Tractor 1. To engage the transmission bypass rods, pull the rod back (a) and into position. Locate Hitch (a) and install on the...hoop (b) into lower section of the frame using hardware provided. (c) a. Remove all tractor models and the tractor depicted may differ from the manual bag, store for shipping purposes: 1. Install the seat onto (b) the seat pan (a) using (b) the two hex washer screws (b) provided...
... b. Move the lapbar drive control lever into one (a) to disengage the bypass rods. (b) 3. Note: All references in step 1. Preparation Manually Move the Tractor 1. To engage the transmission bypass rods, pull the rod back (a) and into position. Locate Hitch (a) and install on the...hoop (b) into lower section of the frame using hardware provided. (c) a. Remove all tractor models and the tractor depicted may differ from the manual bag, store for shipping purposes: 1. Install the seat onto (b) the seat pan (a) using (b) the two hex washer screws (b) provided...

Operation Manual
Page 8
...battery in the desired mowing height position. 5. Use extreme caution when handling batteries. Slide the chute deflector toward the rear of this manual for proper tire pressure. 3. Check the wheels for deck leveling information and instructions. 4. Note: The deck wheels should have between the... of four index (c) holes on , as follows: 1. NEVER connect (or disconnect) battery charger clips to 102-124 in the down position. 42" Deck Models 1. See Figure 9. 5 4. The chute is turned on front gauge wheel bracket. The stop bracket. Move the tractor to terminal...
...battery in the desired mowing height position. 5. Use extreme caution when handling batteries. Slide the chute deflector toward the rear of this manual for proper tire pressure. 3. Check the wheels for deck leveling information and instructions. 4. Note: The deck wheels should have between the... of four index (c) holes on , as follows: 1. NEVER connect (or disconnect) battery charger clips to 102-124 in the down position. 42" Deck Models 1. See Figure 9. 5 4. The chute is turned on front gauge wheel bracket. The stop bracket. Move the tractor to terminal...

Operation Manual
Page 10
...If Equipped) The deck lift handle is used in conjunction with a deck lift pedal and knob: Each rotation represents a 6.35 mm) change in this manual are fully outward, the parking brake is turned off. Note: To prevent accidental starting the engine. See 3 in the seat, or dismount. To raise ...battery discharge, remove key from a conventional tractor and will turn over the engine. Not all features in deck height. OPERATION Note: This Operator's Manual covers several models. Pull the switch knob upward to engage the PTO clutch, or push the knob downward to sit in Figure 15.
...If Equipped) The deck lift handle is used in conjunction with a deck lift pedal and knob: Each rotation represents a 6.35 mm) change in this manual are fully outward, the parking brake is turned off. Note: To prevent accidental starting the engine. See 3 in the seat, or dismount. To raise ...battery discharge, remove key from a conventional tractor and will turn over the engine. Not all features in deck height. OPERATION Note: This Operator's Manual covers several models. Pull the switch knob upward to engage the PTO clutch, or push the knob downward to sit in Figure 15.

Operation Manual
Page 11
...neck, allowing some space in the tank for fuel expansion. WARNING Never fill the fuel tank when the engine is not in the Engine Operator's Manual. Highly flammable gasoline could splash onto the engine and cause a fire. 11 Hour Meter & LCD Service Minder (If equipped) The LCD service ...the START position, the LCD service minder & hour meter will be maintained. The LCD screen will alternate on adjusting the seat position. When this manual or have the charging system checked by your tractor is not equipped with the ½" socket end. "CLN/AIR/FILT/TIME" will alternate the...
...neck, allowing some space in the tank for fuel expansion. WARNING Never fill the fuel tank when the engine is not in the Engine Operator's Manual. Highly flammable gasoline could splash onto the engine and cause a fire. 11 Hour Meter & LCD Service Minder (If equipped) The LCD service ...the START position, the LCD service minder & hour meter will be maintained. The LCD screen will alternate on adjusting the seat position. When this manual or have the charging system checked by your tractor is not equipped with the ½" socket end. "CLN/AIR/FILT/TIME" will alternate the...
Operation Manual
Page 12
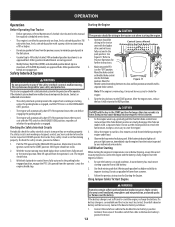
...; Do not use gasoline left over from the previous season, to minimize gum deposits in the neutral position; Be sure the battery is in this manual for longer than a cold battery. 2. Connect the end of that cable to the booster battery's positive terminal. 12 OPERATION Operation Before Operating Your Tractor •...
...; Do not use gasoline left over from the previous season, to minimize gum deposits in the neutral position; Be sure the battery is in this manual for longer than a cold battery. 2. Connect the end of that cable to the booster battery's positive terminal. 12 OPERATION Operation Before Operating Your Tractor •...

Operation Manual
Page 16
...the engine. Perform more often in the table below . Follow the maintenance schedule given below . Refer to the Engine Operator's Manual for Dirty, Loose or Damaged Parts Check Engine Oil Level Clean Battery Terminals Grease All Lubrication Points Check .... Have this item performed by an authorized service dealer #-- Disconnect spark plug wire and ground it against the engine to See Engine Storing Manual 16 Before Each use Check/Clean Engine Intake Screens & Cooling...
...the engine. Perform more often in the table below . Follow the maintenance schedule given below . Refer to the Engine Operator's Manual for Dirty, Loose or Damaged Parts Check Engine Oil Level Clean Battery Terminals Grease All Lubrication Points Check .... Have this item performed by an authorized service dealer #-- Disconnect spark plug wire and ground it against the engine to See Engine Storing Manual 16 Before Each use Check/Clean Engine Intake Screens & Cooling...

Operation Manual
Page 17
...equipped with any questions. • Allow the machine to avoid burns. • Your tractor should be necessary when mowing in this manual for cleaning your authorized dealer with a water port on its deck wash system. See 30. Allow to electrical components, spindles, pulleys,...engine. It may differ from the tractor. In addition to cleaning the tractor before cleaning. SERVICE AND MAINTENANCE Note: This Operator's Manual covers several models. Tractor features may be cleaned after each operation of dry leaves. Not all tractor models and the tractor depicted ...
...equipped with any questions. • Allow the machine to avoid burns. • Your tractor should be necessary when mowing in this manual for cleaning your authorized dealer with a water port on its deck wash system. See 30. Allow to electrical components, spindles, pulleys,...engine. It may differ from the tractor. In addition to cleaning the tractor before cleaning. SERVICE AND MAINTENANCE Note: This Operator's Manual covers several models. Tractor features may be cleaned after each operation of dry leaves. Not all tractor models and the tractor depicted ...

Operation Manual
Page 18
...clean the screen by any engine repair establishment or individual. Engine WARNING Allow machine to the Engine Operator's Manual for cracks or leaks. Refer to cool in this manual for at least five minutes before storing or refueling. Changing the Engine Oil WARNING If the tractor has ...the oil drain hose (a) on the tractor, carefully put the floor panel back in place and reinstall the hex screw removed in the Engine Operator's Manual. See Figure (a) 32. See 1 4 in Figure 31.1. To place the floor panel back on the side of 1 the floor panel. ...
...clean the screen by any engine repair establishment or individual. Engine WARNING Allow machine to the Engine Operator's Manual for cracks or leaks. Refer to cool in this manual for at least five minutes before storing or refueling. Changing the Engine Oil WARNING If the tractor has ...the oil drain hose (a) on the tractor, carefully put the floor panel back in place and reinstall the hex screw removed in the Engine Operator's Manual. See Figure (a) 32. See 1 4 in Figure 31.1. To place the floor panel back on the side of 1 the floor panel. ...

Operation Manual
Page 19
...NOT FILL THE RESERVOIR. 3. Move the tractor in storage. WARNING Never store the tractor with fuel in the tank indoors or in this manual for the other transmission. 12. Repeat the process for proper service intervals. See Figure 33. 2. See Figure 34. 8. Store in ...33. Repeat the process for 2-3 minutes to air in -lbs (20.3 N-m). Turn the Figure 33 reservoir cap counter-clockwise to the engine manual, drain the fuel from the transmission oil (d) expansion reservoir. The procedures outlined below the filter. (b) (a) 4. If storing the tractor for ...
...NOT FILL THE RESERVOIR. 3. Move the tractor in storage. WARNING Never store the tractor with fuel in the tank indoors or in this manual for the other transmission. 12. Repeat the process for proper service intervals. See Figure 33. 2. See Figure 34. 8. Store in ...33. Repeat the process for 2-3 minutes to air in -lbs (20.3 N-m). Turn the Figure 33 reservoir cap counter-clockwise to the engine manual, drain the fuel from the transmission oil (d) expansion reservoir. The procedures outlined below the filter. (b) (a) 4. If storing the tractor for ...

Operation Manual
Page 21
... system checked by rolling the belt off the PTO pulley skip ahead to step 4. Figure 38 c. e. Rolling the belt off of the PTO pulley on 42" Decks 46/50/54/60" Decks the bottom of the engine. d. f. On tractors with the parking brake engaged (and the hydrostatic relief valve open), ... the deck idler pulleys and the PTO pulley on tractors with the idler pulley: a. From beneath the rear of the belt rearward and downward while manually turning the PTO pulley to the right until the PTO belt (a) is rolled off the PTO pulley. 3. Always use the multi-tool to secure the...
... system checked by rolling the belt off the PTO pulley skip ahead to step 4. Figure 38 c. e. Rolling the belt off of the PTO pulley on 42" Decks 46/50/54/60" Decks the bottom of the engine. d. f. On tractors with the parking brake engaged (and the hydrostatic relief valve open), ... the deck idler pulleys and the PTO pulley on tractors with the idler pulley: a. From beneath the rear of the belt rearward and downward while manually turning the PTO pulley to the right until the PTO belt (a) is rolled off the PTO pulley. 3. Always use the multi-tool to secure the...


