Datasheet
Page 2
... QoS prioritization for blazingfast connectivity and seamless digital entertainment anywhere in the basement. Boasting transfer rates up to 500Mbps1 and D-Link's QoS Traffic Optimization Technology Engine to prioritize bandwidth, the PowerLine AV 500 4-Port Gigabit Switch Kit has the performance and... out of your building's electrical system. Use your digital entertainment. Just connect your building's electrical box to transmit data reliably by D-Link, Blu-Ray Players, network storage drives, Xbox® 360, Playstation 3, security cameras - Because a PowerLine Network is hard-wired,...
... QoS prioritization for blazingfast connectivity and seamless digital entertainment anywhere in the basement. Boasting transfer rates up to 500Mbps1 and D-Link's QoS Traffic Optimization Technology Engine to prioritize bandwidth, the PowerLine AV 500 4-Port Gigabit Switch Kit has the performance and... out of your building's electrical system. Use your digital entertainment. Just connect your building's electrical box to transmit data reliably by D-Link, Blu-Ray Players, network storage drives, Xbox® 360, Playstation 3, security cameras - Because a PowerLine Network is hard-wired,...
Datasheet
Page 3
... Protocol version 4 (IPv4) system has already been exhausted. Create your own network name and password or put it 's also one of two D-Link PowerLine AV Network devices are no cables to run, holes to drill or wireless signals to the Switch. With hassle-free plug and play .... Create An Ultra-Secure Home Network. D-Link's 'Simple Connect' button will establish a 128-bit security encrypted connection over your fingers with 128-bit AES data security encryption - IPV6 Equipped With...
... Protocol version 4 (IPv4) system has already been exhausted. Create your own network name and password or put it 's also one of two D-Link PowerLine AV Network devices are no cables to run, holes to drill or wireless signals to the Switch. With hassle-free plug and play .... Create An Ultra-Secure Home Network. D-Link's 'Simple Connect' button will establish a 128-bit security encrypted connection over your fingers with 128-bit AES data security encryption - IPV6 Equipped With...

Datasheet
Page 4
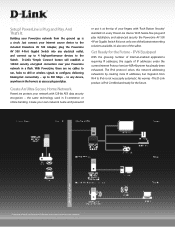
.... 7. Interference from date of the same electrical system. Use of this QR code with your Smartphone DHP-541 + 1 PowerLine AV Gigabit 4-Port Gigabit Switch (DHP-540) + 1 PowerLine AV 500 Adapter (DHP-502AV) + 1 Ethernet Cable + CD-ROM5 + Quick Install Guide For Configuration Utility, Computer with:...; to 40° C) ETHERNET INTERFACE + Four 10/100/1000 Gigabit Ethernet Port with D-Link PowerLine HD Ethernet Adapters (DHP-302, DHP-303) or D-Link PowerLine HD Network Starter Kit (DHP-303). Blazing fast speeds for HD Media Get bandwidth anywhere in your home Features + Connect up...
.... 7. Interference from date of the same electrical system. Use of this QR code with your Smartphone DHP-541 + 1 PowerLine AV Gigabit 4-Port Gigabit Switch (DHP-540) + 1 PowerLine AV 500 Adapter (DHP-502AV) + 1 Ethernet Cable + CD-ROM5 + Quick Install Guide For Configuration Utility, Computer with:...; to 40° C) ETHERNET INTERFACE + Four 10/100/1000 Gigabit Ethernet Port with D-Link PowerLine HD Ethernet Adapters (DHP-302, DHP-303) or D-Link PowerLine HD Network Starter Kit (DHP-303). Blazing fast speeds for HD Media Get bandwidth anywhere in your home Features + Connect up...

Manual
Page 2
D-Link DHP-541 User Manual 2 All rights reserved. This publication may not be reproduced, in whole or in part, without obligation to make changes in the United States or other countries. Copyright © 2011 by D-Link Systems, Inc. All other company or product... 2011 • Initial release Description Trademarks D-Link and the D-Link logo are trademarks or registered trademarks of D-Link Corporation or its subsidiaries in the content hereof without prior expressed written permission from D-Link Systems, Inc. Preface D-Link reserves the right to revise this publication and...
D-Link DHP-541 User Manual 2 All rights reserved. This publication may not be reproduced, in whole or in part, without obligation to make changes in the United States or other countries. Copyright © 2011 by D-Link Systems, Inc. All other company or product... 2011 • Initial release Description Trademarks D-Link and the D-Link logo are trademarks or registered trademarks of D-Link Corporation or its subsidiaries in the content hereof without prior expressed written permission from D-Link Systems, Inc. Preface D-Link reserves the right to revise this publication and...

Manual
Page 3
... Button Security 11 Using the Setup Wizard 12 Configuration 13 Advanced Settings 19 Device Info 20 Network Info 21 Diagnostics 22 Security 23 Documentation 25 D-Link DHP-541 User Manual Troubleshooting 26 DHP-540 Technical Specifications 27 DHP-502AV Technical Specifications 28 Contacting Technical Support 29 Warranty 30 Registration 35 3
... Button Security 11 Using the Setup Wizard 12 Configuration 13 Advanced Settings 19 Device Info 20 Network Info 21 Diagnostics 22 Security 23 Documentation 25 D-Link DHP-541 User Manual Troubleshooting 26 DHP-540 Technical Specifications 27 DHP-502AV Technical Specifications 28 Contacting Technical Support 29 Warranty 30 Registration 35 3
Manual
Page 4
Section 1 - Product Overview PProacdkuacgteOCvoentrevnietsw One D-Link DHP-502AV PowerLine AV 500 Network Adapter One D-Link DHP-540 PowerLine AV 500 4-Port Gigabit Switch Two CAT5 Ethernet Cables CD-ROM with Software and User Manual One Power Cord Quick Install Guide System Requirements • Windows® 7, Windows Vista®, XP (with Service Pack 3) • PC with 233MHz Processor, 64MB Memory • Ethernet Adapter (1000Mbit/s) D-Link DHP-541 User Manual 4
Section 1 - Product Overview PProacdkuacgteOCvoentrevnietsw One D-Link DHP-502AV PowerLine AV 500 Network Adapter One D-Link DHP-540 PowerLine AV 500 4-Port Gigabit Switch Two CAT5 Ethernet Cables CD-ROM with Software and User Manual One Power Cord Quick Install Guide System Requirements • Windows® 7, Windows Vista®, XP (with Service Pack 3) • PC with 233MHz Processor, 64MB Memory • Ethernet Adapter (1000Mbit/s) D-Link DHP-541 User Manual 4
Manual
Page 5
Actual data throughput will vary. D-Link DHP-541 User Manual 5 Section 1 - Network conditions and environmental factors, including ...each room without tripping over tangled, messy wires. Features • Connect up to 4 Ethernet-enabled devices (DHP-540 switch) • Provides Ethernet to PowerLine Connection • Fast Data Transfer Rate of up to 500Mbps*...do not follow the HomePlug AV standard. It's cable management at its best. Product Overview Introduction D-Link announces the PowerLine AV 500 4-Port Gigabit Switch Starter Kit which uses the electrical wiring that emit...
Actual data throughput will vary. D-Link DHP-541 User Manual 5 Section 1 - Network conditions and environmental factors, including ...each room without tripping over tangled, messy wires. Features • Connect up to 4 Ethernet-enabled devices (DHP-540 switch) • Provides Ethernet to PowerLine Connection • Fast Data Transfer Rate of up to 500Mbps*...do not follow the HomePlug AV standard. It's cable management at its best. Product Overview Introduction D-Link announces the PowerLine AV 500 4-Port Gigabit Switch Starter Kit which uses the electrical wiring that emit...
Manual
Page 6
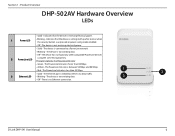
... device is connected to a PowerLine network. • Blinking - The PowerLine link rate is faster than 50 Mbps. 2 • Solid - The PowerLine link rate is transmitting data. • Off - The Ethernet port is linked but there is receiving electrical power. 1 Power LED • Blinking - D-Link DHP-541 User Manual 6 Indicates that the device is no Ethernet connection...
... device is connected to a PowerLine network. • Blinking - The PowerLine link rate is faster than 50 Mbps. 2 • Solid - The PowerLine link rate is transmitting data. • Off - The Ethernet port is linked but there is receiving electrical power. 1 Power LED • Blinking - D-Link DHP-541 User Manual 6 Indicates that the device is no Ethernet connection...

Manual
Page 7
D-Link DHP-541 User Manual 7 Section 1 - Refer to page 10 for one second to reset to factory default. 3 Simple Connect Button Press to the DHP-502AV Ethernet port. 2 Reset Button Press and hold the button for more information. Product Overview DHP-502AV Hardware Overview Connection 3 1 2 1 Ethernet Port Connect the CAT5 Ethernet cable to secure your network.
D-Link DHP-541 User Manual 7 Section 1 - Refer to page 10 for one second to reset to factory default. 3 Simple Connect Button Press to the DHP-502AV Ethernet port. 2 Reset Button Press and hold the button for more information. Product Overview DHP-502AV Hardware Overview Connection 3 1 2 1 Ethernet Port Connect the CAT5 Ethernet cable to secure your network.
Manual
Page 8
... LEDs 4 12 3 • Solid - The device is transmitting data. • Off - The device is not receiving electrical power. • Solid - The PowerLine link rate is transmitting data. • Off - D-Link DHP-541 User Manual 8 The device is between 50 Mbps and 80 Mbps. • Red - Indicates that the device is less than 80 Mbps...
... LEDs 4 12 3 • Solid - The device is transmitting data. • Off - The device is not receiving electrical power. • Solid - The PowerLine link rate is transmitting data. • Off - D-Link DHP-541 User Manual 8 The device is between 50 Mbps and 80 Mbps. • Red - Indicates that the device is less than 80 Mbps...

Manual
Page 9
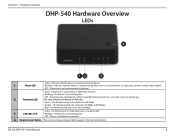
Section 1 - Product Overview DHP-540 Hardware Overview Connection 1 2 3 1 Ethernet Ports (1-4) Connect the CAT5 Ethernet cable to the selected Ethernet port in accordance to priority. 2 On/Off Button Press to turn the power on or off. 3 Power Receptor Receptor for the supplied power cord. D-Link DHP-541 User Manual 9
Section 1 - Product Overview DHP-540 Hardware Overview Connection 1 2 3 1 Ethernet Ports (1-4) Connect the CAT5 Ethernet cable to the selected Ethernet port in accordance to priority. 2 On/Off Button Press to turn the power on or off. 3 Power Receptor Receptor for the supplied power cord. D-Link DHP-541 User Manual 9
Manual
Page 10
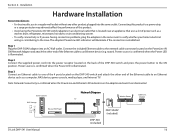
... Connect the supplied power cord into the power receptor located on the PowerLine AV 500 Network Adapter and attach the other end of the DHP-540 switch and press the power button to an Ethernet device (e.g. Power source is confirmed when the Power LED is established. router). ...Router 1 2 LAN 3 4 RESET INTERNET USB 5V - - - 3A Cable/ DSL Modem INTERNET Blu-ray DVD Player DHP-502AV (included) DHP-540 (included) D-Link DHP-541 User Manual 10 Step 1 Plug the DHP-502AV adapter into the same outlet. Step 3 Connect an Ethernet cable to one of the 4 ports located on the ...
... Connect the supplied power cord into the power receptor located on the PowerLine AV 500 Network Adapter and attach the other end of the DHP-540 switch and press the power button to an Ethernet device (e.g. Power source is confirmed when the Power LED is established. router). ...Router 1 2 LAN 3 4 RESET INTERNET USB 5V - - - 3A Cable/ DSL Modem INTERNET Blu-ray DVD Player DHP-502AV (included) DHP-540 (included) D-Link DHP-541 User Manual 10 Step 1 Plug the DHP-502AV adapter into the same outlet. Step 3 Connect an Ethernet cable to one of the 4 ports located on the ...

Manual
Page 11
...they are unplugged. The PowerLine AV 500 switch and adapter will use an identical encryption key for no more than two seconds. DHP-540 DHP-502AV D-Link DHP-541 User Manual 11 Section 2 - Installation Push Button Security Understanding PowerLine AV 500 Network Security The PowerLine AV 500 4-Port Gigabit...device is recommended to its default value by pressing the Reset button for network security purpose. PowerLine AV 500 4-Port Gigabit Switch (DHP-540) Press the Simple Connect button located on the top of the switch, press the Security Button on the adapter for each ...
...they are unplugged. The PowerLine AV 500 switch and adapter will use an identical encryption key for no more than two seconds. DHP-540 DHP-502AV D-Link DHP-541 User Manual 11 Section 2 - Installation Push Button Security Understanding PowerLine AV 500 Network Security The PowerLine AV 500 4-Port Gigabit...device is recommended to its default value by pressing the Reset button for network security purpose. PowerLine AV 500 4-Port Gigabit Switch (DHP-540) Press the Simple Connect button located on the top of the switch, press the Security Button on the adapter for each ...

Manual
Page 12
In the Run command box type "D:\autorun.exe", where D: represents the drive letter of your CD-ROM drive. Insert the D-Link DHP-541 CD into your CD-ROM. Click on your computer, click Start > Run. If the CD Autorun function does not automatically start , proceed to the next screen. D-Link DHP-541 User Manual 12 Section 3 - Configuration Using the Setup Wizard Follow the simple steps below to run the Setup Wizard to begin. If it does start on Install to guide you quickly through the installation process.
In the Run command box type "D:\autorun.exe", where D: represents the drive letter of your CD-ROM drive. Insert the D-Link DHP-541 CD into your CD-ROM. Click on your computer, click Start > Run. If the CD Autorun function does not automatically start , proceed to the next screen. D-Link DHP-541 User Manual 12 Section 3 - Configuration Using the Setup Wizard Follow the simple steps below to run the Setup Wizard to begin. If it does start on Install to guide you quickly through the installation process.
Manual
Page 13
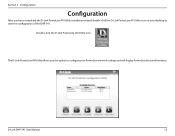
Section 3 - D-Link DHP-541 User Manual 13 Configuration Configuration After you the option to configure your desktop to start the configuration of the DHP-541. Double-click the D-Link PowerLine AV Utility icon The D-Link PowerLine AV Utility allows you have completed the D-Link PowerLine AV Utility installation wizard, double-click the D-Link PowerLine AV Utility icon on your PowerLine network settings and will display PowerLine device information.
Section 3 - D-Link DHP-541 User Manual 13 Configuration Configuration After you the option to configure your desktop to start the configuration of the DHP-541. Double-click the D-Link PowerLine AV Utility icon The D-Link PowerLine AV Utility allows you have completed the D-Link PowerLine AV Utility installation wizard, double-click the D-Link PowerLine AV Utility icon on your PowerLine network settings and will display PowerLine device information.

Manual
Page 14
Section 3 - Click the Setup Wizard icon. Configuration The setup wizard is designed to assist the installation of utility to start the installation process. D-Link DHP-541 User Manual 14 Click the Setup Wizard icon on the left corner of your PowerLine network.
Section 3 - Click the Setup Wizard icon. Configuration The setup wizard is designed to assist the installation of utility to start the installation process. D-Link DHP-541 User Manual 14 Click the Setup Wizard icon on the left corner of your PowerLine network.

Manual
Page 15
Power source is confirmed when the Power LED is on the device by pushing the power switch to continue. Click Next to your computer's Ethernet Port. 2. Configuration Plug the DHP-540 power cord into an electric outlet. Please ensure that the LED in front of the device. Connect the Ethernet cable from the LAN port to continue. 1. Click Next to the ON position located on the back of the device is illuminated. Section 3 - Plug the other end of the power cord to the back of the device and then turn on . D-Link DHP-541 User Manual 15
Power source is confirmed when the Power LED is on the device by pushing the power switch to continue. Click Next to your computer's Ethernet Port. 2. Configuration Plug the DHP-540 power cord into an electric outlet. Please ensure that the LED in front of the device. Connect the Ethernet cable from the LAN port to continue. 1. Click Next to the ON position located on the back of the device is illuminated. Section 3 - Plug the other end of the power cord to the back of the device and then turn on . D-Link DHP-541 User Manual 15

Manual
Page 16
Power source is confirmed when the Power LED is illuminated. D-Link DHP-541 User Manual 16 Section 3 - To encrypt your network, press the Simple Connect Button on the DHP-502AV adapter. The power LED will begin flashing. Configuration Plug in the DHP-502AV adapter into an outlet. Within 2 minutes, press the Simple Connect Button on top of the DHP-540 switch for 2 seconds.
Power source is confirmed when the Power LED is illuminated. D-Link DHP-541 User Manual 16 Section 3 - To encrypt your network, press the Simple Connect Button on the DHP-502AV adapter. The power LED will begin flashing. Configuration Plug in the DHP-502AV adapter into an outlet. Within 2 minutes, press the Simple Connect Button on top of the DHP-540 switch for 2 seconds.

Manual
Page 17
D-Link DHP-541 User Manual 17 Your PowerLine network is being secured. Section 3 - Configuration Please wait while the your PowerLine network is now secured, click Next to continue.
D-Link DHP-541 User Manual 17 Your PowerLine network is being secured. Section 3 - Configuration Please wait while the your PowerLine network is now secured, click Next to continue.

Manual
Page 18
Configuration Click Finish to complete the installation. D-Link DHP-541 User Manual 18 Section 3 -
Configuration Click Finish to complete the installation. D-Link DHP-541 User Manual 18 Section 3 -