
User Guide
Page 4
... recommend using any nearby favorite music. (SA10046), or Delphi portable audio FM radio without using the old SKYFi replay up to 30 minutes of live • More versatile vehicle mounting Vehicle Adaptor Kit (SA10002) with the enclosed connecting devices or other approved... accessories to ensure maximum performance. the SKYFi2 Receiver since the SA10102 • TuneSelect™. Caution: Your SKYFi2 must have a Vehicle by song title or artist ...
... recommend using any nearby favorite music. (SA10046), or Delphi portable audio FM radio without using the old SKYFi replay up to 30 minutes of live • More versatile vehicle mounting Vehicle Adaptor Kit (SA10002) with the enclosed connecting devices or other approved... accessories to ensure maximum performance. the SKYFi2 Receiver since the SA10102 • TuneSelect™. Caution: Your SKYFi2 must have a Vehicle by song title or artist ...

User Guide
Page 28
... case, marine antenna, mount, and FM modulator. Vehicle Adaptor Kit by Delphi (SA10102) Extends the antenna cable by Delphi (SA10103) Allows you to install SKYFi2 in places where additional antenna cable adaptors depending air cannot circulate around the unit. Consult your SKYFi2, any XM Home Antenna (SA10006) peripherals, and any solvents, chemicals, Use the Vehicle Kit to use SKYFi2 on a boat...
... case, marine antenna, mount, and FM modulator. Vehicle Adaptor Kit by Delphi (SA10102) Extends the antenna cable by Delphi (SA10103) Allows you to install SKYFi2 in places where additional antenna cable adaptors depending air cannot circulate around the unit. Consult your SKYFi2, any XM Home Antenna (SA10006) peripherals, and any solvents, chemicals, Use the Vehicle Kit to use SKYFi2 on a boat...

User Guide
Page 29
... does not have installed SKYFi2 in a with trouble-free performance check the 12V adaptor fuse by end-cap, it does not power on the display: NO SIGNAL Cause: the XM signal is not damaged or kinked. Troubleshooting 3. If required, replace for servicing. Make sure the vehicle antenna is mounted outside the vehicle or the home...
... does not have installed SKYFi2 in a with trouble-free performance check the 12V adaptor fuse by end-cap, it does not power on the display: NO SIGNAL Cause: the XM signal is not damaged or kinked. Troubleshooting 3. If required, replace for servicing. Make sure the vehicle antenna is mounted outside the vehicle or the home...

Installation Guide
Page 2
...: SKYFi2 Cradle Vehicle swivel mount Vent mount Cassette audio adaptor Nokia®-style button mount converter Figure 1. 2 This device complies with Part 15 of application or installation. This device may cause undesired operation. Changes or modifications to the unit not expressly approved by Delphi can void your authority to the fol- SKYFi2 Vehicle Adaptor Kit components. 12V power adaptor XM Vehicle...
...: SKYFi2 Cradle Vehicle swivel mount Vent mount Cassette audio adaptor Nokia®-style button mount converter Figure 1. 2 This device complies with Part 15 of application or installation. This device may cause undesired operation. Changes or modifications to the unit not expressly approved by Delphi can void your authority to the fol- SKYFi2 Vehicle Adaptor Kit components. 12V power adaptor XM Vehicle...

Installation Guide
Page 6
... If using the wireless FM modulator or the Delphi FM Direct Adaptor, set the SKYFi2 Receiver and the FM radio to XM channel 1. Warning: Do not install the mount where it or SKYFi2 could result in injury to correctly place SKYFi2 could block your vehicle and where you are provided as airbags. You ...should be able to XM Using Any FM Radio."...
... If using the wireless FM modulator or the Delphi FM Direct Adaptor, set the SKYFi2 Receiver and the FM radio to XM channel 1. Warning: Do not install the mount where it or SKYFi2 could result in injury to correctly place SKYFi2 could block your vehicle and where you are provided as airbags. You ...should be able to XM Using Any FM Radio."...

Installation Guide
Page 7
... used. Find a place where you to the back the bottom. Flat mount: Use the included onto the vent, and then posi- Be of two possible SKYFi2 Receiver and the SKYFi2 mount on the Vehicle Adaptor Kit. Do not install the rotated in one of the SKYFi2 vehicle cradle the clips must match each certain the air vent is...
... used. Find a place where you to the back the bottom. Flat mount: Use the included onto the vent, and then posi- Be of two possible SKYFi2 Receiver and the SKYFi2 mount on the Vehicle Adaptor Kit. Do not install the rotated in one of the SKYFi2 vehicle cradle the clips must match each certain the air vent is...

Installation Guide
Page 8
...apply pressure to air dry thoroughly. - Warm the vehicle mount adhesive pad by using a hair dryer or by placing the vehicle mount on . 8 c. ily repositioned when installed, so use care when choosing the location of your SKYFi2 Vehicle Adaptor after it will bond almost immediately. Do not...Dry the area with the enclosed surface preparation cleaning kit. Install the mount only if the temperature is installed. Allow to the vehicle's surface. Make sure you to adjust the angle of and placing the mount. Swivel mount: This mount allows you accurately place the pad on a ...
...apply pressure to air dry thoroughly. - Warm the vehicle mount adhesive pad by using a hair dryer or by placing the vehicle mount on . 8 c. ily repositioned when installed, so use care when choosing the location of your SKYFi2 Vehicle Adaptor after it will bond almost immediately. Do not...Dry the area with the enclosed surface preparation cleaning kit. Install the mount only if the temperature is installed. Allow to the vehicle's surface. Make sure you to adjust the angle of and placing the mount. Swivel mount: This mount allows you accurately place the pad on a ...

Installation Guide
Page 9
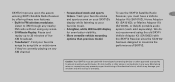
To vehicle dashboard Figure 4. Attach vehicle mount to back of SKYFi2 as in step 2. 8. Reassemble the system as shown. 6. Clip the SKYFi2 vehicle cradle 9 onto the vent or swivel mount (figures 3 and 4). 7. Attach the antenna as explained on page 11 and route the antenna cable as described on page 13. Figure 3. Vent mount.
To vehicle dashboard Figure 4. Attach vehicle mount to back of SKYFi2 as in step 2. 8. Reassemble the system as shown. 6. Clip the SKYFi2 vehicle cradle 9 onto the vent or swivel mount (figures 3 and 4). 7. Attach the antenna as explained on page 11 and route the antenna cable as described on page 13. Figure 3. Vent mount.

Installation Guide
Page 10
.... Caution: Never use a mild household 90-degree angle. Be careful from your dashboard by rubbing your fingers, pull the pad gently your vehicle. Lift one edge of a spoon. Once enough of dashboard surface, the adhesive the edge is loosened to clean the dashboard sharp tools that... could damage the mounting 1. This can easily be removed by following not to soften the adhesive. Repeat step 1. gently with can damage the unit or your...
.... Caution: Never use a mild household 90-degree angle. Be careful from your dashboard by rubbing your fingers, pull the pad gently your vehicle. Lift one edge of a spoon. Once enough of dashboard surface, the adhesive the edge is loosened to clean the dashboard sharp tools that... could damage the mounting 1. This can easily be removed by following not to soften the adhesive. Repeat step 1. gently with can damage the unit or your...

Installation Guide
Page 11
... avoided. Warning: Failure to you or others if it becomes detached during an accident. XM Antenna Setup For best reception, follow these recommendations: • Mount the XM Antenna on the metal surface of the vehicle roof in reception. Trunk mounting of the antenna is an alternative only for installation depending on many possible locations for...
... avoided. Warning: Failure to you or others if it becomes detached during an accident. XM Antenna Setup For best reception, follow these recommendations: • Mount the XM Antenna on the metal surface of the vehicle roof in reception. Trunk mounting of the antenna is an alternative only for installation depending on many possible locations for...

Installation Guide
Page 12
... interfere with the opening or closing of the convertible top and that the FM antenna may mount the antenna embedded in the windshield or rear off-center. Where exposed to wind, it is a hard- vehicle's FM antenna as close to the location cannot be identified, contact quality must be... mounted on the metal trunk lid at least 4" from the rear window. ribs, you use the wireless FM ...
... interfere with the opening or closing of the convertible top and that the FM antenna may mount the antenna embedded in the windshield or rear off-center. Where exposed to wind, it is a hard- vehicle's FM antenna as close to the location cannot be identified, contact quality must be... mounted on the metal trunk lid at least 4" from the rear window. ribs, you use the wireless FM ...

Installation Guide
Page 13
... the door jamb and into contact with a rough metal open- Figure 6. ing, use a rubber grommet to prevent damage. • For antennas mounted at the front or middle of routing the antenna cable. • Avoid kinking, crimping, twisting, or chafing the cable. If the cable comes into... the vehi- Route XM Antenna through the same grommet that carries power window and power lock wires. cle. (See figure 6.) In some vehicles, you may route the cable through windshield as shown.
... the door jamb and into contact with a rough metal open- Figure 6. ing, use a rubber grommet to prevent damage. • For antennas mounted at the front or middle of routing the antenna cable. • Avoid kinking, crimping, twisting, or chafing the cable. If the cable comes into... the vehi- Route XM Antenna through the same grommet that carries power window and power lock wires. cle. (See figure 6.) In some vehicles, you may route the cable through windshield as shown.

Installation Guide
Page 14
instead, route the cable under the weather seal near the bottom of the door. • For antennas mounted at the lowest part of the roof, route the cable into the trunk as shown. Rear Mounting Option Figure 7. Route XM Antenna wiring as shown in figure 7. Always use the weather seal at the rear of the trunk to force it through the grommet, do not try to reduce water leaks. • Use pre-existing wiring channels when possible. ly through ; 14 If the antenna cable does not fit easi-
instead, route the cable under the weather seal near the bottom of the door. • For antennas mounted at the lowest part of the roof, route the cable into the trunk as shown. Rear Mounting Option Figure 7. Route XM Antenna wiring as shown in figure 7. Always use the weather seal at the rear of the trunk to force it through the grommet, do not try to reduce water leaks. • Use pre-existing wiring channels when possible. ly through ; 14 If the antenna cable does not fit easi-