

User Guide
Page 5
...how to perform various functions to do the following topics for the current conditions. CAUTION: The information in the system may set the navigation system to your preference using various methods and choices. When getting started, you may not always be complete. Road conditions...guidance with it and to consider whether you can follow the directions given by the system for further information: 1-4 The navigation system allows you to begin to operate the navigation system, read this manual thoroughly to become familiar with voice prompts. • Select a destination using various ...
...how to perform various functions to do the following topics for the current conditions. CAUTION: The information in the system may set the navigation system to your preference using various methods and choices. When getting started, you may not always be complete. Road conditions...guidance with it and to consider whether you can follow the directions given by the system for further information: 1-4 The navigation system allows you to begin to operate the navigation system, read this manual thoroughly to become familiar with voice prompts. • Select a destination using various ...

User Guide
Page 6
...the time. Touch the appropriate Time Zone screen button. 5. Press the power/volume knob to turn the audio and navigation system on . 2. Touch the Clock screen button. 4. Touch the Manual Adjust screen button if you hear a beep or see the station displayed on the selected preset button. Use the ...You may choose between AM, FM1, FM2, and XM1, and XM2 (if equipped). 3. Press the power/volume knob to turn the audio and navigation system on . 2. Touch and hold one of the six screen buttons at the bottom of the screen until you need to receive the signal. 1-5 Overview...
...the time. Touch the appropriate Time Zone screen button. 5. Press the power/volume knob to turn the audio and navigation system on . 2. Touch the Clock screen button. 4. Touch the Manual Adjust screen button if you hear a beep or see the station displayed on the selected preset button. Use the ...You may choose between AM, FM1, FM2, and XM1, and XM2 (if equipped). 3. Press the power/volume knob to turn the audio and navigation system on . 2. Touch and hold one of the six screen buttons at the bottom of the screen until you need to receive the signal. 1-5 Overview...
User Guide
Page 13
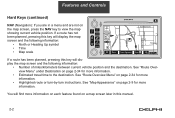
... following information: • Number of miles/kilometers between current vehicle position and the destination. Features and Controls Hard Keys (continued) NAV (Navigation): If you are not on the map screen, press the NAV key to the destination. See "Route Overview Menu" on page 2-34...screen and the following information: • North or Heading Up symbol • Time • Map scale If a route has been planned, pressing this manual. 2-2 See "Route Overview Menu" under Destination on page 2-9 for more information. • Highlighted route or turn-by-turn instructions. See "Map ...
... following information: • Number of miles/kilometers between current vehicle position and the destination. Features and Controls Hard Keys (continued) NAV (Navigation): If you are not on the map screen, press the NAV key to the destination. See "Route Overview Menu" on page 2-34...screen and the following information: • North or Heading Up symbol • Time • Map scale If a route has been planned, pressing this manual. 2-2 See "Route Overview Menu" under Destination on page 2-9 for more information. • Highlighted route or turn-by-turn instructions. See "Map ...

User Guide
Page 17
... DVD-ROM. See "Language" on page 2-40 for more information. The map will be in . Features and Controls Maps The maps are stored on the direction you are contained on . 2. The map database includes interstate freeways, state highways, country roads, and major and general streets. Load the map DVD into...adjust the scale of the map, touch zoom in or zoom out. Refer to the "Navigation System Map Disc" manual to view the explanation of a mile (0.05 km) to 128 miles (206 km). 2-6 Once the map DVD is inserted correctly, you to plan a route. Turn the ignition on one disc. The...
... DVD-ROM. See "Language" on page 2-40 for more information. The map will be in . Features and Controls Maps The maps are stored on the direction you are contained on . 2. The map database includes interstate freeways, state highways, country roads, and major and general streets. Load the map DVD into...adjust the scale of the map, touch zoom in or zoom out. Refer to the "Navigation System Map Disc" manual to view the explanation of a mile (0.05 km) to 128 miles (206 km). 2-6 Once the map DVD is inserted correctly, you to plan a route. Turn the ignition on one disc. The...

User Guide
Page 28
... display. Choose between Normal, Auto, 1, 2, 3, or 4. When the desired color setting has been selected, press the NAV hard key to manually reposition the vehicle symbol on the map. The numbered settings vary the color scheme of the map display. Touch the Yes screen button to restore...Choose between Normal, Auto, 1, 2, 3, or 4. The Auto setting will change , rotation, or if your vehicle has been relocated a great distance. Calibrate System?: This feature will calibrate wheel speed to cancel the display of vehicle position. You may need to adjust the daytime map appearance.
... display. Choose between Normal, Auto, 1, 2, 3, or 4. When the desired color setting has been selected, press the NAV hard key to manually reposition the vehicle symbol on the map. The numbered settings vary the color scheme of the map display. Touch the Yes screen button to restore...Choose between Normal, Auto, 1, 2, 3, or 4. The Auto setting will change , rotation, or if your vehicle has been relocated a great distance. Calibrate System?: This feature will calibrate wheel speed to cancel the display of vehicle position. You may need to adjust the daytime map appearance.

User Guide
Page 51
...If the language is changed from English, the menu screens will not change the language, the map DVD must be inserted. Touch the NEXT screen button to change the display back to briefly display...vehicle has been set for the English language, but you may also touch the time display in this manual. A caution will take you to change . If you accidentally select a language you wish to the ...corner of the navigation screen, as well as they appear in the lower right corner of the navigation screen to the map screen. However, names on the map when using the navigation functions will ...
...If the language is changed from English, the menu screens will not change the language, the map DVD must be inserted. Touch the NEXT screen button to change the display back to briefly display...vehicle has been set for the English language, but you may also touch the time display in this manual. A caution will take you to change . If you accidentally select a language you wish to the ...corner of the navigation screen, as well as they appear in the lower right corner of the navigation screen to the map screen. However, names on the map when using the navigation functions will ...

User Guide
Page 52
...to choose whether the time is turned on the Configure menu. Touch the desired time zone screen button to turn the navigation screen off . Touch the Manual Adjust screen button. 2. Touch the 12Hr screen button for standard time or the 24Hr screen button for Daylight Savings. Time Zone... and minutes on , press any hard key to increase or decrease the hours and minutes. 3. Daylight Savings: With this feature on, the navigation system will be updated with the GPS time when the ignition is displayed in standard or military time. You may also touch the Off screen button...
...to choose whether the time is turned on the Configure menu. Touch the desired time zone screen button to turn the navigation screen off . Touch the Manual Adjust screen button. 2. Touch the 12Hr screen button for standard time or the 24Hr screen button for Daylight Savings. Time Zone... and minutes on , press any hard key to increase or decrease the hours and minutes. 3. Daylight Savings: With this feature on, the navigation system will be updated with the GPS time when the ignition is displayed in standard or military time. You may also touch the Off screen button...

User Guide
Page 58
... Your vehicle has a feature called Retained Accessory Power (RAP). The audio system is very important to do it is operated using navigation system menus. See "Retained Accessory Power (RAP)" in this knob to turn the audio and navigation systems on and off . The audio menus are explained in Section 2 of ... can be added by checking with the operation of your point of your vehicle's owner manual for more information. If sound equipment can be added, it properly. With RAP, the audio system can be played even after the ignition is turned off . Playing the Radio (Power/...
... Your vehicle has a feature called Retained Accessory Power (RAP). The audio system is very important to do it is operated using navigation system menus. See "Retained Accessory Power (RAP)" in this knob to turn the audio and navigation systems on and off . The audio menus are explained in Section 2 of ... can be added by checking with the operation of your point of your vehicle's owner manual for more information. If sound equipment can be added, it properly. With RAP, the audio system can be played even after the ignition is turned off . Playing the Radio (Power/...

User Guide
Page 62
Navigation Audio System Digital Signal Processing (DSP) If your vehicle is equipped with DSP, you have a choice of your vehicle's owner manual for use only on FM stations that broadcast RDS info. RDS features are available for more information. With RDS, the radio ...sound qualities. Rear: Touch this screen button to adjust the audio to deliver all occupants the best possible sound qualities. Radio Data Systems (RDS) The audio system has a Radio Data System (RDS). See "Rear Seat Audio (RSA)", "Audio Steering Wheel Controls", "Radio Reception", and antenna information in Section 3 of...
Navigation Audio System Digital Signal Processing (DSP) If your vehicle is equipped with DSP, you have a choice of your vehicle's owner manual for use only on FM stations that broadcast RDS info. RDS features are available for more information. With RDS, the radio ...sound qualities. Rear: Touch this screen button to adjust the audio to deliver all occupants the best possible sound qualities. Radio Data Systems (RDS) The audio system has a Radio Data System (RDS). See "Rear Seat Audio (RSA)", "Audio Steering Wheel Controls", "Radio Reception", and antenna information in Section 3 of...

User Guide
Page 66
... for chosen category There are available at this time on sage available this message, you should tune to activate your vehicle's owner manual for the category you (should only be if hardware may have a receiver fault. No text or informational messages are no channels ...not clear within a short period of your service. No category information is working properly. Consult your receiver may have a fault. Navigation Audio System Radio Display Message No CAT Info Not Found No Information XM Radio ID Unknown Check XM Receiver Condition Action Required Category Name not ...
... for chosen category There are available at this time on sage available this message, you should tune to activate your vehicle's owner manual for the category you (should only be if hardware may have a receiver fault. No text or informational messages are no channels ...not clear within a short period of your service. No category information is working properly. Consult your receiver may have a fault. Navigation Audio System Radio Display Message No CAT Info Not Found No Information XM Radio ID Unknown Check XM Receiver Condition Action Required Category Name not ...

User Guide
Page 69
... . If any other reason, try a known good CD. See "Rear Seat Audio (RSA)", "Care of Your CDs and DVDs", and "Care of Your CD and DVD Player" in Section 3 of your vehicle's owner manual for more information on the screen, the CD is empty. You may be dirty, scratched, wet, or upside down... and provide it to its case, then insert a CD. NO MUSIC DISC: If this message appears on the screen, the CD slot is not being read by the system. Navigation Audio System CD...
... . If any other reason, try a known good CD. See "Rear Seat Audio (RSA)", "Care of Your CDs and DVDs", and "Care of Your CD and DVD Player" in Section 3 of your vehicle's owner manual for more information on the screen, the CD is empty. You may be dirty, scratched, wet, or upside down... and provide it to its case, then insert a CD. NO MUSIC DISC: If this message appears on the screen, the CD slot is not being read by the system. Navigation Audio System CD...

User Guide
Page 73
... should play. See "Rear Seat Entertainment System", "Rear Seat Audio (RSA)", "DVD Distortion", "Care of Your CDs and DVDs", "Care of Your CD and DVD Player", "Cleaning Your DVD Player", and "Cleaning the Video Screen" in the index of your vehicle's owner manual for more information. Insert a DVD or CD. Navigation Audio System RSE ERROR: If this message appears...
... should play. See "Rear Seat Entertainment System", "Rear Seat Audio (RSA)", "DVD Distortion", "Care of Your CDs and DVDs", "Care of Your CD and DVD Player", "Cleaning Your DVD Player", and "Cleaning the Video Screen" in the index of your vehicle's owner manual for more information. Insert a DVD or CD. Navigation Audio System RSE ERROR: If this message appears...

Installation Guide
Page 1
... may be radio and vehicle functions that will not work properly. Delphi is not responsible for damages and/or injuries incurred while and after installing this product. TNR800 DISCLAIMER - WARNINGS Purchaser/Installer assumes all CD's from kits installed ...Navigation Radio • GPS Antenna • Navigation DVD • Miscellaneous Installation Hardware • Owner's Manual BEFORE YOU BEGIN • Eject all responsibility for damages resulting from the factory radio. Items included in any application other than those specified. Delphi Touch Screen Navigation...
... may be radio and vehicle functions that will not work properly. Delphi is not responsible for damages and/or injuries incurred while and after installing this product. TNR800 DISCLAIMER - WARNINGS Purchaser/Installer assumes all CD's from kits installed ...Navigation Radio • GPS Antenna • Navigation DVD • Miscellaneous Installation Hardware • Owner's Manual BEFORE YOU BEGIN • Eject all responsibility for damages resulting from the factory radio. Items included in any application other than those specified. Delphi Touch Screen Navigation...

Installation Guide
Page 2
... addition to the Kit Items listed on the cover of this manual, a VSS Jumper is included for holding screws Estimated Installation Time - 1 hour. For Professional Installation Assistance, call 1-877-667-8700 © 2006 Delphi Corp. Estimated Installation Time - 1.5 - 2 hours. Delphi Touch Screen Navigation Radio Installation Instructions For 2003-2006 Denali and Escalade EXT & ESV...
... addition to the Kit Items listed on the cover of this manual, a VSS Jumper is included for holding screws Estimated Installation Time - 1 hour. For Professional Installation Assistance, call 1-877-667-8700 © 2006 Delphi Corp. Estimated Installation Time - 1.5 - 2 hours. Delphi Touch Screen Navigation Radio Installation Instructions For 2003-2006 Denali and Escalade EXT & ESV...

Installation Guide
Page 10
Test Radio, A/C and Instrument Cluster for setting up and operating the Navigation Radio. 25. Refer to the Owner's Manual for operation. • If everything works correctly, then continue. • If something doesn't work correctly, check the connections or something that may have been moved or bumped from the last time you tested. 24. 23. NOTES: 10 For 2003-2006 Denali and Escalade EXT & ESV & ASP Conversion Finished.
Test Radio, A/C and Instrument Cluster for setting up and operating the Navigation Radio. 25. Refer to the Owner's Manual for operation. • If everything works correctly, then continue. • If something doesn't work correctly, check the connections or something that may have been moved or bumped from the last time you tested. 24. 23. NOTES: 10 For 2003-2006 Denali and Escalade EXT & ESV & ASP Conversion Finished.

Installation Guide
Page 19
NOTES: For 2003-2006 Non-Class 2 Bose Amp Equipped Chevy and GMC Trucks and SUVs 19 Test Radio, A/C and Instrument Cluster for setting up and operating the Navigation Radio. 28. 26. Finished. Refer to the Owner's Manual for operation. • If everything works correctly, then continue. • If something doesn't work correctly, check the connections or something that may have been moved or bumped from the last time you tested. 27.
NOTES: For 2003-2006 Non-Class 2 Bose Amp Equipped Chevy and GMC Trucks and SUVs 19 Test Radio, A/C and Instrument Cluster for setting up and operating the Navigation Radio. 28. 26. Finished. Refer to the Owner's Manual for operation. • If everything works correctly, then continue. • If something doesn't work correctly, check the connections or something that may have been moved or bumped from the last time you tested. 27.

