
Installation Instructions
Page 1
K Installation Instructions Renaissance Wall Oven Models: EOR, MOR Part No. 102579 Rev.
K Installation Instructions Renaissance Wall Oven Models: EOR, MOR Part No. 102579 Rev.
Installation Instructions
Page 3
... problems, read these installation instructions with materials such as aerosol cans, away from the oven. Do not store flammable or explosive materials in overheating of the appliance. NEVER cover any other appliance. • Always contact the Dacor Customer Service Team about problems and conditions that COULD result in these installation instructions for...
... problems, read these installation instructions with materials such as aerosol cans, away from the oven. Do not store flammable or explosive materials in overheating of the appliance. NEVER cover any other appliance. • Always contact the Dacor Customer Service Team about problems and conditions that COULD result in these installation instructions for...
Installation Instructions
Page 4
... the literature accompanying it . WARNING • To prevent injury due to the unit tipping forward, secure the oven to children above the oven. They will be damaged. • Do not allow clothing to the oven. Dacor is turned off electric power to come into contact with the controls. A qualified service technician should perform all...
... the literature accompanying it . WARNING • To prevent injury due to the unit tipping forward, secure the oven to children above the oven. They will be damaged. • Do not allow clothing to the oven. Dacor is turned off electric power to come into contact with the controls. A qualified service technician should perform all...

Installation Instructions
Page 5
... (U.S.A. Friday 6:00 a.m. The model and serial number are printed on the appliance data plate. Pacific Time Web site: www.Dacor.com Dacor Distinctive Service (repairs under warranty call , have questions or problems with Chrome Trim B = Black Handle, Black Trim BK ... Renaissance Millennia Renaissance B NUMBER OF CONVECTION OVENS: S = Single D = Double C NUMBER OF OVENS: 1 = Single 2 = Double D WIDTH: 27 = 27 Inch 30 = 30 Inch 36 = 36 Inch E TRIM: SCH = Stainless Steel with installation, contact your Dacor dealer or the Dacor Customer Service Team. to expose the grill...
... (U.S.A. Friday 6:00 a.m. The model and serial number are printed on the appliance data plate. Pacific Time Web site: www.Dacor.com Dacor Distinctive Service (repairs under warranty call , have questions or problems with Chrome Trim B = Black Handle, Black Trim BK ... Renaissance Millennia Renaissance B NUMBER OF CONVECTION OVENS: S = Single D = Double C NUMBER OF OVENS: 1 = Single 2 = Double D WIDTH: 27 = 27 Inch 30 = 30 Inch 36 = 36 Inch E TRIM: SCH = Stainless Steel with installation, contact your Dacor dealer or the Dacor Customer Service Team. to expose the grill...
Installation Instructions
Page 6
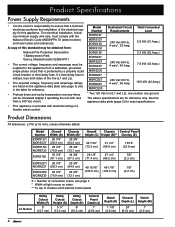
...be supplied to ensure that is protected by a properly sized circuit breaker or time-delay fuse. Model Number EORS127 MORS127 EORS130 MORS130 EORS136 EORS227 MORS227 EORS230 MORS230 EORD227 MORD227 EORD230 MORD230 Dedicated Circuit Total Connected Requirements Load 240 Vac 60 Hz, 4 ... 3) for this standard may be obtained from a dedicated, grounded, single phase circuit that a licensed electrician performs the installation of convection ovens, see page 3) and in a flexible metal conduit. Product Dimensions All tolerances: ±1/16 (±1.6 mm), unless otherwise stated. ...
...be supplied to ensure that is protected by a properly sized circuit breaker or time-delay fuse. Model Number EORS127 MORS127 EORS130 MORS130 EORS136 EORS227 MORS227 EORS230 MORS230 EORD227 MORD227 EORD230 MORD230 Dedicated Circuit Total Connected Requirements Load 240 Vac 60 Hz, 4 ... 3) for this standard may be obtained from a dedicated, grounded, single phase circuit that a licensed electrician performs the installation of convection ovens, see page 3) and in a flexible metal conduit. Product Dimensions All tolerances: ±1/16 (±1.6 mm), unless otherwise stated. ...

Installation Instructions
Page 7
L J C Top of chassis L B* Utility cutout F J G H D Light cover C Utility cutout Top of chassis B* F G H Light cover D A Control panel front Chassis Notch Side View K E M Conduit: 60" (152 cm) Long Top of chassis Single Oven 3 3/8" (8.6 cm) 1" (2.5 cm) 1" (2.5 cm) Light cover Control panel front Chassis Notch Side View A K E M Top of chassis Conduit: 60" (152 cm) Long Double Oven Epicure Millennia Handle is integral Handle Dimensions 21 1/8" 5 Design Specifications Product Dimensions All tolerances: ±1/16 (±1.6 mm), unless otherwise stated.
L J C Top of chassis L B* Utility cutout F J G H D Light cover C Utility cutout Top of chassis B* F G H Light cover D A Control panel front Chassis Notch Side View K E M Conduit: 60" (152 cm) Long Top of chassis Single Oven 3 3/8" (8.6 cm) 1" (2.5 cm) 1" (2.5 cm) Light cover Control panel front Chassis Notch Side View A K E M Top of chassis Conduit: 60" (152 cm) Long Double Oven Epicure Millennia Handle is integral Handle Dimensions 21 1/8" 5 Design Specifications Product Dimensions All tolerances: ±1/16 (±1.6 mm), unless otherwise stated.

Installation Instructions
Page 8
...Be certain that proper clearance is provided for the oven door when it is not installed level it needs to level the specifications on page 4, can be used as indicated. Model Number EORS127/ MORS127 EORS130/ MOCS130 EORS136 EORX227/ MORX227 Minimum Cabinet Width (N)... Depth: 24" (61.0 cm) 6 cabinet must be oven. Cabinet Dimensions Cabinet tolerances: +1/16 (1.6 mm), -0, unless otherwise stated. plywood is the respon- The top installed. Installation Specifications Installation Planning • Dacor recommends installing the electrical junction box in the one of the...
...Be certain that proper clearance is provided for the oven door when it is not installed level it needs to level the specifications on page 4, can be used as indicated. Model Number EORS127/ MORS127 EORS130/ MOCS130 EORS136 EORX227/ MORX227 Minimum Cabinet Width (N)... Depth: 24" (61.0 cm) 6 cabinet must be oven. Cabinet Dimensions Cabinet tolerances: +1/16 (1.6 mm), -0, unless otherwise stated. plywood is the respon- The top installed. Installation Specifications Installation Planning • Dacor recommends installing the electrical junction box in the one of the...

Installation Instructions
Page 9
...typical toe kick 9 5/8" (24.4 cm) recommended Double Wall Oven - to bottom of cabinet door Alternate electrical location 31 1/4" (79.4 cm) recommended 3/4" (1.9 cm) support platform 1" (2.5 cm) Min. to combustible floor 4" typical toe kick Single Wall Oven - N N 1" (2.5 cm) Min. to top of... cabinet door Recommended electrical location 1" (2.5 cm) min. to bottom of drawer face 4" typical toe kick Single Wall Oven - support platform to combustibles 1 1/2" (3.8 cm) typical counter 36" (91.4 cm) R P Recommended electrical location 3/4" (1.9 cm) 1"...
...typical toe kick 9 5/8" (24.4 cm) recommended Double Wall Oven - to bottom of cabinet door Alternate electrical location 31 1/4" (79.4 cm) recommended 3/4" (1.9 cm) support platform 1" (2.5 cm) Min. to combustible floor 4" typical toe kick Single Wall Oven - N N 1" (2.5 cm) Min. to top of... cabinet door Recommended electrical location 1" (2.5 cm) min. to bottom of drawer face 4" typical toe kick Single Wall Oven - support platform to combustibles 1 1/2" (3.8 cm) typical counter 36" (91.4 cm) R P Recommended electrical location 3/4" (1.9 cm) 1"...

Installation Instructions
Page 10
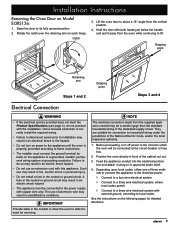
...; 8 Pull the door away from the horizontal. 4. Removing the Oven Door(s): All Models Except EORS136 See facing page for double ovens) color should match exhaust grill: Silver Dacor PN 83571, Black Dacor PN 83263) • Standard oven racks (single ovens come with 2, double • Dacor Stainless Steel Cleaner ovens come with either 4 or 5) (stainless steel models only) •...
...; 8 Pull the door away from the horizontal. 4. Removing the Oven Door(s): All Models Except EORS136 See facing page for double ovens) color should match exhaust grill: Silver Dacor PN 83571, Black Dacor PN 83263) • Standard oven racks (single ovens come with 2, double • Dacor Stainless Steel Cleaner ovens come with either 4 or 5) (stainless steel models only) •...
Installation Instructions
Page 11
...Code, and/or the local inspection authority. 1. Feed the appliance conduit into the electrical junction box and attach it away from the oven while continuing to do not proceed with external ground, according to its fully opened position. 2. Failure to lift. IMPORTANT Provide slack... wiring. • Failure to disconnect power prior to installation may be connected at the circuit breaker or fuse box. 2. Position the oven directly in unsatisfactory conditions. Depending upon local codes, utilize one of aluminum wire may result in fire, electric shock or personal injury. ...
...Code, and/or the local inspection authority. 1. Feed the appliance conduit into the electrical junction box and attach it away from the oven while continuing to do not proceed with external ground, according to its fully opened position. 2. Failure to lift. IMPORTANT Provide slack... wiring. • Failure to disconnect power prior to installation may be connected at the circuit breaker or fuse box. 2. Position the oven directly in unsatisfactory conditions. Depending upon local codes, utilize one of aluminum wire may result in fire, electric shock or personal injury. ...

Installation Instructions
Page 12
... wires coming out of the appliance conduit. 2. Connect the red wire from the appliance conduit to oven Three Wire Connection 10 Junction box Wire nut, 4 places Incoming power Junction box Wire nut, 3 places Conduit to oven Four Wire Connection Conduit to the green (ground) wire in the junction box. Separate the wires...
... wires coming out of the appliance conduit. 2. Connect the red wire from the appliance conduit to oven Three Wire Connection 10 Junction box Wire nut, 4 places Incoming power Junction box Wire nut, 3 places Conduit to oven Four Wire Connection Conduit to the green (ground) wire in the junction box. Separate the wires...

Installation Instructions
Page 13
... External Ground - Installation Instructions Connecting to the red (L2) supply wire in the junction box. 5. Incoming Power To connect the green appliance conduit wire to oven Three Wire Connection with an external grounding screw. Junction Box Wire Nut, 4 Places Separate 10 AWG Wire Minimum Clamp wire tightly to pipe Conduit to...
... External Ground - Installation Instructions Connecting to the red (L2) supply wire in the junction box. 5. Incoming Power To connect the green appliance conduit wire to oven Three Wire Connection with an external grounding screw. Junction Box Wire Nut, 4 Places Separate 10 AWG Wire Minimum Clamp wire tightly to pipe Conduit to...

Installation Instructions
Page 14
...be placed into the recessed area located along the rear vertical edge of the cavity opening in the cabinet platform or coils above the oven chassis. Install all of the provided #6 screws through all necessary safety precautions due to install it in the cabinet with the cabinet face... and the oven is centered within the cut out, using the upper edge of the oven or coiled above the oven chassis as gripping points. Installation Instructions Installing the Oven in the Cabinet warning • Failure to properly install the ...
...be placed into the recessed area located along the rear vertical edge of the cavity opening in the cabinet platform or coils above the oven chassis. Install all of the provided #6 screws through all necessary safety precautions due to install it in the cabinet with the cabinet face... and the oven is centered within the cut out, using the upper edge of the oven or coiled above the oven chassis as gripping points. Installation Instructions Installing the Oven in the Cabinet warning • Failure to properly install the ...

Installation Instructions
Page 15
...(2) provided screws. Open and close the door slowly and completely to ensure that it to the oven with the openings in a safety hazard and may occur. NOTE: To re-install the oven door on opposite sides and lift it until the bottom hinge arms drop fully into the hinge ...receptacles. Rotate both hinge catches toward the oven. Reinstalling the Oven Doors warning Failure to fully rotate the hinge catches will result in the oven frame. 2. Grasp the oven door on model EORS136, see page 14. 1. caution On double ovens, install the top door first to the fully opened position...
...(2) provided screws. Open and close the door slowly and completely to ensure that it to the oven with the openings in a safety hazard and may occur. NOTE: To re-install the oven door on opposite sides and lift it until the bottom hinge arms drop fully into the hinge ...receptacles. Rotate both hinge catches toward the oven. Reinstalling the Oven Doors warning Failure to fully rotate the hinge catches will result in the oven frame. 2. Grasp the oven door on model EORS136, see page 14. 1. caution On double ovens, install the top door first to the fully opened position...

Installation Instructions
Page 16
... or fuse box and check the electrical connections. • Turn on bottom of hinge 14 Lower lip of hinge receptacle note For double ovens, test oven operation for location. After approximately three (3) minutes, the upper heating element should glow red through the glass. 8. See page 3 for.... Notch on power and repeat the above heating test. • If the appliance still does not work, contact Dacor Distinctive Service at (877) 337-3226. If the oven does not operate properly, follow these troubleshooting steps: • Verify that the notch on the bottom of each hinge...
... or fuse box and check the electrical connections. • Turn on bottom of hinge 14 Lower lip of hinge receptacle note For double ovens, test oven operation for location. After approximately three (3) minutes, the upper heating element should glow red through the glass. 8. See page 3 for.... Notch on power and repeat the above heating test. • If the appliance still does not work, contact Dacor Distinctive Service at (877) 337-3226. If the oven does not operate properly, follow these troubleshooting steps: • Verify that the notch on the bottom of each hinge...
Installation Instructions
Page 17
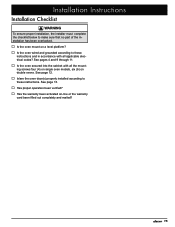
...to these instructions. See pages 4 and 9 through 11. □□ Is the oven secured into the cabinet with all the mounting screws four (4) on single oven models, six (6) on double ovens. Installation Instructions Installation Checklist warning To ensure proper installation, the installer must complete the checklist... below to make sure that no part of the installation has been overlooked. □□ Is the oven mount on a level platform? □□ Is the oven wired and grounded according to these instructions and in accordance with all applicable electrical codes?
...to these instructions. See pages 4 and 9 through 11. □□ Is the oven secured into the cabinet with all the mounting screws four (4) on single oven models, six (6) on double ovens. Installation Instructions Installation Checklist warning To ensure proper installation, the installer must complete the checklist... below to make sure that no part of the installation has been overlooked. □□ Is the oven mount on a level platform? □□ Is the oven wired and grounded according to these instructions and in accordance with all applicable electrical codes?
Use & Care Manuals
Page 1
P Use and Care Manual Renaissance Wall Oven For use with models: EOR, MOR Style varies Model EORD230 shown Ta b l e o f C o n t e n t s Important Safety Instructions 1 Getting to Know Your Oven 3 Operating Your Oven 8 Cooking Tips 21 Care and Cleaning 23 Part and Accessories 28 Before You Call for Service 29 Warranty and Service 31 Notes 32 Warranty Card Back Cover Part No. 102580 Rev.
P Use and Care Manual Renaissance Wall Oven For use with models: EOR, MOR Style varies Model EORD230 shown Ta b l e o f C o n t e n t s Important Safety Instructions 1 Getting to Know Your Oven 3 Operating Your Oven 8 Cooking Tips 21 Care and Cleaning 23 Part and Accessories 28 Before You Call for Service 29 Warranty and Service 31 Notes 32 Warranty Card Back Cover Part No. 102580 Rev.

Use & Care Manuals
Page 3
... the quality and performance of this appliance. Friday 6:00 a.m. Always contact the Dacor Customer Service Team about problems or conditions that could explode, such as aerosol cans away from the burners and oven. Do not store flammable or explosive materials in a safe place. Keep items ...that you have any other than warranty questions, call: Dacor Customer Service (800) 793-0093 (U.S.A. Pacific Time Web site: www.Dacor.com Have the complete model and serial...
... the quality and performance of this appliance. Friday 6:00 a.m. Always contact the Dacor Customer Service Team about problems or conditions that could explode, such as aerosol cans away from the burners and oven. Do not store flammable or explosive materials in a safe place. Keep items ...that you have any other than warranty questions, call: Dacor Customer Service (800) 793-0093 (U.S.A. Pacific Time Web site: www.Dacor.com Have the complete model and serial...
Use & Care Manuals
Page 4
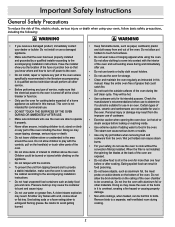
... damaged product, immediately contact your safety, do not use a damaged appliance. • Make sure that could be harmful to sit in the oven for cooking tasks expected of a home appliance as aluminum foil, the meat probe or cookie sheets on the handle(s) or touch other materials. ...Important Safety Instructions General Safety Precautions To reduce the risk of fire, electric shock, serious injury or death when using the oven. Eating spoiled food can cause serious burns or scalds. • Use only dry pot holders when removing food and cookware from the ...
... damaged product, immediately contact your safety, do not use a damaged appliance. • Make sure that could be harmful to sit in the oven for cooking tasks expected of a home appliance as aluminum foil, the meat probe or cookie sheets on the handle(s) or touch other materials. ...Important Safety Instructions General Safety Precautions To reduce the risk of fire, electric shock, serious injury or death when using the oven. Eating spoiled food can cause serious burns or scalds. • Use only dry pot holders when removing food and cookware from the ...

Use & Care Manuals
Page 5
... Control panel Single Oven Style varies Double Oven Style varies Control Panel - Double Oven with Convection Upper Oven Only Control Panel - Double Oven with Upper and Lower Convection Oven 3 Single Oven Control Panel - Getting to Know Your Oven Model Identification • The oven comes in three widths, 27 inches, 30 inches and 36 inches wide. • The oven also available...
... Control panel Single Oven Style varies Double Oven Style varies Control Panel - Double Oven with Convection Upper Oven Only Control Panel - Double Oven with Upper and Lower Convection Oven 3 Single Oven Control Panel - Getting to Know Your Oven Model Identification • The oven comes in three widths, 27 inches, 30 inches and 36 inches wide. • The oven also available...


