
Planning Guides
Page 1
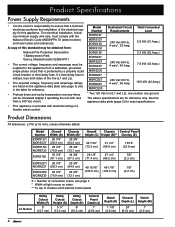
www.Dacor.com Phone: (800) 793-0093 1.1 Contact your local building department for exact...codes and ordinances during planning and installation. EOR, MOR Document # PG01-003 27", 30", 36" Wide, Single, Renaissance Wall Ovens Revised 05/25/10 Page 1/2 PLANNING GUIDE All tolerances: ±1/16" (±1.6 mm) unless otherwise stated L J C ...69.2 cm) (E) Control Panel Overlay 15/16" (23.8 cm) 7/8" (2.2 cm) Model Number EORS127 MORS127 EORS130 MORS130 EORS136 Dedicated Circuit Requirements 240 Vac 60 Hz., 4-wire***, 30 Amp. See the appliance data plate for further information. •...
www.Dacor.com Phone: (800) 793-0093 1.1 Contact your local building department for exact...codes and ordinances during planning and installation. EOR, MOR Document # PG01-003 27", 30", 36" Wide, Single, Renaissance Wall Ovens Revised 05/25/10 Page 1/2 PLANNING GUIDE All tolerances: ±1/16" (±1.6 mm) unless otherwise stated L J C ...69.2 cm) (E) Control Panel Overlay 15/16" (23.8 cm) 7/8" (2.2 cm) Model Number EORS127 MORS127 EORS130 MORS130 EORS136 Dedicated Circuit Requirements 240 Vac 60 Hz., 4-wire***, 30 Amp. See the appliance data plate for further information. •...

Planning Guides
Page 2
...(N) Minimum Cabinet Width (P) Minimum Cut Out Width (R) Minimum Cut out Height EORS127/ MORS127 EORS130/ MORS130 EORS136 27" (68.6 cm) 30" (76.2 cm) 36" (91.4 cm) 25 ½" (64...to combustible floor Single Wall Oven - Installed Under Counter 1" (2.5 cm) Min. Document # PG01-003 EOR, MOR 27", 30", 36" Wide, Single, Renaissance Wall Ovens All tolerances: +1/16",...cabinet door Alternate electrical location 31 1/4" (79.4 cm) recommended 4" typical toe kick Single Wall Oven - to change without notice. Cut Out Dimensions Specifications subject to combustibles 1 1/2" (3.8 cm)...
...(N) Minimum Cabinet Width (P) Minimum Cut Out Width (R) Minimum Cut out Height EORS127/ MORS127 EORS130/ MORS130 EORS136 27" (68.6 cm) 30" (76.2 cm) 36" (91.4 cm) 25 ½" (64...to combustible floor Single Wall Oven - Installed Under Counter 1" (2.5 cm) Min. Document # PG01-003 EOR, MOR 27", 30", 36" Wide, Single, Renaissance Wall Ovens All tolerances: +1/16",...cabinet door Alternate electrical location 31 1/4" (79.4 cm) recommended 4" typical toe kick Single Wall Oven - to change without notice. Cut Out Dimensions Specifications subject to combustibles 1 1/2" (3.8 cm)...
Installation Instructions
Page 1
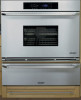
K Installation Instructions Renaissance Wall Oven Models: EOR, MOR Part No. 102579 Rev.
K Installation Instructions Renaissance Wall Oven Models: EOR, MOR Part No. 102579 Rev.
Installation Instructions
Page 3
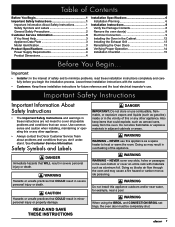
... such as gasoline) inside or in overheating of the appliance. warning WARNING - NEVER cover any slots, holes or passages in the oven bottom or cover an entire rack with the customer. • Customer: Keep these installation instructions completely and carefully before you don't ...that WILL result in severe personal injury or death. warning Do not install this or any other appliance. • Always contact the Dacor Customer Service Team about problems and conditions that could explode, such as a space heater to minimize problems, read these installation instructions for...
... such as gasoline) inside or in overheating of the appliance. warning WARNING - NEVER cover any slots, holes or passages in the oven bottom or cover an entire rack with the customer. • Customer: Keep these installation instructions completely and carefully before you don't ...that WILL result in severe personal injury or death. warning Do not install this or any other appliance. • Always contact the Dacor Customer Service Team about problems and conditions that could explode, such as a space heater to minimize problems, read these installation instructions for...
Installation Instructions
Page 4
... not install or use the oven to the cabinet using the supplied mounting screws. • Keep flammable items, such as aluminum foil, the meat probe, cookie sheets, etc. Do not install or use the appliance if the conduit is properly installed. • Do not use . Dacor is responsible to make sure... these installation instructions prior to use the door handle(s) to lift or move the oven. • A minimum of two people are in the top and bottom of the...
... not install or use the oven to the cabinet using the supplied mounting screws. • Keep flammable items, such as aluminum foil, the meat probe, cookie sheets, etc. Do not install or use the appliance if the conduit is properly installed. • Do not use . Dacor is responsible to make sure... these installation instructions prior to use the door handle(s) to lift or move the oven. • A minimum of two people are in the top and bottom of the...

Installation Instructions
Page 5
... requirements. • It can be seen through grate 3 and Canada) Monday - Friday 6:00 a.m. On double ovens, the plate is located behind the top grill. Model Identification If you call the Dacor Distinctive Service line. For repairs to 4:00 p.m. Dacor Customer Service Phone: (800) 793-0093 (U.S.A. EORS227SCH A BC D E A MODEL: EOR = MOR = Epicure Renaissance Millennia...
... requirements. • It can be seen through grate 3 and Canada) Monday - Friday 6:00 a.m. On double ovens, the plate is located behind the top grill. Model Identification If you call the Dacor Distinctive Service line. For repairs to 4:00 p.m. Dacor Customer Service Phone: (800) 793-0093 (U.S.A. EORS227SCH A BC D E A MODEL: EOR = MOR = Epicure Renaissance Millennia...
Installation Instructions
Page 6
... Hz, 4 wire*, 50 Amp. 10.0 kW (42 Amp.) * Two 120 Vac hot (L1 and L2), one neutral, one ground. Model Number EORS127/ MORS127 EORS130/ MORS130 EORS136 EORX227/ MORX227 Overall Width (A) 26 7/8" (68.3 cm) 29 7/8" (75.9 cm) 35 7/8" (91.1 cm) 26 7/8" (68.3 cm) EORX230/ 29 7/8" MORX230 (75.9 cm)... cm) 28 1/8" (71.4 cm) 27 1/4" (69.2 cm) 7/8" (2.2 cm) 49 15/16" 49 1/16" (126.8 cm) (124.6 cm) 7/8" (2.2 cm) X = Number of convection ovens, see page 3 * Width at light covers on the appliance data plate (see page 3) and in a flexible metal conduit. A copy of this appliance. See the appliance...
... Hz, 4 wire*, 50 Amp. 10.0 kW (42 Amp.) * Two 120 Vac hot (L1 and L2), one neutral, one ground. Model Number EORS127/ MORS127 EORS130/ MORS130 EORS136 EORX227/ MORX227 Overall Width (A) 26 7/8" (68.3 cm) 29 7/8" (75.9 cm) 35 7/8" (91.1 cm) 26 7/8" (68.3 cm) EORX230/ 29 7/8" MORX230 (75.9 cm)... cm) 28 1/8" (71.4 cm) 27 1/4" (69.2 cm) 7/8" (2.2 cm) 49 15/16" 49 1/16" (126.8 cm) (124.6 cm) 7/8" (2.2 cm) X = Number of convection ovens, see page 3 * Width at light covers on the appliance data plate (see page 3) and in a flexible metal conduit. A copy of this appliance. See the appliance...

Installation Instructions
Page 7
Design Specifications Product Dimensions All tolerances: ±1/16 (±1.6 mm), unless otherwise stated. L J C Top of chassis L B* Utility cutout F J G H D Light cover C Utility cutout Top of chassis B* F G H Light cover D A Control panel front Chassis Notch Side View K E M Conduit: 60" (152 cm) Long Top of chassis Single Oven 3 3/8" (8.6 cm) 1" (2.5 cm) 1" (2.5 cm) Light cover Control panel front Chassis Notch Side View A K E M Top of chassis Conduit: 60" (152 cm) Long Double Oven Epicure Millennia Handle is integral Handle Dimensions 21 1/8" 5
Design Specifications Product Dimensions All tolerances: ±1/16 (±1.6 mm), unless otherwise stated. L J C Top of chassis L B* Utility cutout F J G H D Light cover C Utility cutout Top of chassis B* F G H Light cover D A Control panel front Chassis Notch Side View K E M Conduit: 60" (152 cm) Long Top of chassis Single Oven 3 3/8" (8.6 cm) 1" (2.5 cm) 1" (2.5 cm) Light cover Control panel front Chassis Notch Side View A K E M Top of chassis Conduit: 60" (152 cm) Long Double Oven Epicure Millennia Handle is integral Handle Dimensions 21 1/8" 5

Installation Instructions
Page 8
... junction box so that the oven may deliver poor or inconsistent baking results. • Install the junction box in a location that all governing codes and ordinances during planning and installation. Model Number EORS127/ MORS127 EORS130/ MOCS130 EORS136 EORX227/ MORX227 Minimum Cabinet Width... All contact surfaces between the appliance and the this built-in appliance. Installation Specifications Installation Planning • Dacor recommends installing the electrical junction box in the one of convection ovens, see page 3 Minimum Cut out Height (R) 27 5/8" (70.2 cm) 27 ½" (69...
... junction box so that the oven may deliver poor or inconsistent baking results. • Install the junction box in a location that all governing codes and ordinances during planning and installation. Model Number EORS127/ MORS127 EORS130/ MOCS130 EORS136 EORX227/ MORX227 Minimum Cabinet Width... All contact surfaces between the appliance and the this built-in appliance. Installation Specifications Installation Planning • Dacor recommends installing the electrical junction box in the one of convection ovens, see page 3 Minimum Cut out Height (R) 27 5/8" (70.2 cm) 27 ½" (69...

Installation Instructions
Page 9
... of cabinet door Recommended electrical location R P 3/4" (1.9 cm) support platform R P 1" (2.5 cm) Min. Installed Under Counter 7 Cut Out Dimensions 4" typical toe kick 9 5/8" (24.4 cm) recommended Double Wall Oven - to combustibles 1 1/2" (3.8 cm) typical counter 36" (91.4 cm) R P Recommended electrical location 3/4" (1.9 cm) 1" (2.5 cm) Min. Installation Specifications Cabinet Dimensions Cabinet tolerances: +1/16 (1.6 mm), -0, unless otherwise stated...
... of cabinet door Recommended electrical location R P 3/4" (1.9 cm) support platform R P 1" (2.5 cm) Min. Installed Under Counter 7 Cut Out Dimensions 4" typical toe kick 9 5/8" (24.4 cm) recommended Double Wall Oven - to combustibles 1 1/2" (3.8 cm) typical counter 36" (91.4 cm) R P Recommended electrical location 3/4" (1.9 cm) 1" (2.5 cm) Min. Installation Specifications Cabinet Dimensions Cabinet tolerances: +1/16 (1.6 mm), -0, unless otherwise stated...

Installation Instructions
Page 10
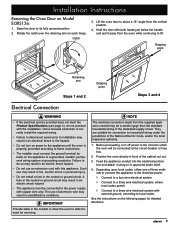
...incomplete appliance. Removing the Oven Door(s): All Models Except EORS136 See facing page for double ovens) color should match exhaust grill: Silver Dacor PN 83571, Black Dacor PN 83263) • Standard oven racks (single ovens come with 2, double • Dacor Stainless Steel Cleaner ovens come with either 4 or... attempt to about a 30˚ angle from model EORS136. 1. Lift the oven door to disengage the hinge catches with 2 mounting screws (2, #8 X 3/8", • Mounting screws (Wood, #6 X ¾, Dacor PN 83331, 4 for single ovens, 6 for removing door from the horizontal. 4. If...
...incomplete appliance. Removing the Oven Door(s): All Models Except EORS136 See facing page for double ovens) color should match exhaust grill: Silver Dacor PN 83571, Black Dacor PN 83263) • Standard oven racks (single ovens come with 2, double • Dacor Stainless Steel Cleaner ovens come with either 4 or... attempt to about a 30˚ angle from model EORS136. 1. Lift the oven door to disengage the hinge catches with 2 mounting screws (2, #8 X 3/8", • Mounting screws (Wood, #6 X ¾, Dacor PN 83331, 4 for single ovens, 6 for removing door from the horizontal. 4. If...
Installation Instructions
Page 11
...inspection authority. 1. Open the door to about a 15° angle from the supplied appliance conduit may result in unsatisfactory conditions. Lift the oven door to its fully opened position. 2. Hold the door with this appliance. note The electrical connection leads from the vertical position. 4. Call... • The installer must be connected at the circuit breaker or fuse box. 2. Rotate the catch over the retaining arm on Model EORS136: 1. IMPORTANT Provide slack in an electrical shock or fire hazard. • Do not turn off power to the circuit to slide forward...
...inspection authority. 1. Open the door to about a 15° angle from the supplied appliance conduit may result in unsatisfactory conditions. Lift the oven door to its fully opened position. 2. Hold the door with this appliance. note The electrical connection leads from the vertical position. 4. Call... • The installer must be connected at the circuit breaker or fuse box. 2. Rotate the catch over the retaining arm on Model EORS136: 1. IMPORTANT Provide slack in an electrical shock or fire hazard. • Do not turn off power to the circuit to slide forward...

Installation Instructions
Page 12
...green appliance conduit wire to the white (neutral) supply wire in the junction box. Connect the white wire from the appliance conduit to oven Three Wire Connection 10 Connect the green wire from the appliance conduit to the neutral (white) junction box wire unless local building codes ...permit. 1. Junction box Wire nut, 4 places Incoming power Junction box Wire nut, 3 places Conduit to oven Four Wire Connection Conduit to the green (ground) wire in the junction box. 3. Connect the red wire from the appliance conduit to the red...
...green appliance conduit wire to the white (neutral) supply wire in the junction box. Connect the white wire from the appliance conduit to oven Three Wire Connection 10 Connect the green wire from the appliance conduit to the neutral (white) junction box wire unless local building codes ...permit. 1. Junction box Wire nut, 4 places Incoming power Junction box Wire nut, 3 places Conduit to oven Four Wire Connection Conduit to the green (ground) wire in the junction box. 3. Connect the red wire from the appliance conduit to the red...

Installation Instructions
Page 13
... the red wire from the appliance conduit may be connected to the white (neutral) supply wire in the junction box. 5. Securely clamp the wire to oven Three Wire Connection with an external grounding screw. Separate the wires coming out of No. 4 copper wire. Any insulating materials must not be jumped, with...
... the red wire from the appliance conduit may be connected to the white (neutral) supply wire in the junction box. 5. Securely clamp the wire to oven Three Wire Connection with an external grounding screw. Separate the wires coming out of No. 4 copper wire. Any insulating materials must not be jumped, with...

Installation Instructions
Page 14
... is slid into the recessed area until the rear edge of the oven or coiled above the oven chassis as gripping points. Resting the oven on the cabinet-mounting platform, slide the oven into place. Do not trap the appliance cable between the oven case back and the rear wall. 12 Mounting Screws: Four (4) for... necessary safety precautions due to drill pilot holes in the cabinet through the opening in a fire hazard, cabinet damage or poor performance. • The wall oven is centered within the cut out, using the upper edge of the cavity opening and the bottom of the...
... is slid into the recessed area until the rear edge of the oven or coiled above the oven chassis as gripping points. Resting the oven on the cabinet-mounting platform, slide the oven into place. Do not trap the appliance cable between the oven case back and the rear wall. 12 Mounting Screws: Four (4) for... necessary safety precautions due to drill pilot holes in the cabinet through the opening in a fire hazard, cabinet damage or poor performance. • The wall oven is centered within the cut out, using the upper edge of the cavity opening and the bottom of the...

Installation Instructions
Page 15
... openings until the door hinges are aligned with the two (2) provided screws. Open and close the door slowly and completely to the oven and/or improper door alignment may cause personal injury due to reduce the chance of damaging the lower door during installation. Catch 13...Lower the door to the oven with the openings in a safety hazard and may occur. Installation Instructions Installing the Exhaust Grill With the oven secured to the cabinet, install the exhaust grill by mounting it to the fully opened position. Grasp the oven door on model EORS136, see page 14. 1. ...
... openings until the door hinges are aligned with the two (2) provided screws. Open and close the door slowly and completely to the oven and/or improper door alignment may cause personal injury due to reduce the chance of damaging the lower door during installation. Catch 13...Lower the door to the oven with the openings in a safety hazard and may occur. Installation Instructions Installing the Exhaust Grill With the oven secured to the cabinet, install the exhaust grill by mounting it to the fully opened position. Grasp the oven door on model EORS136, see page 14. 1. ...

Installation Instructions
Page 16
...resting the bottom of plastic that covers the stainless steel surfaces. 2. Slowly and carefully open the oven door. • Rotate the hinge locks toward the oven. 4. For stainless steel ovens, peel off the protective layer of the hinge arms on the hinge receptacles. Remove any packaging...8226; If the appliance still does not work, contact Dacor Distinctive Service at the circuit breaker or fuse box. 5. Installation Instructions Reinstalling the Oven Door (Cont) Verifying Proper Operation To re-install the oven door on model EORS136: warning To avoid personal injury or damage to the ...
...resting the bottom of plastic that covers the stainless steel surfaces. 2. Slowly and carefully open the oven door. • Rotate the hinge locks toward the oven. 4. For stainless steel ovens, peel off the protective layer of the hinge arms on the hinge receptacles. Remove any packaging...8226; If the appliance still does not work, contact Dacor Distinctive Service at the circuit breaker or fuse box. 5. Installation Instructions Reinstalling the Oven Door (Cont) Verifying Proper Operation To re-install the oven door on model EORS136: warning To avoid personal injury or damage to the ...
Installation Instructions
Page 17
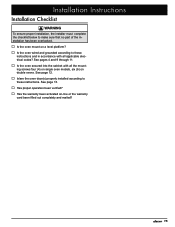
...activated on-line or the warranty card been filled out completely and mailed? 15 See page 12. □□ Is/are the oven door(s) properly installed according to these instructions. Installation Instructions Installation Checklist warning To ensure proper installation, the installer must complete the checklist ...below to make sure that no part of the installation has been overlooked. □□ Is the oven mount on a level platform? □□ Is the oven wired and grounded according to these instructions and in accordance with all applicable electrical codes?
...activated on-line or the warranty card been filled out completely and mailed? 15 See page 12. □□ Is/are the oven door(s) properly installed according to these instructions. Installation Instructions Installation Checklist warning To ensure proper installation, the installer must complete the checklist ...below to make sure that no part of the installation has been overlooked. □□ Is the oven mount on a level platform? □□ Is the oven wired and grounded according to these instructions and in accordance with all applicable electrical codes?
Use & Care Manuals
Page 1
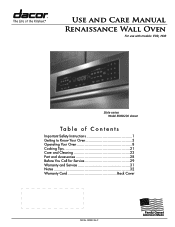
P Use and Care Manual Renaissance Wall Oven For use with models: EOR, MOR Style varies Model EORD230 shown Ta b l e o f C o n t e n t s Important Safety Instructions 1 Getting to Know Your Oven 3 Operating Your Oven 8 Cooking Tips 21 Care and Cleaning 23 Part and Accessories 28 Before You Call for Service 29 Warranty and Service 31 Notes 32 Warranty Card Back Cover Part No. 102580 Rev.
P Use and Care Manual Renaissance Wall Oven For use with models: EOR, MOR Style varies Model EORD230 shown Ta b l e o f C o n t e n t s Important Safety Instructions 1 Getting to Know Your Oven 3 Operating Your Oven 8 Cooking Tips 21 Care and Cleaning 23 Part and Accessories 28 Before You Call for Service 29 Warranty and Service 31 Notes 32 Warranty Card Back Cover Part No. 102580 Rev.

Use & Care Manuals
Page 3
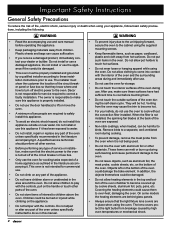
...the grill, below for future reference. Always contact the Dacor Customer Service Team about problems or conditions that could explode, such as aerosol cans away from the burners and oven. Do not store flammable or explosive materials in the oven bottom or cover an entire rack with the appliance. Visit... www.Dacor.com to heat or warm the room. If you don't understand. NEVER use ...
...the grill, below for future reference. Always contact the Dacor Customer Service Team about problems or conditions that could explode, such as aerosol cans away from the burners and oven. Do not store flammable or explosive materials in the oven bottom or cover an entire rack with the appliance. Visit... www.Dacor.com to heat or warm the room. If you don't understand. NEVER use ...


