
Planning Guides
Page 1
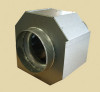
www.Dacor.com Phone: (800) 793-0093 9.5 Air Flow 3/16" (0.5 cm) 6 ½" (16.5 cm) 16 ½" (41.9 cm) 13 ¼" (33.6 cm) warning • Observe all appliances according to change without notice. ILHSF8, ILHSF10 Document # PG09 - 002 In-line Blower Revised 12/09/09 ...38.7 cm) 2 1/4" (5.7 cm) 16" (40.6 cm) 10" REF (25.4 cm) 10" REF (25.4 cm) 8 1/4" (21.0 cm) 15 3/4" (40.0 cm) ILHSF10 Overall Dimensions 10 3/4" (27.3 cm) Specifications subject to accompanying installation instructions. Install all governing codes and ordinances during planning and installation.
www.Dacor.com Phone: (800) 793-0093 9.5 Air Flow 3/16" (0.5 cm) 6 ½" (16.5 cm) 16 ½" (41.9 cm) 13 ¼" (33.6 cm) warning • Observe all appliances according to change without notice. ILHSF8, ILHSF10 Document # PG09 - 002 In-line Blower Revised 12/09/09 ...38.7 cm) 2 1/4" (5.7 cm) 16" (40.6 cm) 10" REF (25.4 cm) 10" REF (25.4 cm) 8 1/4" (21.0 cm) 15 3/4" (40.0 cm) ILHSF10 Overall Dimensions 10 3/4" (27.3 cm) Specifications subject to accompanying installation instructions. Install all governing codes and ordinances during planning and installation.

Planning Guides
Page 2
... a hood or raised vent that has an internal blower. • DO NOT install more than one blower to the unit overheating: • DO NOT install this blower only with approved Dacor hoods/ vents. All models are for exact specifications. Document # PG09 - 002 ILHSF8, ILHSF10 In-line Blowers Revised 12/09/09 Page 2/2 PLANNING GUIDE Model Number ILHSF8...
... a hood or raised vent that has an internal blower. • DO NOT install more than one blower to the unit overheating: • DO NOT install this blower only with approved Dacor hoods/ vents. All models are for exact specifications. Document # PG09 - 002 ILHSF8, ILHSF10 In-line Blowers Revised 12/09/09 Page 2/2 PLANNING GUIDE Model Number ILHSF8...

Installation Instructions
Page 1
To complete this blower, the hood assembly must be purchased separately. Suitable for use with solid state controls. E Suitable for use in a household cooking area. See the hood installation instructions to determine suitability. In-Line Blower Models: ILHSF8, ILHSF10 Installation Instructions Part No. 103719 Rev.
To complete this blower, the hood assembly must be purchased separately. Suitable for use with solid state controls. E Suitable for use in a household cooking area. See the hood installation instructions to determine suitability. In-Line Blower Models: ILHSF8, ILHSF10 Installation Instructions Part No. 103719 Rev.

Installation Instructions
Page 2
... 7 Notes 8 Before You Begin... and Canada) Monday - Friday 6:00 a.m. Dacor Customer Service Phone: (800) 793-0093 (U.S.A. Pacific Time Model Identification ILHSF8 = 8-inch in-line blower ILHSF10 = 10-inch in-line blower All specifications subject to specifications. © 2008 Dacor, all rights reserved. If you call the Dacor Distinctive Service line. The model and serial number are printed on the...
... 7 Notes 8 Before You Begin... and Canada) Monday - Friday 6:00 a.m. Dacor Customer Service Phone: (800) 793-0093 (U.S.A. Pacific Time Model Identification ILHSF8 = 8-inch in-line blower ILHSF10 = 10-inch in-line blower All specifications subject to specifications. © 2008 Dacor, all rights reserved. If you call the Dacor Distinctive Service line. The model and serial number are printed on the...

Installation Instructions
Page 4
...cigarettes or napkins, to prevent power from entering the home. Follow the wiring diagrams carefully in the hood or in -line blower, make sure that the service panel is not intended for further information. • Install or locate this appliance only in... with these installation instructions and the Dacor hood or downdraft vent installation instructions. Improper installation, adjustment, alteration, service or maintenance can cause serious personal injury or property damage. • Before installing or servicing the in -line blower installation instructions to the wiring is ...
...cigarettes or napkins, to prevent power from entering the home. Follow the wiring diagrams carefully in the hood or in -line blower, make sure that the service panel is not intended for further information. • Install or locate this appliance only in... with these installation instructions and the Dacor hood or downdraft vent installation instructions. Improper installation, adjustment, alteration, service or maintenance can cause serious personal injury or property damage. • Before installing or servicing the in -line blower installation instructions to the wiring is ...

Installation Instructions
Page 6
...is performed by a qualified electrician. Model Number ILHSF8 Weight 22 lbs. (10 kg.) ILHSF10 31 lbs. (14 kg.) • Install the blower so that is supplied via 1/2" 3-wire conduit (not included) by an approved Dacor hood or raised vent. The circuit must be supplied to the hood or raised vent ***... the data on each end by a 1/2" UL certified strain relief. General System Design Notes • Wire the remote blower to accommodate screws 2" in -line blower on by the hood or raised vent. • Consult the installation instructions for the raised vent or hood for complete layout ...
...is performed by a qualified electrician. Model Number ILHSF8 Weight 22 lbs. (10 kg.) ILHSF10 31 lbs. (14 kg.) • Install the blower so that is supplied via 1/2" 3-wire conduit (not included) by an approved Dacor hood or raised vent. The circuit must be supplied to the hood or raised vent ***... the data on each end by a 1/2" UL certified strain relief. General System Design Notes • Wire the remote blower to accommodate screws 2" in -line blower on by the hood or raised vent. • Consult the installation instructions for the raised vent or hood for complete layout ...

Installation Instructions
Page 7
...fuse box. 3. Remove the electrical access cover from the in -line blower parallel to the duct work. 2. Blower Mounting 1. Knock-out BLK BLU GRN N1 L1 GND Conduit Blower Mounting surface 5 See the Electrical Supply Requirements section for complete ... licensed electrician to correct the situation before connecting the blower to the power source. Hold the blower steady in -line blower location). Remove one of the blower. 5. Installation Instructions Installation Preparation Verify Package Contents • Blower assembly Parts Required • Four (4) #10 X ...
...fuse box. 3. Remove the electrical access cover from the in -line blower parallel to the duct work. 2. Blower Mounting 1. Knock-out BLK BLU GRN N1 L1 GND Conduit Blower Mounting surface 5 See the Electrical Supply Requirements section for complete ... licensed electrician to correct the situation before connecting the blower to the power source. Hold the blower steady in -line blower location). Remove one of the blower. 5. Installation Instructions Installation Preparation Verify Package Contents • Blower assembly Parts Required • Four (4) #10 X ...