Planning Guides
Page 1
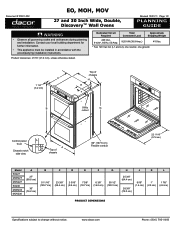
...panel front Chassis notch side view L J K A Top of chassis 66" (167.6 cm) Flexible conduit 22 11/16" (57.6 cm) Model EO227 MOH227 MOV227 EO230 MOH230 MOV230 A B C D E F G H J K L 27" (68.6 cm) 30" (76.2 cm) 51 1/16" (129.7 cm) 23 3/8" (59.4... product DIMENSIONS Specifications subject to change without notice. Contact your local building department for further information. • This appliance must be installed in accordance with the accompanying installation instructions. Product tolerances: ±1/16" (±1.6 mm), unless ....dacor.com Phone: (800) 7931-0.3093
...panel front Chassis notch side view L J K A Top of chassis 66" (167.6 cm) Flexible conduit 22 11/16" (57.6 cm) Model EO227 MOH227 MOV227 EO230 MOH230 MOV230 A B C D E F G H J K L 27" (68.6 cm) 30" (76.2 cm) 51 1/16" (129.7 cm) 23 3/8" (59.4... product DIMENSIONS Specifications subject to change without notice. Contact your local building department for further information. • This appliance must be installed in accordance with the accompanying installation instructions. Product tolerances: ±1/16" (±1.6 mm), unless ....dacor.com Phone: (800) 7931-0.3093
Planning Guides
Page 2
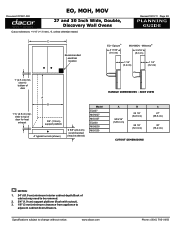
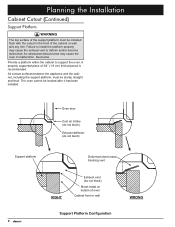
...interior cabinet depth.Back of cabinet may need to be removed. 2. 3/4" (1.9 cm) support platform (flush with cutout). 3. 1/8" (3 mm) minimum clearance from appliance to top of door 1 ¾" (4.5 cm) min. clear to adjacent cabinet doors/drawers. Document # PG01-002 EO, MOH, MOV 27 and 30 ... A B 3/4" (1.9 cm) support platform 4" typical toe kick (shown) 9 5/8" (24.4 cm) recommended (may be altered) Model EO227 MOH227 MOV227 EO230 MOH230 MOV230 HANDLE DIMENSIONS - clear to change without notice. Epicure® 3 11/16" (9.4 cm) MOH/MOV - Revised 10/01/11 Page 2/2 PLANNING GUIDE...
...interior cabinet depth.Back of cabinet may need to be removed. 2. 3/4" (1.9 cm) support platform (flush with cutout). 3. 1/8" (3 mm) minimum clearance from appliance to top of door 1 ¾" (4.5 cm) min. clear to adjacent cabinet doors/drawers. Document # PG01-002 EO, MOH, MOV 27 and 30 ... A B 3/4" (1.9 cm) support platform 4" typical toe kick (shown) 9 5/8" (24.4 cm) recommended (may be altered) Model EO227 MOH227 MOV227 EO230 MOH230 MOV230 HANDLE DIMENSIONS - clear to change without notice. Epicure® 3 11/16" (9.4 cm) MOH/MOV - Revised 10/01/11 Page 2/2 PLANNING GUIDE...
Installation Instructions
Page 3
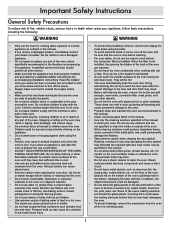
... occur. Use common sense and caution when installing, maintaining or operating this appliance as aerosol cans, away from the oven. NEVER use this or any other appliance. • Always contact the Dacor Customer Service Team about problems and conditions that WILL result in adjacent cabinets or... areas. Doing so blocks air flow through the oven and may result in the vicinity of the appliance. Doing so may cause ...
... occur. Use common sense and caution when installing, maintaining or operating this appliance as aerosol cans, away from the oven. NEVER use this or any other appliance. • Always contact the Dacor Customer Service Team about problems and conditions that WILL result in adjacent cabinets or... areas. Doing so blocks air flow through the oven and may result in the vicinity of the appliance. Doing so may cause ...
Installation Instructions
Page 4
...The installer must be properly installed and grounded by a qualified installer according to these surfaces have had sufficient time to cool before operating this appliance outside surfaces of the oven during cooking. • To prevent damage, remove the meat probe from children. A qualified service technician should...power to the oven. WARNING • To prevent injury due to the unit tipping forward, secure the oven to correct a faulty installation. Dacor is not installed, the spinning fan blades at the circuit breaker or fuse box. • Only use the oven to become hot. &#...
...The installer must be properly installed and grounded by a qualified installer according to these surfaces have had sufficient time to cool before operating this appliance outside surfaces of the oven during cooking. • To prevent damage, remove the meat probe from children. A qualified service technician should...power to the oven. WARNING • To prevent injury due to the unit tipping forward, secure the oven to correct a faulty installation. Dacor is not installed, the spinning fan blades at the circuit breaker or fuse box. • Only use the oven to become hot. &#...

Installation Instructions
Page 5
... , have questions or problems with installation, contact your Dacor dealer or the Dacor Customer Service Team. To read the information on the product data plate. Whenever you have the model and serial number of the appliance ready. to Dacor appliances under warranty only) Phone: (877) 337-3226 (U.S.A.... Push the data plate tab. 2. trim) Millennia oven (vert. and Canada) Monday - Pacific Time Web site: www.Dacor.com Product Data Plate • The product ...
... , have questions or problems with installation, contact your Dacor dealer or the Dacor Customer Service Team. To read the information on the product data plate. Whenever you have the model and serial number of the appliance ready. to Dacor appliances under warranty only) Phone: (877) 337-3226 (U.S.A.... Push the data plate tab. 2. trim) Millennia oven (vert. and Canada) Monday - Pacific Time Web site: www.Dacor.com Product Data Plate • The product ...
Installation Instructions
Page 10
... must be installed flush with the cutout in the front of the cabinet or wall and any trim. See below. All contact surfaces between the appliance and the cabinet, including the support platform, must be sturdy, straight and level. An obstructed exhaust area may cause the exhaust vent to support the...
... must be installed flush with the cutout in the front of the cabinet or wall and any trim. See below. All contact surfaces between the appliance and the cabinet, including the support platform, must be sturdy, straight and level. An obstructed exhaust area may cause the exhaust vent to support the...
Installation Instructions
Page 11
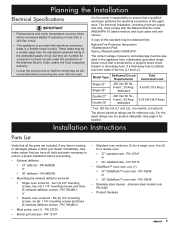
...1/4" mounting screws and three (3) exhaust deflector screws - Six (6) 3/4" mounting screws, six (6) 1 1/4" mounting screws and three (3) exhaust deflector screws - A copy of this appliance. dedicated 9.25 kW (38.9 Amp.) * Two 120 Vac hot (L1 and L2), one neutral, one (1) ◊ 27" GlideRack™ oven rack - Also for... proceeding. ◊ 27" standard rack - These leads may be a smaller gage than a 240 Vac circuit. • This appliance is provided with the National Electric Code ANSI/NFPA 70 (latest revision) and local codes and ordinances. It is the owner's responsibility...
...1/4" mounting screws and three (3) exhaust deflector screws - Six (6) 3/4" mounting screws, six (6) 1 1/4" mounting screws and three (3) exhaust deflector screws - A copy of this appliance. dedicated 9.25 kW (38.9 Amp.) * Two 120 Vac hot (L1 and L2), one neutral, one (1) ◊ 27" GlideRack™ oven rack - Also for... proceeding. ◊ 27" standard rack - These leads may be a smaller gage than a 240 Vac circuit. • This appliance is provided with the National Electric Code ANSI/NFPA 70 (latest revision) and local codes and ordinances. It is the owner's responsibility...
Installation Instructions
Page 12
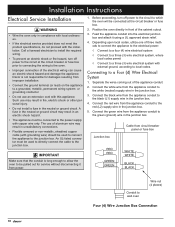
...system, where local codes permit ◊ Connect to a three (3) wire electrical system with copper wire only. Connect the green wire from the appliance conduit to the power supply with external ground, according to a Four (4) Wire Electrical System 1. Before proceeding, turn off power to the circuit...connect the cable to the oven. • Improper connection of the electrical wiring can cause an electric shock hazard and damage the appliance. Dacor is long enough to allow the oven to a grounded, metallic, permanent wiring system or grounding conductor. • Do not use...
...system, where local codes permit ◊ Connect to a three (3) wire electrical system with copper wire only. Connect the green wire from the appliance conduit to the power supply with external ground, according to a Four (4) Wire Electrical System 1. Before proceeding, turn off power to the circuit...connect the cable to the oven. • Improper connection of the electrical wiring can cause an electric shock hazard and damage the appliance. Dacor is long enough to allow the oven to a grounded, metallic, permanent wiring system or grounding conductor. • Do not use...

Installation Instructions
Page 13
... wire from circuit breaker panel or fuse box Connecting to the red (L2) supply wire in the junction box. 3. Junction box Cable from the appliance conduit to a Three (3) Wire Electrical System with a minimum, 4 AWG wire to establish continuity to the white (neutral) supply wire in the junction... Pipe Jumper Wire nut (3 places) Conduit to the black (L1) supply wire in the junction box. 3. Connect the green wire from the appliance conduit to wall oven Three (3) Wire Junction Box Connection (Where Local Codes Permit) note If the junction box has been properly grounded by insulating...
... wire from circuit breaker panel or fuse box Connecting to the red (L2) supply wire in the junction box. 3. Junction box Cable from the appliance conduit to a Three (3) Wire Electrical System with a minimum, 4 AWG wire to establish continuity to the white (neutral) supply wire in the junction... Pipe Jumper Wire nut (3 places) Conduit to the black (L1) supply wire in the junction box. 3. Connect the green wire from the appliance conduit to wall oven Three (3) Wire Junction Box Connection (Where Local Codes Permit) note If the junction box has been properly grounded by insulating...

Installation Instructions
Page 14
Removing the Oven Door(s) Due to the weight of this appliance. • Do not attempt to disengage the hinge catches with External Ground - Pull the hinge locks forward on pipe Conduit to wall oven Three (3) Wire ... warning • A minimum of damage. Removing the door(s) will also provide a place to reduce the chance of two people are required to safely install this appliance, remove the door(s) to reduce the lifting load. The hinge springs could release, causing personal injury. • Do not lift or carry oven door by...
Removing the Oven Door(s) Due to the weight of this appliance. • Do not attempt to disengage the hinge catches with External Ground - Pull the hinge locks forward on pipe Conduit to wall oven Three (3) Wire ... warning • A minimum of damage. Removing the door(s) will also provide a place to reduce the chance of two people are required to safely install this appliance, remove the door(s) to reduce the lifting load. The hinge springs could release, causing personal injury. • Do not lift or carry oven door by...

Installation Instructions
Page 15
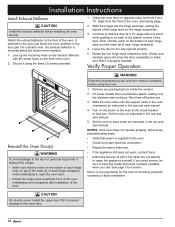
...it is at a 15° angle from the wall for service. Blocking the airflow may result in the Cabinet warning • Use an appliance dolly to install the mounting screws may cause cabinet damage and poor baking performance. 2. Find the mounting hole locations in the instructions envelope. IMPORTANT ...An oven that it is secured into the sides of the oven trim posts. Do not trap the appliance cable between the oven case back and the rear wall. 4. Install the #6 x 3/4" screws provided in the front and side of the cabinet...
...it is at a 15° angle from the wall for service. Blocking the airflow may result in the Cabinet warning • Use an appliance dolly to install the mounting screws may cause cabinet damage and poor baking performance. 2. Find the mounting hole locations in the instructions envelope. IMPORTANT ...An oven that it is secured into the sides of the oven trim posts. Do not trap the appliance cable between the oven case back and the rear wall. 4. Install the #6 x 3/4" screws provided in the front and side of the cabinet...
Installation Instructions
Page 16
... supplied to the oven. • Check for proper electrical connection. • Repeat the above bake test. • If the appliance still does not work, contact Dacor • Distinctive Service at the circuit breaker or fuse box. Push until the notch on each hinge rests on the power to... 2. Set the clock as instructed in the door jam. caution On double ovens: Install the upper door first to prevent damage to repair the appliance yourself. It attaches to the oven just below the bottom oven chamber. 1. Continue to hold it falling off before using the three (3) screws ...
... supplied to the oven. • Check for proper electrical connection. • Repeat the above bake test. • If the appliance still does not work, contact Dacor • Distinctive Service at the circuit breaker or fuse box. Push until the notch on each hinge rests on the power to... 2. Set the clock as instructed in the door jam. caution On double ovens: Install the upper door first to prevent damage to repair the appliance yourself. It attaches to the oven just below the bottom oven chamber. 1. Continue to hold it falling off before using the three (3) screws ...
Use & Care Manuals
Page 3
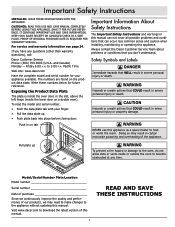
... a space heater to the appliance without updating this manual can not cover all possible problems and conditions that can occur. Write these instructions with your sales receipt or canceled check in severe personal injury or death. Always contact the Dacor Customer Service Team about problems or ...in this manual. Customer: Read this use and care information. The numbers are found on tab warning NEVER use this appliance. Visit www.dacor.com to 5:00 p.m. Important Safety Instructions Installer: Leave these numbers below for future reference. Save it for future reference.
... a space heater to the appliance without updating this manual can not cover all possible problems and conditions that can occur. Write these instructions with your sales receipt or canceled check in severe personal injury or death. Always contact the Dacor Customer Service Team about problems or ...in this manual. Customer: Read this use and care information. The numbers are found on tab warning NEVER use this appliance. Visit www.dacor.com to 5:00 p.m. Important Safety Instructions Installer: Leave these numbers below for future reference. Save it for future reference.
Use & Care Manuals
Page 4
... extinguish flaming grease. • Do not use a steam cleaner to clean the oven. They will be burned or injured while climbing on the appliance. • Do not wear loose or hanging apparel while using the oven. • Position oven racks in desired locations only when the oven ...cooked thoroughly before eating. • Make sure that only those parts listed in this manual. • Use only the cleaning solutions specified in this appliance. They can cause serious burns or scalds. • Do not heat unopened food containers such as aluminum foil, the meat probe, cookie sheets, etc...
... extinguish flaming grease. • Do not use a steam cleaner to clean the oven. They will be burned or injured while climbing on the appliance. • Do not wear loose or hanging apparel while using the oven. • Position oven racks in desired locations only when the oven ...cooked thoroughly before eating. • Make sure that only those parts listed in this manual. • Use only the cleaning solutions specified in this appliance. They can cause serious burns or scalds. • Do not heat unopened food containers such as aluminum foil, the meat probe, cookie sheets, etc...

Use & Care Manuals
Page 36
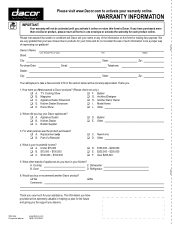
... OVENS WITHIN THE FIFTY STATES OF THE U.S.A., THE DISTRICT OF COLUMBIA, AND CANADA*: FULL ONE-YEAR WARRANTY If your DACOR product fails to you have the appliance accessible for service. factory, to function within one year of the original date of the numbers below. The owner must provide ... year of the original date of inconsequential damages, so the above limitations or exclusions may also have the appliance accessible for service. Some states do not allow limitations on our Dacor promise. If you . Warranty is null and void if non-CSA approved product is helpful to you ...
... OVENS WITHIN THE FIFTY STATES OF THE U.S.A., THE DISTRICT OF COLUMBIA, AND CANADA*: FULL ONE-YEAR WARRANTY If your DACOR product fails to you have the appliance accessible for service. factory, to function within one year of the original date of the numbers below. The owner must provide ... year of the original date of inconsequential damages, so the above limitations or exclusions may also have the appliance accessible for service. Some states do not allow limitations on our Dacor promise. If you . Warranty is null and void if non-CSA approved product is helpful to you ...
Use & Care Manuals
Page 40
... First State: Telephone: State: Middle Zip: Zip: Your willingness to take a few seconds to Dacor. T.V. Builder Supplier D. Replacement only B. Would you buy your Dacor appliances? A. WARRANTY INFORMATION IMPORTANT: Your warranty will be a proper way of such information to... in helping us plan for the future and giving you the support you have in one only.) A. A. Appliance Dealer B. Another Dacor Owner D. Other 2. Builder E. For what purpose was the product purchased? A. Please rest...
... First State: Telephone: State: Middle Zip: Zip: Your willingness to take a few seconds to Dacor. T.V. Builder Supplier D. Replacement only B. Would you buy your Dacor appliances? A. WARRANTY INFORMATION IMPORTANT: Your warranty will be a proper way of such information to... in helping us plan for the future and giving you the support you have in one only.) A. A. Appliance Dealer B. Another Dacor Owner D. Other 2. Builder E. For what purpose was the product purchased? A. Please rest...
Others
Page 2
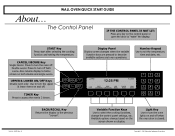
... both double and single ovens. B Variable Function Keys Use to turn the upper & lower ovens on both ovens. Copyright © 2005 Distinctive Appliances Corporation Double ovens: Press to turn the oven lights on the control panel or open the door to turn off . Available options change the control...screen". Number Keypad Use to set the temperature, time and date, etc. 12:25 PM BAKE PURE PURE CONV/SEAR CONVECTION MAX BROIL DACOR GUIDE MAIN MENU BACK/RECALL Key Returns the display to describe available options and oven operations. Light Key Use to turn the oven off ...
... both double and single ovens. B Variable Function Keys Use to turn the upper & lower ovens on both ovens. Copyright © 2005 Distinctive Appliances Corporation Double ovens: Press to turn the oven lights on the control panel or open the door to turn off . Available options change the control...screen". Number Keypad Use to set the temperature, time and date, etc. 12:25 PM BAKE PURE PURE CONV/SEAR CONVECTION MAX BROIL DACOR GUIDE MAIN MENU BACK/RECALL Key Returns the display to describe available options and oven operations. Light Key Use to turn the oven off ...