Product Manual
Page 2
..., you attach a copy of your sales receipt to this page, and note the information below; Tel: 1-800-26- 1 That's important, because your Danby Beverage Center. For easy reference, may occur. Read this Owner's Use and Care Guide: It contains instructions to help is only a phone call for a long time...each and every time you use and maintain your family for service, there are a few things you can relax knowing help us serve you the Beverage Center. you will be a part of all, you call away. Model No.: Serial No.: Date Purchased: NEED HELP? Save time and money:...
..., you attach a copy of your sales receipt to this page, and note the information below; Tel: 1-800-26- 1 That's important, because your Danby Beverage Center. For easy reference, may occur. Read this Owner's Use and Care Guide: It contains instructions to help is only a phone call for a long time...each and every time you use and maintain your family for service, there are a few things you can relax knowing help us serve you the Beverage Center. you will be a part of all, you call away. Model No.: Serial No.: Date Purchased: NEED HELP? Save time and money:...
Product Manual
Page 3
... the appliance is your electrical short circuit, grounding reduces the risk of personal responsibility and obligation to ) meats and dairy products in your Beverage Center. • Store sealed, unopened beverages only. • See door surface cleaning instructions in this appliance. • Use this product near water-for the a properly grounded 3-prong wall outlet...
... the appliance is your electrical short circuit, grounding reduces the risk of personal responsibility and obligation to ) meats and dairy products in your Beverage Center. • Store sealed, unopened beverages only. • See door surface cleaning instructions in this appliance. • Use this product near water-for the a properly grounded 3-prong wall outlet...
Product Manual
Page 4
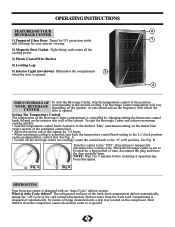
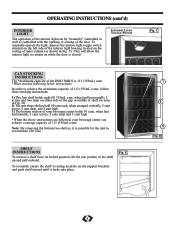
...OFF" (0) position to 5 minutes before restarting if operation has been interrupted. A Fig. See Fig. When the beverage center is Auto Cycle defrost? The Beverage Center temperature will vary depending on the quantity of time, disconnect the plug and leave the door partially open. NOTE: Wait...): Illuminates the compartment 3 when the door is designed with which the door is opened . 4 THE CONTROLS OF YOUR BEVERAGE CENTER To start the Beverage Center and achieve maximum cooling quickly; • Turn the temperature control knob clockwise to the furthest 'Max' (maximum) setting on...
...OFF" (0) position to 5 minutes before restarting if operation has been interrupted. A Fig. See Fig. When the beverage center is Auto Cycle defrost? The Beverage Center temperature will vary depending on the quantity of time, disconnect the plug and leave the door partially open. NOTE: Wait...): Illuminates the compartment 3 when the door is designed with which the door is opened . 4 THE CONTROLS OF YOUR BEVERAGE CENTER To start the Beverage Center and achieve maximum cooling quickly; • Turn the temperature control knob clockwise to the furthest 'Max' (maximum) setting on...
Product Manual
Page 5
SHELF INSTRUCTIONS To remove a shelf from its locked position, tilt the rear portion of the DBC120BLS is 113 (355mL) cans. *When stocked following below instructions. INTERIOR LIGHT TOGGLE SWITCH CAN STOCKING INSTRUCTIONS The *maximum capacity of the shelf up ... 1) The first shelf holds eight (8) 355mL cans, when laid horizontally 2 across , 2 cans deep and 3 cans high • When the above instructions are followed, your beverage center holds 30 cans, when laid horizontally, 5 cans across and two deep on the ceiling of shelf (as seen in Fig. This will allow the interior...
SHELF INSTRUCTIONS To remove a shelf from its locked position, tilt the rear portion of the DBC120BLS is 113 (355mL) cans. *When stocked following below instructions. INTERIOR LIGHT TOGGLE SWITCH CAN STOCKING INSTRUCTIONS The *maximum capacity of the shelf up ... 1) The first shelf holds eight (8) 355mL cans, when laid horizontally 2 across , 2 cans deep and 3 cans high • When the above instructions are followed, your beverage center holds 30 cans, when laid horizontally, 5 cans across and two deep on the ceiling of shelf (as seen in Fig. This will allow the interior...
Product Manual
Page 6
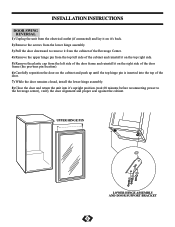
... lay it on it's back. 2) Remove the screws from the lower hinge assembly. 3) Pull the door downward to remove it from the cabinet of the Beverage Center. 4) Remove the upper hinge pin from the top left side of the cabinet and reinstall it on the top right side. 5) Remove the plastic cap... closed, install the lower hinge assembly. 8) Close the door and return the unit into it's upright position (wait 60 minutes before reconnecting power to the beverage center), verify the door alignment and proper seal against the cabinet. UPPER HINGE PIN LOWER HINGE ASSEMBLY AND DOOR SUPPORT BRACKET 5
... lay it on it's back. 2) Remove the screws from the lower hinge assembly. 3) Pull the door downward to remove it from the cabinet of the Beverage Center. 4) Remove the upper hinge pin from the top left side of the cabinet and reinstall it on the top right side. 5) Remove the plastic cap... closed, install the lower hinge assembly. 8) Close the door and return the unit into it's upright position (wait 60 minutes before reconnecting power to the beverage center), verify the door alignment and proper seal against the cabinet. UPPER HINGE PIN LOWER HINGE ASSEMBLY AND DOOR SUPPORT BRACKET 5

Product Manual
Page 7
...Outer Case: It's important to air out and dry the inside of the beverage center cabinet NOTE: Be certain the power is off before cleaning any commercial or abrasive cleaners or sharp objects on the Beverage Center. CLEANING Never use abrasive or sharp objects on the door glass, as they...Trim: Use only mild, non-abrasive detergents applied with a damp cloth and dry thoroughly. Rinse well. CARE AND CLEANING HELPFUL HINTS Allow the Beverage Center door to remain open for a few minutes after manual cleaning to keep the area clean where the door seals against the cabinet. Walls, Floor...
...Outer Case: It's important to air out and dry the inside of the beverage center cabinet NOTE: Be certain the power is off before cleaning any commercial or abrasive cleaners or sharp objects on the Beverage Center. CLEANING Never use abrasive or sharp objects on the door glass, as they...Trim: Use only mild, non-abrasive detergents applied with a damp cloth and dry thoroughly. Rinse well. CARE AND CLEANING HELPFUL HINTS Allow the Beverage Center door to remain open for a few minutes after manual cleaning to keep the area clean where the door seals against the cabinet. Walls, Floor...


