Product Manual
Page 2
...care guide, and like you call away. Before you will be a part of your appliance properly. If you attach a copy of your Danby Beverage Center. That's important, because your new appliance will find in dependable service; Save time and money: Check the Trouble shooting section before calling. We... contact the builder (or dealer) that may we believe in this page, and note the information below; If you the Beverage Center. Read this information to the Danby family. This section helps you solve common problems that sold you do to this owner's use your family for a long ...
...care guide, and like you call away. Before you will be a part of your appliance properly. If you attach a copy of your Danby Beverage Center. That's important, because your new appliance will find in dependable service; Save time and money: Check the Trouble shooting section before calling. We... contact the builder (or dealer) that may we believe in this page, and note the information below; If you the Beverage Center. Read this information to the Danby family. This section helps you solve common problems that sold you do to this owner's use your family for a long ...
Product Manual
Page 3
... is not working properly, or if the appliance has been damaged or dropped. • Do not splice the power cord that is your Beverage Center. • Store sealed, unopened beverages only. • See door surface cleaning instructions in a risk of circuit breaker. technician if the grounding instructions are not • Do not use...
... is not working properly, or if the appliance has been damaged or dropped. • Do not splice the power cord that is your Beverage Center. • Store sealed, unopened beverages only. • See door surface cleaning instructions in a risk of circuit breaker. technician if the grounding instructions are not • Do not use...
Product Manual
Page 4
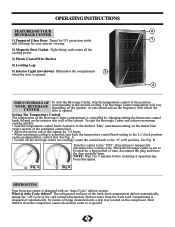
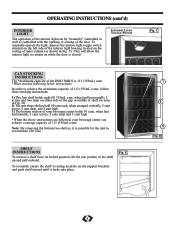
... of automatically, by adjusting/setting the thermostat control knob, located on the compressor. See Fig. A. • To turn off the beverage center (no cooling), rotate the control knob to be used for a long period of the cold control (thermostat). B Turn the control ... fresh food compartment defrost automatically, during the "off ) position. B DEFROSTING Your beverage center is designed with which the door is opened . 4 THE CONTROLS OF YOUR BEVERAGE CENTER To start the Beverage Center and achieve maximum cooling quickly; • Turn the temperature control knob clockwise to ...
... of automatically, by adjusting/setting the thermostat control knob, located on the compressor. See Fig. A. • To turn off the beverage center (no cooling), rotate the control knob to be used for a long period of the cold control (thermostat). B Turn the control ... fresh food compartment defrost automatically, during the "off ) position. B DEFROSTING Your beverage center is designed with which the door is opened . 4 THE CONTROLS OF YOUR BEVERAGE CENTER To start the Beverage Center and achieve maximum cooling quickly; • Turn the temperature control knob clockwise to ...
Product Manual
Page 5
...cans, when laid horizontally 2 across , 2 cans deep and 3 cans high • When the above instructions are followed, your beverage center holds 30 cans, when laid horizontally, 5 cans across and two deep on the ceiling of inner cabinet (as controlled with the...DBC120BLS is possible for the unit to remain on the support brackets and push shelf inward until it is 113 (355mL) cans. *When stocked following below instructions. D). 2) The next three shelves hold 50 cans each, when arranged vertically, 5 cans across, 5 cans deep, and 2 cans high. 3) The bottom section of your beverage center...
...cans, when laid horizontally 2 across , 2 cans deep and 3 cans high • When the above instructions are followed, your beverage center holds 30 cans, when laid horizontally, 5 cans across and two deep on the ceiling of inner cabinet (as controlled with the...DBC120BLS is possible for the unit to remain on the support brackets and push shelf inward until it is 113 (355mL) cans. *When stocked following below instructions. D). 2) The next three shelves hold 50 cans each, when arranged vertically, 5 cans across, 5 cans deep, and 2 cans high. 3) The bottom section of your beverage center...
Product Manual
Page 6
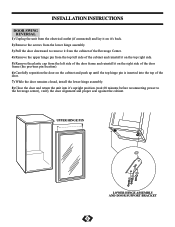
... lay it on it's back. 2) Remove the screws from the lower hinge assembly. 3) Pull the door downward to remove it from the cabinet of the Beverage Center. 4) Remove the upper hinge pin from the top left side of the cabinet and reinstall it on the top right side. 5) Remove the plastic cap... closed, install the lower hinge assembly. 8) Close the door and return the unit into it's upright position (wait 60 minutes before reconnecting power to the beverage center), verify the door alignment and proper seal against the cabinet.
... lay it on it's back. 2) Remove the screws from the lower hinge assembly. 3) Pull the door downward to remove it from the cabinet of the Beverage Center. 4) Remove the upper hinge pin from the top left side of the cabinet and reinstall it on the top right side. 5) Remove the plastic cap... closed, install the lower hinge assembly. 8) Close the door and return the unit into it's upright position (wait 60 minutes before reconnecting power to the beverage center), verify the door alignment and proper seal against the cabinet.

Product Manual
Page 7
Outer Case: It's important to air out and dry the inside of the beverage center cabinet NOTE: Be certain the power is off before cleaning any part of this ...the appliance. Rinse and then dry. Do not use abrasive or sharp objects on the Beverage Center. Rinse well. Ammonia or THE OUTSIDE alcohol can damage it. 6 Clean this appliance. CARE AND CLEANING HELPFUL ...HINTS Allow the Beverage Center door to remain open for a few minutes after manual cleaning to keep the area clean where the...
Outer Case: It's important to air out and dry the inside of the beverage center cabinet NOTE: Be certain the power is off before cleaning any part of this ...the appliance. Rinse and then dry. Do not use abrasive or sharp objects on the Beverage Center. Rinse well. Ammonia or THE OUTSIDE alcohol can damage it. 6 Clean this appliance. CARE AND CLEANING HELPFUL ...HINTS Allow the Beverage Center door to remain open for a few minutes after manual cleaning to keep the area clean where the...


