
Product Manual
Page 3
..., grounding reduces the risk of an replaced with a grounding plug. Cooler. • Do not splice the power cord that is properly installed and grounded. • Do not under any openings on the itself in a risk of the grounding plug can result in water. Remove...wine in sealed containers only. • See door surface cleaning instructions in your personal responsibility and obligation to have a qualified electrician or service technician install an outlet near a sink. • Do not use corrosive chemicals or vapors in a wet basement, near a swimming pool or near the...
..., grounding reduces the risk of an replaced with a grounding plug. Cooler. • Do not splice the power cord that is properly installed and grounded. • Do not under any openings on the itself in a risk of the grounding plug can result in water. Remove...wine in sealed containers only. • See door surface cleaning instructions in your personal responsibility and obligation to have a qualified electrician or service technician install an outlet near a sink. • Do not use corrosive chemicals or vapors in a wet basement, near a swimming pool or near the...

Product Manual
Page 4
...adjacent cabinetry, or the rear of Countertop to admit the power cord. hole *if electical outlet is recommended that you do not install the wine cooler into a corner (i.e. Safety Glasses Gloves Drill & Hole Saw set Level Flashlight Carpenters Square Measuring Tape PREPARING THE ...ELECTRICAL REQUIREMENTS: The appliance must be worn. directly beside a wall). INSTALLTION INTRUCTIONS TOOLS YOU WILL NEED FOR YOUR SAFETY: While performing installations described in this section, gloves, safety glasses, or goggles should also have a greater then 90° opening must be covered with ...
...adjacent cabinetry, or the rear of Countertop to admit the power cord. hole *if electical outlet is recommended that you do not install the wine cooler into a corner (i.e. Safety Glasses Gloves Drill & Hole Saw set Level Flashlight Carpenters Square Measuring Tape PREPARING THE ...ELECTRICAL REQUIREMENTS: The appliance must be worn. directly beside a wall). INSTALLTION INTRUCTIONS TOOLS YOU WILL NEED FOR YOUR SAFETY: While performing installations described in this section, gloves, safety glasses, or goggles should also have a greater then 90° opening must be covered with ...

Product Manual
Page 6
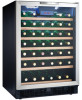
A. D and pull outward To re-install, ensure the rack is 50 (750mL) wine bottles. * When stocked as per instructions below. OPERATING INTRUCTIONS (cont'd) SETTING THE TEMPERATURE Important: In the event of a ... display between the Fahrenheit (°F) and Celsius (°C) scale, depress the 'Set Upper' and 'Set Lower' control buttons simultaneously for the total storage of the DWC508BLS is resting securely on the bottom shelf as in Fig. WINE STORAGE The Maximum Capacity* of fifty (50) 750mL wine bottles. To remove a rack from...
A. D and pull outward To re-install, ensure the rack is 50 (750mL) wine bottles. * When stocked as per instructions below. OPERATING INTRUCTIONS (cont'd) SETTING THE TEMPERATURE Important: In the event of a ... display between the Fahrenheit (°F) and Celsius (°C) scale, depress the 'Set Upper' and 'Set Lower' control buttons simultaneously for the total storage of the DWC508BLS is resting securely on the bottom shelf as in Fig. WINE STORAGE The Maximum Capacity* of fifty (50) 750mL wine bottles. To remove a rack from...

Product Manual
Page 7
... the plastic caps from the left side of the frame (Fig. 3) and reinstall them on the right side of the frame (the previous hinge location). 9) Install the new left hand hinge assembly (supplied with unit) on the left side of the frame. 3) Remove the screw that is closest to the hinge... left side upper hinge assembly, then onto the lower door support bracket. 12) While the door remains closed, install the first screw into the lower support bracket. 13) Open the door and install the screw that is closest to the hinge assembly. 14) Close the door and return the unit to its...
... the plastic caps from the left side of the frame (Fig. 3) and reinstall them on the right side of the frame (the previous hinge location). 9) Install the new left hand hinge assembly (supplied with unit) on the left side of the frame. 3) Remove the screw that is closest to the hinge... left side upper hinge assembly, then onto the lower door support bracket. 12) While the door remains closed, install the first screw into the lower support bracket. 13) Open the door and install the screw that is closest to the hinge assembly. 14) Close the door and return the unit to its...
