
Product Manual
Page 2
... manual; You'll see it in this manual It contains instructions to help you can relax knowing help us serve you use and maintain your Wine Cooler. They are a few things you can do need it in dependable service. Read this easy-to-use manual and you'll hear it to help... Check the Trouble Shooting section before calling. If you do to obtain service under warranty. We're proud of your receipt to the Danby family. BEFORE USING YOUR WINE COOLER Write down the model and serial numbers here. you call away: Tel: 1-800-26(1-800-263-2629) 1 Before you will be part of...
... manual; You'll see it in this manual It contains instructions to help you can relax knowing help us serve you use and maintain your Wine Cooler. They are a few things you can do need it in dependable service. Read this easy-to-use manual and you'll hear it to help... Check the Trouble Shooting section before calling. If you do to obtain service under warranty. We're proud of your receipt to the Danby family. BEFORE USING YOUR WINE COOLER Write down the model and serial numbers here. you call away: Tel: 1-800-26(1-800-263-2629) 1 Before you will be part of...

Product Manual
Page 3
... attraction to guarantee it • Do not use an adapter plug with this appliance only for household use , as described in your Wine the appliance has been damaged or dropped. SAFETY PRECAUTIONS • This appliance must be plugged into its intended use only. appliance. •...to whether the appliance is properly grounded. • If the outlet is a standard 2-prong wall outlet, it is equipped with a grounding plug. Cooler. • Do not splice the power cord that is properly installed and grounded. • Do not under any openings on page 4. •...
... attraction to guarantee it • Do not use an adapter plug with this appliance only for household use , as described in your Wine the appliance has been damaged or dropped. SAFETY PRECAUTIONS • This appliance must be plugged into its intended use only. appliance. •...to whether the appliance is properly grounded. • If the outlet is a standard 2-prong wall outlet, it is equipped with a grounding plug. Cooler. • Do not splice the power cord that is properly installed and grounded. • Do not under any openings on page 4. •...

Product Manual
Page 4
... at least 24" deep by a 15 or 20 ampere circuit breaker or time delay fuse. • It is recommended that you do not install the wine cooler into a corner (i.e. A limited door swing may be covered with a bushing or grommet. 34 3/4" From Underside of the shaded area (as shown in adjacent cabinetry 24...
... at least 24" deep by a 15 or 20 ampere circuit breaker or time delay fuse. • It is recommended that you do not install the wine cooler into a corner (i.e. A limited door swing may be covered with a bushing or grommet. 34 3/4" From Underside of the shaded area (as shown in adjacent cabinetry 24...

Product Manual
Page 5
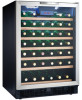
.... 3) Display: Display screen shows current cabinet temperature. 4) °C/°F: Adjacent indicator light denotes which scale of the wine cooler. 3) Magnetic Door Gaskets: Tight fitting seals retain all the cooling power and humidity levels. 4 4) Wire Shelves With...Button: Used to signify the cooling mode is opened. 5 2 3 1 7 6 THE CONTROLS OF YOUR WINE COOLER 1 2 3 4 TEMP. AFFICHAGE 1) Run: Indicator light illuminates to decrease the temperature (cooler) in ) applications. 6) Leveling Legs. 7) Interior Light Toggle Switch: To manually illuminate/ extinguish the interior ...
.... 3) Display: Display screen shows current cabinet temperature. 4) °C/°F: Adjacent indicator light denotes which scale of the wine cooler. 3) Magnetic Door Gaskets: Tight fitting seals retain all the cooling power and humidity levels. 4 4) Wire Shelves With...Button: Used to signify the cooling mode is opened. 5 2 3 1 7 6 THE CONTROLS OF YOUR WINE COOLER 1 2 3 4 TEMP. AFFICHAGE 1) Run: Indicator light illuminates to decrease the temperature (cooler) in ) applications. 6) Leveling Legs. 7) Interior Light Toggle Switch: To manually illuminate/ extinguish the interior ...

Product Manual
Page 7
... to remove the support bracket from the door and the lower hinge assembly. 5) Pull the door downward to remove it from the cabinet of the wine cooler. 6) Remove the cap from the top left side of the door (Fig. 4) and reinstall it on the top right side. 7) Remove the three (3) screws supporting... closest to the hinge assembly. 14) Close the door and return the unit to its upright position (wait 60 mins before reconnecting power to the wine cooler), verify the door allignment and proper seal against the cabinet.
... to remove the support bracket from the door and the lower hinge assembly. 5) Pull the door downward to remove it from the cabinet of the wine cooler. 6) Remove the cap from the top left side of the door (Fig. 4) and reinstall it on the top right side. 7) Remove the three (3) screws supporting... closest to the hinge assembly. 14) Close the door and return the unit to its upright position (wait 60 mins before reconnecting power to the wine cooler), verify the door allignment and proper seal against the cabinet.

Product Manual
Page 8
...on the panel-they can damage the appearance of the appliance. Outer Case: It's important to air out HINTS and dry the inside of the wine cooler cabinet NOTE: Be certain the power is off before cleaning any part of this area with a dry paper towel, others may also scratch the...7 HOW TO CLEAN Do not use any commercial or abrasive cleaners or sharp objects on the wine cooler. Some paper towels may require a damp cloth. Rinse and then dry. CARE AND CLEANING HELPFUL Allow the wine cooler door to remain open for a few minutes after manual cleaning to keep the area clean where ...
...on the panel-they can damage the appearance of the appliance. Outer Case: It's important to air out HINTS and dry the inside of the wine cooler cabinet NOTE: Be certain the power is off before cleaning any part of this area with a dry paper towel, others may also scratch the...7 HOW TO CLEAN Do not use any commercial or abrasive cleaners or sharp objects on the wine cooler. Some paper towels may require a damp cloth. Rinse and then dry. CARE AND CLEANING HELPFUL Allow the wine cooler door to remain open for a few minutes after manual cleaning to keep the area clean where ...

Product Manual
Page 9
... interior lights are not intended to be • Replace fuse or reset circuit blown or a circuit breaker tripped breaker. • Power surge • Unplug the wine cooler, wait a few seconds and plug back in. • Plug is not fully insterted into outlet. 2) Cabinet temperature too high. • Temperature Setting. • Verify the...
... interior lights are not intended to be • Replace fuse or reset circuit blown or a circuit breaker tripped breaker. • Power surge • Unplug the wine cooler, wait a few seconds and plug back in. • Plug is not fully insterted into outlet. 2) Cabinet temperature too high. • Temperature Setting. • Verify the...


