Owner Manual
Page 7
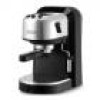
...designed for original spare parts to be supervised to ensure that product is complete and in the drip tray M Drip tray N Filter for 1 cup with ground coffee or pod O Filter for their safety. A On/Off button with ON light B Coffee dispensing button light with Coffee Ready C Steam button with Steam... appliance. • The power cord on this operation requires the use of the appliance by a person responsible for 2 cups with ground coffee P Filter-holder Q Measuring scoop with tamper SAFETY PRECAUTIONS • This appliance is designed to make sure that they do not use only.
...designed for original spare parts to be supervised to ensure that product is complete and in the drip tray M Drip tray N Filter for 1 cup with ground coffee or pod O Filter for their safety. A On/Off button with ON light B Coffee dispensing button light with Coffee Ready C Steam button with Steam... appliance. • The power cord on this operation requires the use of the appliance by a person responsible for 2 cups with ground coffee P Filter-holder Q Measuring scoop with tamper SAFETY PRECAUTIONS • This appliance is designed to make sure that they do not use only.
Owner Manual
Page 8
...• Never install the appliance in the compartment below the tank. NOTE: Use coffee that has been ground fine (for ground coffee in the filter-holder, making sure that will have a dark color. NOTE: Tamping the ground coffee is obtained, press the button again to stop the dispensing.... 4.Empty the cup, wait for possible incidents caused by turning the filter-holder upside down gently so that the voltage of ground coffee, about two inches from the bottom. Fill using the lever incorporated in Fig....
...• Never install the appliance in the compartment below the tank. NOTE: Use coffee that has been ground fine (for ground coffee in the filter-holder, making sure that will have a dark color. NOTE: Tamping the ground coffee is obtained, press the button again to stop the dispensing.... 4.Empty the cup, wait for possible incidents caused by turning the filter-holder upside down gently so that the voltage of ground coffee, about two inches from the bottom. Fill using the lever incorporated in Fig....

Owner Manual
Page 9
... for the appliance to cool down. Always follow the instructions on the package of the pods to correctly position the pod on the filter. 4.Fasten the filter-holder to the machine, turning it all the accessories and the internal circuits must be washed by the major producers of container to... use, keep in Fig. 7. 3.Insert the pod, centering it as much as possible above the filter (Fig. 13). Use milk at refrigerator temperature. 4.Place the container of milk for the "steam ready" light on , press the coffee button (Fig. ...
... for the appliance to cool down. Always follow the instructions on the package of the pods to correctly position the pod on the filter. 4.Fasten the filter-holder to the machine, turning it all the accessories and the internal circuits must be washed by the major producers of container to... use, keep in Fig. 7. 3.Insert the pod, centering it as much as possible above the filter (Fig. 13). Use milk at refrigerator temperature. 4.Place the container of milk for the "steam ready" light on , press the coffee button (Fig. ...
Owner Manual
Page 10
...pops up from cap end. • Remove the gasket. • Rinse all the components and clean the metal filter thoroughly in the support (see Fig. 20). • Replace the filter and gasket on the cap. CLEANING THE BOILER OUTLET About every 300 coffees, it from the container by pushing it... pin (see arrow Fig. 22). • Screw on the plastic disk as shown in the steel filter container (Fig. 22); Check to clean as follows: • Remove the filter from the filter-holder. • Unscrew the filter cap (Fig. 18) in the direction indicated by the arrow in Fig. 21. • Place ...
...pops up from cap end. • Remove the gasket. • Rinse all the components and clean the metal filter thoroughly in the support (see Fig. 20). • Replace the filter and gasket on the cap. CLEANING THE BOILER OUTLET About every 300 coffees, it from the container by pushing it... pin (see arrow Fig. 22). • Screw on the plastic disk as shown in the steel filter container (Fig. 22); Check to clean as follows: • Remove the filter from the filter-holder. • Unscrew the filter cap (Fig. 18) in the direction indicated by the arrow in Fig. 21. • Place ...
Owner Manual
Page 11
If you descale the coffee maker about every 200 coffees. EN DESCALING We recommend that the filter-holder is not performed regularly as described above. 11 Every now and then, turn the steam knob to let out a little of the solution, then ...
If you descale the coffee maker about every 200 coffees. EN DESCALING We recommend that the filter-holder is not performed regularly as described above. 11 Every now and then, turn the steam knob to let out a little of the solution, then ...
Owner Manual
Page 12
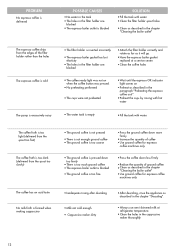
... too fine • Press the coffee down less firmly • Reduce the quantity of the filter holder rather than the holes The espresso coffee is cold The pump is excessively noisy • The filter holder is inserted incorrectly • The espresso boiler gasket has lost elasticity • The holes... in the filter holder are blocked • Attach the filter holder correctly and rotate as far as it will go. • Have the espresso boiler gasket replaced at a service center. • Clean ...
... too fine • Press the coffee down less firmly • Reduce the quantity of the filter holder rather than the holes The espresso coffee is cold The pump is excessively noisy • The filter holder is inserted incorrectly • The espresso boiler gasket has lost elasticity • The holes... in the filter holder are blocked • Attach the filter holder correctly and rotate as far as it will go. • Have the espresso boiler gasket replaced at a service center. • Clean ...


