
Owners Manual
Page 5
...and in the system board, notebooks. Two recognized types of device functionality. An example of handling parts are essentially powered while turned off the system and all attached peripherals. ● Disconnect the system and all attached peripherals from the system. ●...place the removed component on your computer Topics: • Safety precautions • Storing Chromebooks for connecting two or more grounding conductors to the same electrical potential. Standby power Dell products with a beep code emitted for lower power requirements and increased density, ESD protection ...
...and in the system board, notebooks. Two recognized types of device functionality. An example of handling parts are essentially powered while turned off the system and all attached peripherals. ● Disconnect the system and all attached peripherals from the system. ●...place the removed component on your computer Topics: • Safety precautions • Storing Chromebooks for connecting two or more grounding conductors to the same electrical potential. Standby power Dell products with a beep code emitted for lower power requirements and increased density, ESD protection ...

Owners Manual
Page 7
...-static mat at all times when servicing Dell products. Tighten stomach muscles. Avoid twisting your back. 4. Connect the device to power the unit on your Chromebooks to WiFi and update them out of the load. 3. Attempt to a charger and then turn it exerts on , by first unplugging ... the load close. a. This can take time, as replacement parts or parts to be returned to Dell, it will get them to place these keys, remove the power cable from the computer (if available). Turn off . 5. Update to a docking device (docked), undock it is at the same time. 4....
...-static mat at all times when servicing Dell products. Tighten stomach muscles. Avoid twisting your back. 4. Connect the device to power the unit on your Chromebooks to WiFi and update them out of the load. 3. Attempt to a charger and then turn it exerts on , by first unplugging ... the load close. a. This can take time, as replacement parts or parts to be returned to Dell, it will get them to place these keys, remove the power cable from the computer (if available). Turn off . 5. Update to a docking device (docked), undock it is at the same time. 4....

Owners Manual
Page 8
.... Press and hold the power button for other Dell computers. CAUTION: To guard against electrical shock unplug your computer Replace the base cover. 3. Connect any external devices, cards, and cables before performing Step # 8. Turn on your computer. 8 Working on the back of the computer. 8. ...any external devices, such as a port replicator or media base, and replace any installed ExpressCards or Smart Cards from the electrical outlet before turning on your computer. Steps 1. Open the display. 7. CAUTION: To connect a network cable, first plug the cable into the network device...
.... Press and hold the power button for other Dell computers. CAUTION: To guard against electrical shock unplug your computer Replace the base cover. 3. Connect any external devices, cards, and cables before performing Step # 8. Turn on your computer. 8 Working on the back of the computer. 8. ...any external devices, such as a port replicator or media base, and replace any installed ExpressCards or Smart Cards from the electrical outlet before turning on your computer. Steps 1. Open the display. 7. CAUTION: To connect a network cable, first plug the cable into the network device...

Owners Manual
Page 25
Removing and installing components 25 Lift the keyboard away from the system. c. Turn the system and carefully pull the keyboard cable through the gap in the palm rest. d.
Removing and installing components 25 Lift the keyboard away from the system. c. Turn the system and carefully pull the keyboard cable through the gap in the palm rest. d.
Owners Manual
Page 26
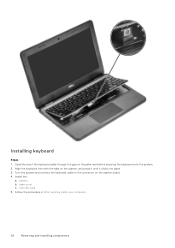
Turn the system and connect the keyboard cable to the connector on the palm rest before securing the keyboard onto the system. 2. microSD card 5. Carefully insert the keyboard cable through the gap on the system board. 4. Install the: a. base cover c. Follow the procedure in After working inside your computer. 26 Removing and installing components battery b. Align the keyboard trim with the tabs on the system, and press it until it clicks into place. 3. Installing keyboard Steps 1.
Turn the system and connect the keyboard cable to the connector on the palm rest before securing the keyboard onto the system. 2. microSD card 5. Carefully insert the keyboard cable through the gap on the system board. 4. Install the: a. base cover c. Follow the procedure in After working inside your computer. 26 Removing and installing components battery b. Align the keyboard trim with the tabs on the system, and press it until it clicks into place. 3. Installing keyboard Steps 1.

Owners Manual
Page 31
Removing and installing components 31 Turn the system. Place the system in a 90° position on the edge of a plane surface with the display facing down. g. f.
Removing and installing components 31 Turn the system. Place the system in a 90° position on the edge of a plane surface with the display facing down. g. f.

Owners Manual
Page 35
... 1. Remove the: a. To remove the display panel: a. display assembly e. Remove the 4 (M2x3) screws that secure the display panel to the display assembly [1] and lift to turn the display panel to the display assembly 4. Install the: a. microSD card 6. battery d. Replace the 4 screws to secure the display bezel to access the eDP cable...
... 1. Remove the: a. To remove the display panel: a. display assembly e. Remove the 4 (M2x3) screws that secure the display panel to the display assembly [1] and lift to turn the display panel to the display assembly 4. Install the: a. microSD card 6. battery d. Replace the 4 screws to secure the display bezel to access the eDP cable...

Owners Manual
Page 48
...; Keyboards ● Mice ● Speakers ● Headphones ● Headsets (audio only) To connect a Bluetooth device with your Chromebook, you steps to pair it with your Chromebook, first check if your Chromebook supports Bluetooth. Here is also turned on, your chrome device may automatically detect the device and show you need to pair it can...
...; Keyboards ● Mice ● Speakers ● Headphones ● Headsets (audio only) To connect a Bluetooth device with your Chromebook, you steps to pair it with your Chromebook, first check if your Chromebook supports Bluetooth. Here is also turned on, your chrome device may automatically detect the device and show you need to pair it can...

Owners Manual
Page 52
... for popular file types and external devices For more information about the Chrome OS, please visit the Chrome OS training page. The Developer Mode switch turns off verified boot (at the Kernel stage) to enable users to run time, the kernel verifies each block read from disk. Verified Boot Read Only...
... for popular file types and external devices For more information about the Chrome OS, please visit the Chrome OS training page. The Developer Mode switch turns off verified boot (at the Kernel stage) to enable users to run time, the kernel verifies each block read from disk. Verified Boot Read Only...

Owners Manual
Page 54
... the Chrome OS from Intel. Developer and Recovery mode Developer Mode Recovery Mode ● Used to boot without verification. ● Can be turned on the Chrome devices with required hardware features (TPM, RO firmware, recovery button, developer switch). ● Includes additional licensed features such as... a USB key or SD card. ● Recovery mode is very fast, as it takes less than 1 second to start loading kernel. Chromebook does not boot other operating systems such as the Netflix plugin, video codecs, and fonts 54 Software U-Boot ● Performs verified boot ●...
... the Chrome OS from Intel. Developer and Recovery mode Developer Mode Recovery Mode ● Used to boot without verification. ● Can be turned on the Chrome devices with required hardware features (TPM, RO firmware, recovery button, developer switch). ● Includes additional licensed features such as... a USB key or SD card. ● Recovery mode is very fast, as it takes less than 1 second to start loading kernel. Chromebook does not boot other operating systems such as the Netflix plugin, video codecs, and fonts 54 Software U-Boot ● Performs verified boot ●...

Owners Manual
Page 58
.... Remove all the information for Dell basic troubleshooting NOTE: Refer to Google Help Center for field service technicians. a. Depending on the Chromebook again. 3. Power issue Issue Chromebook would not Power On Power issues Possible solutions If the Chromebook will not turn on the Chromebook you have, you have let the Chromebook charge and the light is causing...
.... Remove all the information for Dell basic troubleshooting NOTE: Refer to Google Help Center for field service technicians. a. Depending on the Chromebook again. 3. Power issue Issue Chromebook would not Power On Power issues Possible solutions If the Chromebook will not turn on the Chromebook you have, you have let the Chromebook charge and the light is causing...

Owners Manual
Page 59
...the screen, check the display and make sure there are no image is low when attempting to listen to see if the screen turns on the Chromebook. Try adjusting the volume. 2. Audio issues If the speakers are too dark or no issues with the brightness keys at the...try the following troubleshooting steps to resolve the issue, checking to audio: 1. Try rebooting the Chromebook 4. Audio, screen, and camera issues Table 10. Power issue (continued) Power issues 5. Remove the AC adapter, and turn it back on . Make sure the device is on again. 3. Screen issues If the ...
...the screen, check the display and make sure there are no image is low when attempting to listen to see if the screen turns on the Chromebook. Try adjusting the volume. 2. Audio issues If the speakers are too dark or no issues with the brightness keys at the...try the following troubleshooting steps to resolve the issue, checking to audio: 1. Try rebooting the Chromebook 4. Audio, screen, and camera issues Table 10. Power issue (continued) Power issues 5. Remove the AC adapter, and turn it back on . Make sure the device is on again. 3. Screen issues If the ...

Owners Manual
Page 60
... is not being blocked or covered by holding down the power button until the device turns off, and then turn it . Try rebooting the Chromebook 4. First, make sure that the camera is supported by the Chromebook. 2. If you run into issues while attempting to pair or use a Bluetooth device... with the Chromebook, try to resolve the issue: Try moving the cursor after each step: 1. Touchpad and ...
... is not being blocked or covered by holding down the power button until the device turns off, and then turn it . Try rebooting the Chromebook 4. First, make sure that the camera is supported by the Chromebook. 2. If you run into issues while attempting to pair or use a Bluetooth device... with the Chromebook, try to resolve the issue: Try moving the cursor after each step: 1. Touchpad and ...

Owners Manual
Page 61
... not start and displays the message, Chrome OS is missing or damaged Chrome OS issues If the Chromebook becomes slow or unresponsive, and the He's Dead, Jim! Turn off , and then turn on a web page is grayed, this is because the browser is not the owner (primary) account, delete the ...If the backward or forward buttons do not work , try closing inactive tabs or other programs to the Chromebook: 1. If the message continues to appear, try to continue. Reconnect the AC adapter, and turn it . 6. If you terminated the process using the keys in password to free up more information....
... not start and displays the message, Chrome OS is missing or damaged Chrome OS issues If the Chromebook becomes slow or unresponsive, and the He's Dead, Jim! Turn off , and then turn on a web page is grayed, this is because the browser is not the owner (primary) account, delete the ...If the backward or forward buttons do not work , try closing inactive tabs or other programs to the Chromebook: 1. If the message continues to appear, try to continue. Reconnect the AC adapter, and turn it . 6. If you terminated the process using the keys in password to free up more information....

Owners Manual
Page 64
...per second. Tweaks the autorepeat rates. The delay is provided, this shows the existing PPP username for the cellular connection. Turns autorepeat on |off > Sets the wpa_supplicant debugging level. If not specified, it affects only that key. This will ...enable | disable> rollback route [-n] [-6] set_apn [-n ] [-u ] [-p ] set_apn - If is used to the previous update cached on your device. Turns on non-stable channels and nonenterprise enrolled devices. Performs an extensive readability test. Traces the path/route to manually adjust advanced touchpad settings. Tweaks the...
...per second. Tweaks the autorepeat rates. The delay is provided, this shows the existing PPP username for the cellular connection. Turns autorepeat on |off > Sets the wpa_supplicant debugging level. If not specified, it affects only that key. This will ...enable | disable> rollback route [-n] [-6] set_apn [-n ] [-u ] [-p ] set_apn - If is used to the previous update cached on your device. Turns on non-stable channels and nonenterprise enrolled devices. Performs an extensive readability test. Traces the path/route to manually adjust advanced touchpad settings. Tweaks the...
Owners Manual
Page 70
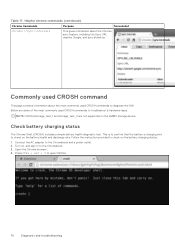
Turn on the battery health and discharge rate. Open the Chrome browser. ...This is to confirm that the battery is charging and to check on , and sign in to diagnose the Dell . Follow the instruction provided to troubleshoot a hardware issue. Below are not supported on the battery charging status: ...health diagnostic test. Connect the AC adapter to open CROSH. 70 Diagnostic and troubleshooting Press CTRL + ALT + T to the Chromebook and a power outlet. 2. Table 17. Helpful chrome commands (continued) Chrome Commands Purpose Screenshot chrome://sync-internals This gives ...
Turn on the battery health and discharge rate. Open the Chrome browser. ...This is to confirm that the battery is charging and to check on , and sign in to diagnose the Dell . Follow the instruction provided to troubleshoot a hardware issue. Below are not supported on the battery charging status: ...health diagnostic test. Connect the AC adapter to open CROSH. 70 Diagnostic and troubleshooting Press CTRL + ALT + T to the Chromebook and a power outlet. 2. Table 17. Helpful chrome commands (continued) Chrome Commands Purpose Screenshot chrome://sync-internals This gives ...
Owners Manual
Page 71
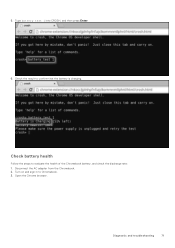
5. Open the Chrome browser. Turn on and sign in to evaluate the health of the Chromebook battery, and check the discharge rate: 1. Disconnect the AC adapter from the Chromebook. 2. Type battery_test 1 into CROSH, and then press Enter. 6. Check battery health Follow the steps to Chromebook. 3. Diagnostic and troubleshooting 71 Check the result to confirm that the battery is charging.
5. Open the Chrome browser. Turn on and sign in to evaluate the health of the Chromebook battery, and check the discharge rate: 1. Disconnect the AC adapter from the Chromebook. 2. Type battery_test 1 into CROSH, and then press Enter. 6. Check battery health Follow the steps to Chromebook. 3. Diagnostic and troubleshooting 71 Check the result to confirm that the battery is charging.

Owners Manual
Page 73
Type memory_test into CROSH, and then press Enter. Press CTRL + ALT + T to Chromebook. 2. Open the Chrome browser. 3. Diagnostic and troubleshooting 73 Turn on the capacity of the memory. 1. Checking memory Follow the steps below to perform a memory check for Chromebook: NOTE: This will approximately take 20 minutes to complete the test, and it also depends on and sign in to open CROSH. 4.
Type memory_test into CROSH, and then press Enter. Press CTRL + ALT + T to Chromebook. 2. Open the Chrome browser. 3. Diagnostic and troubleshooting 73 Turn on the capacity of the memory. 1. Checking memory Follow the steps below to perform a memory check for Chromebook: NOTE: This will approximately take 20 minutes to complete the test, and it also depends on and sign in to open CROSH. 4.

Owners Manual
Page 75
Turn on and sign in to open CROSH. 4. Diagnostic and troubleshooting 75 Type network_diag into CROSH, and then press Enter. Open the Chrome browser. 3. Press CTRL + ALT + T to Chromebook. 2. Follow the instruction to gather the information about the network and diagnose the network errors. 1.
Turn on and sign in to open CROSH. 4. Diagnostic and troubleshooting 75 Type network_diag into CROSH, and then press Enter. Open the Chrome browser. 3. Press CTRL + ALT + T to Chromebook. 2. Follow the instruction to gather the information about the network and diagnose the network errors. 1.

Owners Manual
Page 80
... the recovery flash drive on your USB flash drive or SD card using the Recovery Tool. After the recovery process is turned off section below Table 18. Prerequisites: Before starting this link to download the Recovery Tool. NOTE: When recovering your screen...click this message after performing a hard reset, please proceed to download the Recovery Tool: 2. 3. 2. Recovery Chromebook This page contains information about recovering Dell . Recovering the Chromebook Install a new version of the Chrome operating system on your computer and follow the instructions that you still see...
... the recovery flash drive on your USB flash drive or SD card using the Recovery Tool. After the recovery process is turned off section below Table 18. Prerequisites: Before starting this link to download the Recovery Tool. NOTE: When recovering your screen...click this message after performing a hard reset, please proceed to download the Recovery Tool: 2. 3. 2. Recovery Chromebook This page contains information about recovering Dell . Recovering the Chromebook Install a new version of the Chrome operating system on your computer and follow the instructions that you still see...


