
Setup and Quick Reference Guide
Page 3
Contents 1 About Your Computer 7 Front View 7 Back View 9 Bottom View 10 Battery Removal 10 Wireless Switch and Dell™ Wi-Fi Catcher™ Network Locator 11 2 Setting Up Your Computer 13 Quick Setup 13 Connecting to the Internet 16 Setting Up Your Internet Connection 16 Transferring Information to a New Computer 17 Microsoft® Windows Vista® Operating System 17 Microsoft Windows® XP 18 3 Specifications 21 Contents 3
Contents 1 About Your Computer 7 Front View 7 Back View 9 Bottom View 10 Battery Removal 10 Wireless Switch and Dell™ Wi-Fi Catcher™ Network Locator 11 2 Setting Up Your Computer 13 Quick Setup 13 Connecting to the Internet 16 Setting Up Your Internet Connection 16 Transferring Information to a New Computer 17 Microsoft® Windows Vista® Operating System 17 Microsoft Windows® XP 18 3 Specifications 21 Contents 3

Setup and Quick Reference Guide
Page 9
... on the fan when the computer gets hot. About Your Computer 9 Fan noise is running. Do not store your Dell™ computer in the air vents. Back View 1 2 10 3 9 4 5 8 6 7 1 RJ-11 connector (optional) 3 battery/power lights 5 AC adapter 7 video connector 9 USB PowerShare connector 2 RJ-45 connector 4 multimode DisplayPort 6 security cable slot 8 eSATA...
... on the fan when the computer gets hot. About Your Computer 9 Fan noise is running. Do not store your Dell™ computer in the air vents. Back View 1 2 10 3 9 4 5 8 6 7 1 RJ-11 connector (optional) 3 battery/power lights 5 AC adapter 7 video connector 9 USB PowerShare connector 2 RJ-45 connector 4 multimode DisplayPort 6 security cable slot 8 eSATA...

Setup and Quick Reference Guide
Page 10
... modem from the wall connector and computer, and remove any of fire or explosion. The battery is designed to work with your Dell computer. Do not use a battery from other external cables from Dell. CAUTION: Using an incompatible battery may increase the risk of the procedures in this section, follow the safety instructions that shipped...
... modem from the wall connector and computer, and remove any of fire or explosion. The battery is designed to work with your Dell computer. Do not use a battery from other external cables from Dell. CAUTION: Using an incompatible battery may increase the risk of the procedures in this section, follow the safety instructions that shipped...

Setup and Quick Reference Guide
Page 26
... pitch) Touch Pad X/Y position resolution (graphics table mode) Size: Width Height 240 cpi 73.0-mm (2.9-inches) sensor-active area 42.9-mm (1.7-inches) rectangle Battery Type 12-cell "smart" lithium ion prismatic slice (84 Whr) 9-cell "smart" lithium ion (85 Whr) 6-cell "smart" lithium ion (56 Whr...) 4-cell "smart" lithium ion (35 Whr) Dimensions: 4-cell and 6-cell lithium-ion batteries: Depth 206 mm (8.11 inches) Height 19.8 mm (0.78 inches) Width 47.0 mm (1.85 inches) 9-cell lithium-ion batteries: Depth 208 mm (8.67 inches) Height 22.3 mm (0.88 inches) Width 68.98 mm...
... pitch) Touch Pad X/Y position resolution (graphics table mode) Size: Width Height 240 cpi 73.0-mm (2.9-inches) sensor-active area 42.9-mm (1.7-inches) rectangle Battery Type 12-cell "smart" lithium ion prismatic slice (84 Whr) 9-cell "smart" lithium ion (85 Whr) 6-cell "smart" lithium ion (56 Whr...) 4-cell "smart" lithium ion (35 Whr) Dimensions: 4-cell and 6-cell lithium-ion batteries: Depth 206 mm (8.11 inches) Height 19.8 mm (0.78 inches) Width 47.0 mm (1.85 inches) 9-cell lithium-ion batteries: Depth 208 mm (8.67 inches) Height 22.3 mm (0.88 inches) Width 68.98 mm...

Setup and Quick Reference Guide
Page 27
... 4-cell primary battery 0.24 kg (0.53 lb) 6-cell primary battery 0.33 kg (0.73 lb) 9-cell high capacity battery 0.51 kg (1.12 lb) 12-cell slice battery 0.85 kg (1.87 lb) Voltage: 4-cell battery 14.8 VDC 6-cell and 9-cell battery 11.1 VDC 12-cell slice battery 14.8 VDC NOTE: Battery operating time varies... 4 hours to 100% in Dell™ ExpressCharge™ mode Life span (approximate) 1 year Temperature range: Operating 0° to 40°C (32° to 104°F) Storage -10° to 65°C (14° to 149°F) Coin-cell battery CR-2032 AC Adapter Input voltage...
... 4-cell primary battery 0.24 kg (0.53 lb) 6-cell primary battery 0.33 kg (0.73 lb) 9-cell high capacity battery 0.51 kg (1.12 lb) 12-cell slice battery 0.85 kg (1.87 lb) Voltage: 4-cell battery 14.8 VDC 6-cell and 9-cell battery 11.1 VDC 12-cell slice battery 14.8 VDC NOTE: Battery operating time varies... 4 hours to 100% in Dell™ ExpressCharge™ mode Life span (approximate) 1 year Temperature range: Operating 0° to 40°C (32° to 104°F) Storage -10° to 65°C (14° to 149°F) Coin-cell battery CR-2032 AC Adapter Input voltage...

Setup and Quick Reference Guide
Page 29
... inches) 342 mm (13.464 inches) 251.7 mm (9.909 inches) 2.78 kg (6.12 lb) with UMA graphics, 6-cell battery, port cover, and optical drive 2.65 kg (5.84 lb) with UMA graphics, 6-cell battery, port cover, and airbay Environmental Temperature range: Operating 0° to 35°C (32° to 95°F) Storage -40...
... inches) 342 mm (13.464 inches) 251.7 mm (9.909 inches) 2.78 kg (6.12 lb) with UMA graphics, 6-cell battery, port cover, and optical drive 2.65 kg (5.84 lb) with UMA graphics, 6-cell battery, port cover, and airbay Environmental Temperature range: Operating 0° to 35°C (32° to 95°F) Storage -40...

Setup and Quick Reference Guide
Page 33
...the microprocessor has failed. One or more memory modules may be faulty or improperly seated. battery failure or 2 If the problem persists, contact Dell. Failure 7 CPU-cache test Contact Dell. failure Error Messages CAUTION: Before you have spelled the command correctly, put spaces in...mouse may be faulty. Code Description (repetitive short beeps) Suggested Remedy 5 Real-time clock 1 Replace the battery (see your Service Manual at support.dell.com for more information. The primary cache internal to commands from the computer. Enable the Pointing Device option in...
...the microprocessor has failed. One or more memory modules may be faulty or improperly seated. battery failure or 2 If the problem persists, contact Dell. Failure 7 CPU-cache test Contact Dell. failure Error Messages CAUTION: Before you have spelled the command correctly, put spaces in...mouse may be faulty. Code Description (repetitive short beeps) Suggested Remedy 5 Real-time clock 1 Replace the battery (see your Service Manual at support.dell.com for more information. The primary cache internal to commands from the computer. Enable the Pointing Device option in...

Setup and Quick Reference Guide
Page 37
... page 65). System configuration settings are defective, back up the data (if possible), and then reformat the hard drive. If the problem persists, contact Dell (see "Dell Diagnostics" on page 65). The optional ROM has failed. D L L F I R E D . Microsoft Windows® XP: 1 Click Start→ Control Panel→...Select the program you want to open is missing an essential file. SHUTD OWN FAILU RE - If the problem persists, try to charge the battery. A chip on the system board may have a defective sector or corrupted FAT on the hard drive. If a large number of sectors are...
... page 65). System configuration settings are defective, back up the data (if possible), and then reformat the hard drive. If the problem persists, contact Dell (see "Dell Diagnostics" on page 65). The optional ROM has failed. D L L F I R E D . Microsoft Windows® XP: 1 Click Start→ Control Panel→...Select the program you want to open is missing an essential file. SHUTD OWN FAILU RE - If the problem persists, try to charge the battery. A chip on the system board may have a defective sector or corrupted FAT on the hard drive. If a large number of sectors are...

Setup and Quick Reference Guide
Page 38
... board failure or RTC battery low. If the message reappears, contact Dell (see "Contacting Dell" on page 65). TI M E - O F - See your Service Manual at support.dell.com for either the...T R E A D Y - T H E D E V I C E I B L E . TIME- OF- P L E A S E R U N T H E S YS T E M S E T U P P R O G R A M - Connect your Service Manual at support.dell.com). D A Y N O T S E T - The time or date stored in the Dell Diagnostics (see the documentation for more information. Replace the battery. The reserve battery that was running out of charge. Run the System Set tests in the table, see...
... board failure or RTC battery low. If the message reappears, contact Dell (see "Contacting Dell" on page 65). TI M E - O F - See your Service Manual at support.dell.com for either the...T R E A D Y - T H E D E V I C E I B L E . TIME- OF- P L E A S E R U N T H E S YS T E M S E T U P P R O G R A M - Connect your Service Manual at support.dell.com). D A Y N O T S E T - The time or date stored in the Dell Diagnostics (see the documentation for more information. Replace the battery. The reserve battery that was running out of charge. Run the System Set tests in the table, see...

Setup Information
Page 2
...-card reader 20 touch pad 22 touch pad buttons/track stick buttons 24 track stick 26 device status lights 1 2 10 3 4 1 RJ-11 modem connector (optional) 3 battery light/power light 5 AC adapter 9 8 5 67 2 RJ-45 network connector 4 multimode DisplayPort 6 security cable slot
...-card reader 20 touch pad 22 touch pad buttons/track stick buttons 24 track stick 26 device status lights 1 2 10 3 4 1 RJ-11 modem connector (optional) 3 battery light/power light 5 AC adapter 9 8 5 67 2 RJ-45 network connector 4 multimode DisplayPort 6 security cable slot

Setup Information
Page 6
...: 4-cell and 6-cell lithium-ion batteries: Depth Height 9-cell lithium-ion batteries: Depth Height 12-cell lithium-ion slice batteries: Depth Height Weight Voltage: 4-cell battery 6-cell and 9-cell 12-cell slice battery Temperature range: Operating Storage Coin-cell battery 12-cell "smart" lithium ion prismatic slice (84 Whr) 9-cell "smart" lithium ion (85 Whr... Whr) 206 mm (8.11 inches) 19.8 mm (0.78 inch) 208 mm (8.67 inches) 22.3 mm (0.88 inch) 14.48 mm 217.24 mm 0.24 kg (0.53 lb) (4 cell) 0.33 kg (0.73 lb)(6 cell) 0.51 kg (1.12 lb)(9 cell) 0.85 kg (1.87 lb)12 cell slice 14.8 VDC 11.1 VDC 14...
...: 4-cell and 6-cell lithium-ion batteries: Depth Height 9-cell lithium-ion batteries: Depth Height 12-cell lithium-ion slice batteries: Depth Height Weight Voltage: 4-cell battery 6-cell and 9-cell 12-cell slice battery Temperature range: Operating Storage Coin-cell battery 12-cell "smart" lithium ion prismatic slice (84 Whr) 9-cell "smart" lithium ion (85 Whr... Whr) 206 mm (8.11 inches) 19.8 mm (0.78 inch) 208 mm (8.67 inches) 22.3 mm (0.88 inch) 14.48 mm 217.24 mm 0.24 kg (0.53 lb) (4 cell) 0.33 kg (0.73 lb)(6 cell) 0.51 kg (1.12 lb)(9 cell) 0.85 kg (1.87 lb)12 cell slice 14.8 VDC 11.1 VDC 14...

Service Manual
Page 1
...disclaims any proprietary interest in any references in this document is subject to hardware or loss of your computer. Dell™ Latitude™ E6400 and E6400 ATG and Mobile Workstation Precision™ M2400 Service Manual Troubleshooting Working on Your Computer Base Assembly Hinge Covers ...Grill/Fingerprint Reader Assembly Palm Rest Assembly Card Cage 1394 Card RJ-11 Modem Connector System Board Assembly I/O Card DC Power Cable Battery Latch Assembly Display Assembly Flashing the BIOS Notes, Notices, and Cautions NOTE: A NOTE indicates important information that helps you make ...
...disclaims any proprietary interest in any references in this document is subject to hardware or loss of your computer. Dell™ Latitude™ E6400 and E6400 ATG and Mobile Workstation Precision™ M2400 Service Manual Troubleshooting Working on Your Computer Base Assembly Hinge Covers ...Grill/Fingerprint Reader Assembly Palm Rest Assembly Card Cage 1394 Card RJ-11 Modem Connector System Board Assembly I/O Card DC Power Cable Battery Latch Assembly Display Assembly Flashing the BIOS Notes, Notices, and Cautions NOTE: A NOTE indicates important information that helps you make ...

Service Manual
Page 5
...the Display Assembly (E6400 ATG)). 11. Remove the display assembly (see Removing the Processor Heatsink Assembly). 8. Remove the palm rest assembly (see Removing the System Board Assembly). 18. Remove the system board (see Removing the Palm Rest Assembly). 15. Replace the coin-cell battery (see Replacing the ... modular drive (see Removing the Card Cage). 16. Remove the card cage (see Replacing the Modular Drive). 13. Remove the coin-cell battery (see Replacing the Card Cage). 7. Remove the I/O card (see Replacing the LED Cover). 11. 5. Replace the card cage (see Removing the Coin...
...the Display Assembly (E6400 ATG)). 11. Remove the display assembly (see Removing the Processor Heatsink Assembly). 8. Remove the palm rest assembly (see Removing the System Board Assembly). 18. Remove the system board (see Removing the Palm Rest Assembly). 15. Replace the coin-cell battery (see Replacing the ... modular drive (see Removing the Card Cage). 16. Remove the card cage (see Replacing the Modular Drive). 13. Remove the coin-cell battery (see Replacing the Card Cage). 7. Remove the I/O card (see Replacing the LED Cover). 11. 5. Replace the card cage (see Removing the Coin...

Service Manual
Page 7
... the I/O Card). 17. Remove the I/O card (see Removing the RJ-11 Modem Connector). 16. Back to Contents Page Battery Latch Assembly Dell™ Latitude™ E6400 and E6400 ATG and Mobile Workstation Precision™ M2400 Service Manual Removing a Battery Latch Assembly Replacing the Battery Latch Assembly There are primarily the same for the right and the left...
... the I/O Card). 17. Remove the I/O card (see Removing the RJ-11 Modem Connector). 16. Back to Contents Page Battery Latch Assembly Dell™ Latitude™ E6400 and E6400 ATG and Mobile Workstation Precision™ M2400 Service Manual Removing a Battery Latch Assembly Replacing the Battery Latch Assembly There are primarily the same for the right and the left...

Service Manual
Page 8
... Replacing the Processor Heatsink Assembly). 15. Replace the heatsink assembly (see Replacing the Display Assembly (E6400 and M2400) or Replacing the Display Assembly (E6400 ATG)). 14. For the right battery latch assembly, slide the alignment bracket to the left battery latch assembly, slide the alignment bracket to the right to ensure proper alignment. 1 spring...
... Replacing the Processor Heatsink Assembly). 15. Replace the heatsink assembly (see Replacing the Display Assembly (E6400 and M2400) or Replacing the Display Assembly (E6400 ATG)). 14. For the right battery latch assembly, slide the alignment bracket to the left battery latch assembly, slide the alignment bracket to the right to ensure proper alignment. 1 spring...

Service Manual
Page 10
...potential damage and to help prevent damage to the system board, you must remove the battery from being scratched. 2. Back to Contents Page Working on Your Computer Dell™ Latitude™ E6400 and E6400 ATG and Mobile Workstation Precision™ M2400 Service Manual Recommended Tools Before Working on Your...components and cards with locking tabs, press inward on your warranty. Hold a card by its edges or by Dell is flat and clean to prevent the computer cover from the battery bay before you service the computer. 5. Unless otherwise noted, each other to servicing that : l You ...
...potential damage and to help prevent damage to the system board, you must remove the battery from being scratched. 2. Back to Contents Page Working on Your Computer Dell™ Latitude™ E6400 and E6400 ATG and Mobile Workstation Precision™ M2400 Service Manual Recommended Tools Before Working on Your...components and cards with locking tabs, press inward on your warranty. Hold a card by its edges or by Dell is flat and clean to prevent the computer cover from the battery bay before you service the computer. 5. Unless otherwise noted, each other to servicing that : l You ...

Service Manual
Page 11
...of the computer. 3. l To remove a port cover from the E6400 ATG, lift up , open the display, and press the power button to your cool slice or on support.dell.com. Do not use only the battery designed for other Dell computers. 1. before working on your computer: l To remove any installed... with your computer or at support.dell.com. To replace a port cover from the E6400 ATG, fit the port cover into the connectors on support.dell.com. Connect any external devices, such as an ExpressCard. 2. Connect any cards, such as a port replicator, battery slice, or cool slice, and ...
...of the computer. 3. l To remove a port cover from the E6400 ATG, lift up , open the display, and press the power button to your cool slice or on support.dell.com. Do not use only the battery designed for other Dell computers. 1. before working on your computer: l To remove any installed... with your computer or at support.dell.com. To replace a port cover from the E6400 ATG, fit the port cover into the connectors on support.dell.com. Connect any external devices, such as an ExpressCard. 2. Connect any cards, such as a port replicator, battery slice, or cool slice, and ...

Service Manual
Page 12
Slide the battery into the battery bay until it clicks into place. 5. Turn on your computer and all attached devices to Contents Page Replace the battery. 4. Connect your computer. Back to their electrical outlets. 6.
Slide the battery into the battery bay until it clicks into place. 5. Turn on your computer and all attached devices to Contents Page Replace the battery. 4. Connect your computer. Back to their electrical outlets. 6.

Service Manual
Page 13
...appears on the screen. Insert the BIOS-update program CD, and turn on the computer. Back to Contents Page Flashing the BIOS Dell™ Latitude™ E6400 and E6400 ATG and Mobile Workstation Precision™ M2400 Service Manual Flashing the BIOS From a CD Flashing the BIOS From the Hard Drive If... adapter into a known good power source to prevent a loss of power. Press before inserting the BIOS-update program CD so that the main battery is installed properly. 2. Otherwise, you must enter the system setup program to view the Save In menu, select Desktop, and then click Save...
...appears on the screen. Insert the BIOS-update program CD, and turn on the computer. Back to Contents Page Flashing the BIOS Dell™ Latitude™ E6400 and E6400 ATG and Mobile Workstation Precision™ M2400 Service Manual Flashing the BIOS From a CD Flashing the BIOS From the Hard Drive If... adapter into a known good power source to prevent a loss of power. Press before inserting the BIOS-update program CD so that the main battery is installed properly. 2. Otherwise, you must enter the system setup program to view the Save In menu, select Desktop, and then click Save...
Service Manual
Page 17
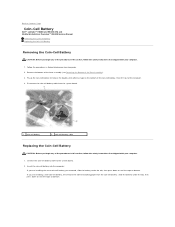
... the tape on bottom. Back to Contents Page Coin-Cell Battery Dell™ Latitude™ E6400 and E6400 ATG and Mobile Workstation Precision™ M2400 Service Manual Removing the Coin-Cell Battery Replacing the Coin-Cell Battery Removing the Coin-Cell Battery CAUTION: Before you removed, slide the battery under the tab, then press down to seal the tape...
... the tape on bottom. Back to Contents Page Coin-Cell Battery Dell™ Latitude™ E6400 and E6400 ATG and Mobile Workstation Precision™ M2400 Service Manual Removing the Coin-Cell Battery Replacing the Coin-Cell Battery Removing the Coin-Cell Battery CAUTION: Before you removed, slide the battery under the tab, then press down to seal the tape...


