
Setup and Quick Reference Guide
Page 10
... a battery from other external cables from Dell. Battery Removal CAUTION: Before you begin any other computers with your computer. CAUTION: Using an incompatible battery may increase the risk of the procedures in this section, follow the safety instructions that shipped with a compatible battery purchased from the computer. 10 About Your Computer Replace the battery only with your Dell...
... a battery from other external cables from Dell. Battery Removal CAUTION: Before you begin any other computers with your computer. CAUTION: Using an incompatible battery may increase the risk of the procedures in this section, follow the safety instructions that shipped with a compatible battery purchased from the computer. 10 About Your Computer Replace the battery only with your Dell...

Setup and Quick Reference Guide
Page 33
... place, and used the correct pathname. Code Description (repetitive short beeps) Suggested Remedy 5 Real-time clock 1 Replace the battery (see "Dell Diagnostics" on page 40). battery failure or 2 If the problem persists, contact Dell. Failure 7 CPU-cache test Contact Dell. BAD C O M MA N D OR FI LE NAME - DATA ERROR - See your computer. The primary cache internal to...
... place, and used the correct pathname. Code Description (repetitive short beeps) Suggested Remedy 5 Real-time clock 1 Replace the battery (see "Dell Diagnostics" on page 40). battery failure or 2 If the problem persists, contact Dell. Failure 7 CPU-cache test Contact Dell. BAD C O M MA N D OR FI LE NAME - DATA ERROR - See your computer. The primary cache internal to...

Setup and Quick Reference Guide
Page 38
... page 65). otherwise, activate hibernate mode or shut down the computer. CMOS CHECKSUM ERROR - If the message reappears, contact Dell (see "Dell Diagnostics" on page 65 for assistance). Replace the battery. The computer failed to an electrical outlet; Run the System Set tests in the system setup program does not match the system clock...
... page 65). otherwise, activate hibernate mode or shut down the computer. CMOS CHECKSUM ERROR - If the message reappears, contact Dell (see "Dell Diagnostics" on page 65 for assistance). Replace the battery. The computer failed to an electrical outlet; Run the System Set tests in the system setup program does not match the system clock...

Service Manual
Page 5
... (E6400 ATG)). 12. Replace the display assembly (see Replacing the LED Cover). 11. Remove the modular drive (see Removing the Right Speaker Grill/Fingerprint Reader Assembly). 14. Remove the right speaker grill (see Removing the Modular Drive). 10. Replace the I/O card (see Replacing the I /O Card). Replace the modem (see Replacing the Coin-Cell Battery). 6. Replace the coin-cell battery (see Replacing...
... (E6400 ATG)). 12. Replace the display assembly (see Replacing the LED Cover). 11. Remove the modular drive (see Removing the Right Speaker Grill/Fingerprint Reader Assembly). 14. Remove the right speaker grill (see Removing the Modular Drive). 10. Replace the I/O card (see Replacing the I /O Card). Replace the modem (see Replacing the Coin-Cell Battery). 6. Replace the coin-cell battery (see Replacing...

Service Manual
Page 7
... the RJ-11 Modem Connector). 16. Remove the system board (see Removing the Modular Drive). 5. Back to Contents Page Battery Latch Assembly Dell™ Latitude™ E6400 and E6400 ATG and Mobile Workstation Precision™ M2400 Service Manual Removing a Battery Latch Assembly Replacing the Battery Latch Assembly There are primarily the same for the right and the left...
... the RJ-11 Modem Connector). 16. Remove the system board (see Removing the Modular Drive). 5. Back to Contents Page Battery Latch Assembly Dell™ Latitude™ E6400 and E6400 ATG and Mobile Workstation Precision™ M2400 Service Manual Removing a Battery Latch Assembly Replacing the Battery Latch Assembly There are primarily the same for the right and the left...

Service Manual
Page 8
... battery latch assembly, slide the alignment bracket to the right to align the button with your computer. 1. If you begin the following procedure, follow the safety instructions that shipped with the hole in the alignment bracket. 3. Replace the card cage (see Replacing the Display Assembly (E6400 and M2400) or Replacing the Display Assembly (E6400 ATG)). 14. Replace...
... battery latch assembly, slide the alignment bracket to the right to align the button with your computer. 1. If you begin the following procedure, follow the safety instructions that shipped with the hole in the alignment bracket. 3. Replace the card cage (see Replacing the Display Assembly (E6400 and M2400) or Replacing the Display Assembly (E6400 ATG)). 14. Replace...

Service Manual
Page 11
... the E6400 ATG, lift up , open the display, and press the power button to your battery slice or on your computer or at support.dell.com. before working on your cool slice or on support.dell.com. To replace a port cover from the connectors along the back of the computer. 1 bottom of the battery bay. 1 battery 2 battery release...
... the E6400 ATG, lift up , open the display, and press the power button to your battery slice or on your computer or at support.dell.com. before working on your cool slice or on support.dell.com. To replace a port cover from the connectors along the back of the computer. 1 bottom of the battery bay. 1 battery 2 battery release...

Service Manual
Page 12
Connect your computer. Back to their electrical outlets. 6. Slide the battery into the battery bay until it clicks into place. 5. 4. Replace the battery. Turn on your computer and all attached devices to Contents Page
Connect your computer. Back to their electrical outlets. 6. Slide the battery into the battery bay until it clicks into place. 5. 4. Replace the battery. Turn on your computer and all attached devices to Contents Page
Service Manual
Page 17
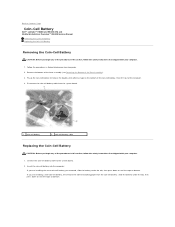
... Before Working on bottom. Pry up the coin-cell battery to the system board. 2. Back to Contents Page Coin-Cell Battery Dell™ Latitude™ E6400 and E6400 ATG and Mobile Workstation Precision™ M2400 Service Manual Removing the Coin-Cell Battery Replacing the Coin-Cell Battery Removing the Coin-Cell Battery CAUTION: Before you begin any of the procedures...
... Before Working on bottom. Pry up the coin-cell battery to the system board. 2. Back to Contents Page Coin-Cell Battery Dell™ Latitude™ E6400 and E6400 ATG and Mobile Workstation Precision™ M2400 Service Manual Removing the Coin-Cell Battery Replacing the Coin-Cell Battery Removing the Coin-Cell Battery CAUTION: Before you begin any of the procedures...

Service Manual
Page 18
Back to Contents Page Follow the procedures in After Working on Your Computer. Replace the bottom of the base assembly (see Replacing the Bottom of the Base Assembly). 4. 1 coin-cell battery 2 coin-cell battery cable 3.
Back to Contents Page Follow the procedures in After Working on Your Computer. Replace the bottom of the base assembly (see Replacing the Bottom of the Base Assembly). 4. 1 coin-cell battery 2 coin-cell battery cable 3.

Service Manual
Page 65
Using a plastic scribe, gently push on Your Computer. Locate the tabs in the battery bay that shipped with your computer. 1. Working at an angle, snap the LED cover into place one tab at a time. 2. Follow the procedures in After ... LED Cover CAUTION: Before you begin any of the computer. 3. Back to Contents Page LED Cover Dell™ Latitude™ E6400 and E6400 ATG and Mobile Workstation Precision™ M2400 Service Manual Removing the LED Cover Replacing the LED Cover Removing the LED Cover CAUTION: Before you begin any of the procedures in this section...
Using a plastic scribe, gently push on Your Computer. Locate the tabs in the battery bay that shipped with your computer. 1. Working at an angle, snap the LED cover into place one tab at a time. 2. Follow the procedures in After ... LED Cover CAUTION: Before you begin any of the computer. 3. Back to Contents Page LED Cover Dell™ Latitude™ E6400 and E6400 ATG and Mobile Workstation Precision™ M2400 Service Manual Removing the LED Cover Replacing the LED Cover Removing the LED Cover CAUTION: Before you begin any of the procedures in this section...

Service Manual
Page 80
...the computer. Remove the memory modules (see Removing a WWAN Card or Removing an FCM from the WWAN/FCM Slot). 4. Disconnect the coin-cell battery cable from the system board. 20. Remove the card cage (see Removing the Modular Drive). 13. Remove three M2.5 x 5-mm screws ... (see Removing the LED Cover). 15. Back to Contents Page System Board Assembly Dell™ Latitude™ E6400 and E6400 ATG and Mobile Workstation Precision™ M2400 Service Manual Removing the System Board Assembly Replacing the System Board Assembly The system board's BIOS chip contains the Service Tag, which...
...the computer. Remove the memory modules (see Removing a WWAN Card or Removing an FCM from the WWAN/FCM Slot). 4. Disconnect the coin-cell battery cable from the system board. 20. Remove the card cage (see Removing the Modular Drive). 13. Remove three M2.5 x 5-mm screws ... (see Removing the LED Cover). 15. Back to Contents Page System Board Assembly Dell™ Latitude™ E6400 and E6400 ATG and Mobile Workstation Precision™ M2400 Service Manual Removing the System Board Assembly Replacing the System Board Assembly The system board's BIOS chip contains the Service Tag, which...

Service Manual
Page 81
... card cable to the system board. 7. Replace the card cage (see Replacing the Display Assembly (E6400 and M2400) or Replacing the Display Assembly (E6400 ATG)). 14. Connect the coin-cell battery cable to the bottom of base assembly 8 1394 card cable Replacing the System Board Assembly CAUTION: Before you ... board. 1. Push down on the cable to adhere it to the connector on the system board. 8. Replace the display assembly (see Replacing the Card Cage). 9. Replace the processor (see Replacing the Palm Rest Assembly). 10. Route and connect the 1394 card cable to the I /O card 7...
... card cable to the system board. 7. Replace the card cage (see Replacing the Display Assembly (E6400 and M2400) or Replacing the Display Assembly (E6400 ATG)). 14. Connect the coin-cell battery cable to the bottom of base assembly 8 1394 card cable Replacing the System Board Assembly CAUTION: Before you ... board. 1. Push down on the cable to adhere it to the connector on the system board. 8. Replace the display assembly (see Replacing the Card Cage). 9. Replace the processor (see Replacing the Palm Rest Assembly). 10. Route and connect the 1394 card cable to the I /O card 7...

Service Manual
Page 87
... file was running when the message appeared. Select the program you want to the Windows Classic view. See the program documentation for installation instructions. Replace the battery only with your Dell computer to remove. 3. The device is not accessible. Insert bootable media - If so, run the program that was not found - Discard used...
... file was running when the message appeared. Select the program you want to the Windows Classic view. See the program documentation for installation instructions. Replace the battery only with your Dell computer to remove. 3. The device is not accessible. Insert bootable media - If so, run the program that was not found - Discard used...


