
Dell™ Technology Guide
Page 10
Removing Applications From Your Computer . . . . . 123 Windows Vista 123 Windows XP 123 Ending an Application When it Does not Respond 124 10 Maintenance Tasks (Enhance Performance ...; XP 128 Performance Tuning 129 System Setup Based Performance Tuning . . . . 129 Software Based Performance Tuning 129 NVIDIA Performance 129 NVIDIA Monitor 130 Cleaning Up Your Hard Drive 131 Defragmenting Your Hard Drive 132 Detecting and Repairing Disk Errors 133 Scanning for Viruses and Spyware 133 10 Contents
Removing Applications From Your Computer . . . . . 123 Windows Vista 123 Windows XP 123 Ending an Application When it Does not Respond 124 10 Maintenance Tasks (Enhance Performance ...; XP 128 Performance Tuning 129 System Setup Based Performance Tuning . . . . 129 Software Based Performance Tuning 129 NVIDIA Performance 129 NVIDIA Monitor 130 Cleaning Up Your Hard Drive 131 Defragmenting Your Hard Drive 132 Detecting and Repairing Disk Errors 133 Scanning for Viruses and Spyware 133 10 Contents

Dell™ Technology Guide
Page 80
... the driver for which you see the Windows desktop, reinsert the Drivers and Utilities media. 5 At the Welcome Dell System Owner screen, click Next. If not, go to your hard drive. 2 Click Start and right-click Computer. 3 Click Properties→ Device Manager. 4 Double-click the type... message appears, stating that you want to reinstall and follow the prompts on the screen. 3 When the InstallShield Wizard Complete window appears, remove the Drivers and Utilities media and click Finish to Reinstall a Driver 1 With the Windows desktop displayed, insert the Drivers and Utilities media. ...
... the driver for which you see the Windows desktop, reinsert the Drivers and Utilities media. 5 At the Welcome Dell System Owner screen, click Next. If not, go to your hard drive. 2 Click Start and right-click Computer. 3 Click Properties→ Device Manager. 4 Double-click the type... message appears, stating that you want to reinstall and follow the prompts on the screen. 3 When the InstallShield Wizard Complete window appears, remove the Drivers and Utilities media and click Finish to Reinstall a Driver 1 With the Windows desktop displayed, insert the Drivers and Utilities media. ...

Dell™ Technology Guide
Page 97
... you want to keep on the RAID volume). 7 On the Select Source Hard Drive screen, double-click the hard drive from which you want to act as the RAID level. NOTICE: In the following step, all data contained on the member drive is removed. 11 Click Finish to start migrating, or click Back to make changes...
... you want to keep on the RAID volume). 7 On the Select Source Hard Drive screen, double-click the hard drive from which you want to act as the RAID level. NOTICE: In the following step, all data contained on the member drive is removed. 11 Click Finish to start migrating, or click Back to make changes...
Dell™ Technology Guide
Page 129
..."tweaking" the performance of the components. For more information on accessing System Setup, see "Removing Applications From Your Computer" on page 307. If your hard drive by removing unused applications, see "System Setup" on page 123. NVIDIA Performance The NVIDIA Performance application...characteristics. Performance - Performance Tuning System Setup Based Performance Tuning For some Dell systems, the settings available under the Advanced page of System Setup provide users with ESA, Dell has preinstalled applications for real-time monitoring and control of the NVIDIA ...
..."tweaking" the performance of the components. For more information on accessing System Setup, see "Removing Applications From Your Computer" on page 307. If your hard drive by removing unused applications, see "System Setup" on page 123. NVIDIA Performance The NVIDIA Performance application...characteristics. Performance - Performance Tuning System Setup Based Performance Tuning For some Dell systems, the settings available under the Advanced page of System Setup provide users with ESA, Dell has preinstalled applications for real-time monitoring and control of the NVIDIA ...

Dell™ Technology Guide
Page 139
...hard drive and then completely turning off computer. The computer may also use one of the following methods to enter hibernate: • Press the power button. • Close the display for a notebook computer. • Press . To manually enter hibernate: • Click Start → Turn off the computer. Remove... your computer is in before entering hibernate. Power (Power Settings, Power Protection Devices, and Batteries) 139 NOTICE: You cannot remove devices or undock your computer while your computer. When the computer exits hibernate, it returns to the same operating state it ...
...hard drive and then completely turning off computer. The computer may also use one of the following methods to enter hibernate: • Press the power button. • Close the display for a notebook computer. • Press . To manually enter hibernate: • Click Start → Turn off the computer. Remove... your computer is in before entering hibernate. Power (Power Settings, Power Protection Devices, and Batteries) 139 NOTICE: You cannot remove devices or undock your computer while your computer. When the computer exits hibernate, it returns to the same operating state it ...

Dell™ Technology Guide
Page 265
... changes that System Restore makes to your data files. Restoring Your Operating System 265 Both permanently delete all data on the hard drive and remove any programs installed after you received the computer. Use the disc only if System Restore did not resolve your operating system problem...when you to return your data files or recover them. NOTICE: Make regular backups of your computer are completely reversible. Use Dell PC Restore or Dell Factory Image Restore only if System Restore did not resolve your operating system problem. System Restore does not monitor your computer ...
... changes that System Restore makes to your data files. Restoring Your Operating System 265 Both permanently delete all data on the hard drive and remove any programs installed after you received the computer. Use the disc only if System Restore did not resolve your operating system problem...when you to return your data files or recover them. NOTICE: Make regular backups of your computer are completely reversible. Use Dell PC Restore or Dell Factory Image Restore only if System Restore did not resolve your operating system problem. System Restore does not monitor your computer ...

Dell™ Technology Guide
Page 267
... your operating system problem. If possible, back up the data before using these options. NOTE: Dell PC Restore by Symantec and Dell Factory Image Restore may not be available in certain countries or on the hard drive and removes any programs or drivers installed after you reinstall Windows XP with less than 200 MB of...
... your operating system problem. If possible, back up the data before using these options. NOTE: Dell PC Restore by Symantec and Dell Factory Image Restore may not be available in certain countries or on the hard drive and removes any programs or drivers installed after you reinstall Windows XP with less than 200 MB of...
Dell™ Technology Guide
Page 343
... discharge - ESD can damage integrated circuits found in some countries. ExpressCard - A removable I/O card adhering to the system bus. Express Service Code service may not be...measurement scale where 32° is the freezing point and 212° is the boiling point of your Dell™ computer. A U.S. ECP - EIDE - electromagnetic interference - expansion card - ExpressCards support both the ... parallel connector design that extends beyond the edge of the IDE interface for hard drives and CD drives. An improved version of the PC Card slot when installed. Also referred to...
... discharge - ESD can damage integrated circuits found in some countries. ExpressCard - A removable I/O card adhering to the system bus. Express Service Code service may not be...measurement scale where 32° is the freezing point and 212° is the boiling point of your Dell™ computer. A U.S. ECP - EIDE - electromagnetic interference - expansion card - ExpressCards support both the ... parallel connector design that extends beyond the edge of the IDE interface for hard drives and CD drives. An improved version of the PC Card slot when installed. Also referred to...
Dell™ Technology Guide
Page 348
...rate between the processor and devices such as video, drives, and networks. P partition - peripheral component interconnect - If the PCI Express chip set . programmed input/output - NVRAM - PCI Express - Plug-and-Play - A removable I/O card adhering to automatically configure devices. Personal ...by the 348 A physical storage area on a hard drive that establishes standards for maintaining computer configuration information such as part of optical drives include CD drives, DVD drives, CD-RW drives, and CD-RW/DVD combo drives. NVRAM is used for PC Cards. PCI -...
...rate between the processor and devices such as video, drives, and networks. P partition - peripheral component interconnect - If the PCI Express chip set . programmed input/output - NVRAM - PCI Express - Plug-and-Play - A removable I/O card adhering to automatically configure devices. Personal ...by the 348 A physical storage area on a hard drive that establishes standards for maintaining computer configuration information such as part of optical drives include CD drives, DVD drives, CD-RW drives, and CD-RW/DVD combo drives. NVRAM is used for PC Cards. PCI -...

Setup Guide
Page 53
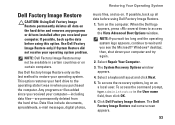
... also deletes all data on the hard drive. Use Dell Factory Image Restore only if System Restore did not resolve your operating system. INSPIRON Restoring Your Operating System You can use it was in when you purchased the computer. This procedure permanently deletes all data on the hard drive and removes any programs installed after you can...
... also deletes all data on the hard drive. Use Dell Factory Image Restore only if System Restore did not resolve your operating system. INSPIRON Restoring Your Operating System You can use it was in when you purchased the computer. This procedure permanently deletes all data on the hard drive and removes any programs installed after you can...
Setup Guide
Page 55
... see the Microsoft® Windows® desktop; Select Repair Your Computer. 3. To access the recovery options, log on . Click Dell Factory Image Restore. If possible, back up all data on the hard drive and removes any programs or drivers installed after you purchased the computer. Data files include documents, spreadsheets, e-mail messages, digital photos...
... see the Microsoft® Windows® desktop; Select Repair Your Computer. 3. To access the recovery options, log on . Click Dell Factory Image Restore. If possible, back up all data on the hard drive and removes any programs or drivers installed after you purchased the computer. Data files include documents, spreadsheets, e-mail messages, digital photos...

Setup Guide
Page 62
... Authorization Number, and write it clearly and prominently on the outside of your confidential, proprietary or personal information; lost removable media that belong with your region, see "Dell Diagnostics" on page 47). 4. Include a copy of the Diagnostics Checklist (see "Diagnostic Checklist" on page 62),... have run and any error messages reported by the Dell Diagnostics (see "Contacting Dell" on page 63. 2. Remove any other storage device in the product. NOTE: For the telephone number to back up any data on the hard drive(s) and on any and all items being returned (power...
... Authorization Number, and write it clearly and prominently on the outside of your confidential, proprietary or personal information; lost removable media that belong with your region, see "Dell Diagnostics" on page 47). 4. Include a copy of the Diagnostics Checklist (see "Diagnostic Checklist" on page 62),... have run and any error messages reported by the Dell Diagnostics (see "Contacting Dell" on page 63. 2. Remove any other storage device in the product. NOTE: For the telephone number to back up any data on the hard drive(s) and on any and all items being returned (power...

Service Manual
Page 4
... or by your warranty. Removing the Battery Extension Board 1. Remove the hard drive (see the Regulatory Compliance Homepage at www.dell.com/regulatory_compliance. Remove the optical drive (see Removing the Keyboard). 9. Remove the keyboard (see Removing the Optical Drive). 7. Remove the center control cover (see Removing the Palm Rest). 10. Remove the tape to Contents Page Battery Extension Board Dell™ Inspiron™ 17 Service Manual...
... or by your warranty. Removing the Battery Extension Board 1. Remove the hard drive (see the Regulatory Compliance Homepage at www.dell.com/regulatory_compliance. Remove the optical drive (see Removing the Keyboard). 9. Remove the keyboard (see Removing the Optical Drive). 7. Remove the center control cover (see Removing the Palm Rest). 10. Remove the tape to Contents Page Battery Extension Board Dell™ Inspiron™ 17 Service Manual...

Service Manual
Page 8
... file icon appears on your desktop. 12. The computer continues to reset the computer defaults. 5. Press to boot and updates the new BIOS. Remove the BIOS-update program CD from the CD. Turn on the screen. Click BIOS. 10. The file downloads to your desktop and is plugged... of product in the Select Your Product Family list. 6. Back to Contents Page Flashing the BIOS Dell™ Inspiron™ 17 Service Manual Flashing the BIOS From a CD Flashing the BIOS From the Hard Drive If a BIOS-update program CD is complete, the computer will automatically restart. 3. Insert the BIOS...
... file icon appears on your desktop. 12. The computer continues to reset the computer defaults. 5. Press to boot and updates the new BIOS. Remove the BIOS-update program CD from the CD. Turn on the screen. Click BIOS. 10. The file downloads to your desktop and is plugged... of product in the Select Your Product Family list. 6. Back to Contents Page Flashing the BIOS Dell™ Inspiron™ 17 Service Manual Flashing the BIOS From a CD Flashing the BIOS From the Hard Drive If a BIOS-update program CD is complete, the computer will automatically restart. 3. Insert the BIOS...

Service Manual
Page 10
...Dell™ Inspiron™ 17 Service Manual Bluetooth Card Bluetooth Board WARNING: Before working inside your computer, read the safety information that shipped with your computer, it from the connector on your computer. Follow the procedures in Before You Begin. 2. Remove the center control cover (see Removing the Hard Drive... ordered a card with Bluetooth wireless technology with your warranty. Remove the hard drive (see Removing the Center Control Cover). 8. Remove the screw that is not authorized by Dell™ is already installed. Lift the Bluetooth card to servicing...
...Dell™ Inspiron™ 17 Service Manual Bluetooth Card Bluetooth Board WARNING: Before working inside your computer, read the safety information that shipped with your computer, it from the connector on your computer. Follow the procedures in Before You Begin. 2. Remove the center control cover (see Removing the Hard Drive... ordered a card with Bluetooth wireless technology with your warranty. Remove the hard drive (see Removing the Center Control Cover). 8. Remove the screw that is not authorized by Dell™ is already installed. Lift the Bluetooth card to servicing...

Service Manual
Page 11
.... 2. Connect the Bluetooth card to the connector on the Bluetooth board cable to the Bluetooth board. 4. Replace the optical drive (see Replacing the Hard Drive). 8. Replace the memory module(s) (see Removing the Bluetooth Card). 3. Remove the Bluetooth Card (see Replacing the Memory Module(s)). 9. Disconnect the display cable and camera cable from the respective system board...
.... 2. Connect the Bluetooth card to the connector on the Bluetooth board cable to the Bluetooth board. 4. Replace the optical drive (see Replacing the Hard Drive). 8. Replace the memory module(s) (see Removing the Bluetooth Card). 3. Remove the Bluetooth Card (see Replacing the Memory Module(s)). 9. Disconnect the display cable and camera cable from the respective system board...

Service Manual
Page 23
...; Inspiron™ 17 Service Manual Display Assembly Display Bezel Display Panel Display Panel Cable WARNING: Before working inside your computer, read the safety information that shipped with your computer). CAUTION: To avoid electrostatic discharge, ground yourself by using a wrist grounding strap or by your computer. Remove the center control cover (see Removing the Hard Drive...
...; Inspiron™ 17 Service Manual Display Assembly Display Bezel Display Panel Display Panel Cable WARNING: Before working inside your computer, read the safety information that shipped with your computer). CAUTION: To avoid electrostatic discharge, ground yourself by using a wrist grounding strap or by your computer. Remove the center control cover (see Removing the Hard Drive...

Service Manual
Page 24
... extremely fragile. Follow the procedures in position and replace the two screws that no stray screws remain inside edge of the computer. 7. Be careful when removing it to the computer base. 3. Replace the palm rest (see Replacing the Memory Module(s)). 10. Replace the two screws at the bottom of the display... Palm Rest). 4. CAUTION: Before turning on the computer, replace all screws and ensure that secure the display assembly to prevent damaging the bezel. 1. Replace the hard drive (see Replacing the Hard Drive). 9. Place the display assembly in Before You Begin. 2.
... extremely fragile. Follow the procedures in position and replace the two screws that no stray screws remain inside edge of the computer. 7. Be careful when removing it to the computer base. 3. Replace the palm rest (see Replacing the Memory Module(s)). 10. Replace the two screws at the bottom of the display... Palm Rest). 4. CAUTION: Before turning on the computer, replace all screws and ensure that secure the display assembly to prevent damaging the bezel. 1. Replace the hard drive (see Replacing the Hard Drive). 9. Place the display assembly in Before You Begin. 2.

Service Manual
Page 28
... Page ExpressCard Reader Board Dell™ Inspiron™ 17 Service Manual Removing the ExpressCard Reader Board Replacing the ExpressCard Reader Board WARNING: Before working inside your computer, read the safety information that shipped with your computer. Remove the battery (see Removing the Module Cover). 4. Remove the module cover (see Removing the Battery). 3. Remove the hard drive (see Removing the Palm Rest...
... Page ExpressCard Reader Board Dell™ Inspiron™ 17 Service Manual Removing the ExpressCard Reader Board Replacing the ExpressCard Reader Board WARNING: Before working inside your computer, read the safety information that shipped with your computer. Remove the battery (see Removing the Module Cover). 4. Remove the module cover (see Removing the Battery). 3. Remove the hard drive (see Removing the Palm Rest...

Service Manual
Page 30
..., drivers, and utilities on your computer (see the Regulatory Compliance Homepage at www.dell.com/regulatory_compliance. CAUTION: To prevent data loss, turn off your computer). Back to Contents Page Hard Drive Dell™ Inspiron™ 17 Service Manual Removing the Hard Drive Replacing the Hard Drive WARNING: Before working inside your computer, read the safety information that shipped with your...
..., drivers, and utilities on your computer (see the Regulatory Compliance Homepage at www.dell.com/regulatory_compliance. CAUTION: To prevent data loss, turn off your computer). Back to Contents Page Hard Drive Dell™ Inspiron™ 17 Service Manual Removing the Hard Drive Replacing the Hard Drive WARNING: Before working inside your computer, read the safety information that shipped with your...


