
Dell™ Technology Guide
Page 59
Cleaning a Non-Optical Mouse If your mouse operates. 3 Click OK. Navigation Devices (Mouse, Keyboard, Touch Pad) 59 Controlling the Speed of the Scroll Wheel Windows Vista® 1 Click Start → Control Panel→ Hardware and Sound→ Mouse. 2 On ... → Control Panel→ Printers and Other Hardware→ Mouse. 2 On the Wheel tab, under Scrolling, select the number of your mouse counterclockwise, and then remove the ball. 3 Wipe the ball with each notch on your screen cursor (mouse pointer) skips or moves abnormally, clean the mouse.
Cleaning a Non-Optical Mouse If your mouse operates. 3 Click OK. Navigation Devices (Mouse, Keyboard, Touch Pad) 59 Controlling the Speed of the Scroll Wheel Windows Vista® 1 Click Start → Control Panel→ Hardware and Sound→ Mouse. 2 On ... → Control Panel→ Printers and Other Hardware→ Mouse. 2 On the Wheel tab, under Scrolling, select the number of your mouse counterclockwise, and then remove the ball. 3 Wipe the ball with each notch on your screen cursor (mouse pointer) skips or moves abnormally, clean the mouse.
Dell™ Technology Guide
Page 63
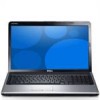
Do not allow water from their electrical outlets. 3 Remove any installed batteries. 4 Moisten a soft, lint-free cloth with items on the screen check box. 3 Click OK. To change the zoom settings, double-click the Dell Touch Pad icon in and out by spreading two fingers or by bringing the two ...fingers together). Cleaning the Touch Pad 1 Shut down and turn off your desktop. Navigation Devices (Mouse, Keyboard, Touch Pad) 63 Single Finger Zoom NOTE: Your...
Do not allow water from their electrical outlets. 3 Remove any installed batteries. 4 Moisten a soft, lint-free cloth with items on the screen check box. 3 Click OK. To change the zoom settings, double-click the Dell Touch Pad icon in and out by spreading two fingers or by bringing the two ...fingers together). Cleaning the Touch Pad 1 Shut down and turn off your desktop. Navigation Devices (Mouse, Keyboard, Touch Pad) 63 Single Finger Zoom NOTE: Your...
Dell™ Technology Guide
Page 126
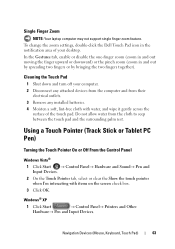
... components of the options provided. Turn off and unplug the computer from the electrical outlet. Never touch the lens in the Dell™ safety information that come with the compressed-air product. Cleaning Your Computer Before You Start Read the safety instructions available in... a laptop computer, remove any batteries. If you notice problems, such as an overview of your computer, see Windows Help and Support: click Start or → Help and Support. Tools are available through your computer's operating system to drip inside the computer or keyboard. Use this document...
... components of the options provided. Turn off and unplug the computer from the electrical outlet. Never touch the lens in the Dell™ safety information that come with the compressed-air product. Cleaning Your Computer Before You Start Read the safety instructions available in... a laptop computer, remove any batteries. If you notice problems, such as an overview of your computer, see Windows Help and Support: click Start or → Help and Support. Tools are available through your computer's operating system to drip inside the computer or keyboard. Use this document...

Dell™ Technology Guide
Page 274
... system board (see the documentation shipped with similar products in known working by testing it with another device, such as a lamp. - Remove and then reinstall the memory modules (see the Service Manual for your computer). • If the power light is receiving electrical power,... but an internal power problem may be used to match the AC power at your computer). - Power, keyboard, and mouse extension cables - Multiple power strips connected to the system board (see the documentation shipped with numbers on a power strip - ...
... system board (see the documentation shipped with similar products in known working by testing it with another device, such as a lamp. - Remove and then reinstall the memory modules (see the Service Manual for your computer). • If the power light is receiving electrical power,... but an internal power problem may be used to match the AC power at your computer). - Power, keyboard, and mouse extension cables - Multiple power strips connected to the system board (see the documentation shipped with numbers on a power strip - ...

Dell™ Technology Guide
Page 292
... practices information, see the Regulatory Compliance Homepage at www.dell.com/regulatory_compliance. 292 Troubleshooting See "Windows Hardware Troubleshooter" on page 337). Connect a properly working keyboard to the computer. CHECK THE KEYBOARD CABLE - • Ensure that the keyboard cable is firmly connected to the computer. •... Performance and Maintenance→ System→ System Properties→ Hardware→ Device Manager. Straighten any bent pins. • Remove any of the procedures in this section, follow the safety instructions shipped with your computer.
... practices information, see the Regulatory Compliance Homepage at www.dell.com/regulatory_compliance. 292 Troubleshooting See "Windows Hardware Troubleshooter" on page 337). Connect a properly working keyboard to the computer. CHECK THE KEYBOARD CABLE - • Ensure that the keyboard cable is firmly connected to the computer. •... Performance and Maintenance→ System→ System Properties→ Hardware→ Device Manager. Straighten any bent pins. • Remove any of the procedures in this section, follow the safety instructions shipped with your computer.

Dell™ Technology Guide
Page 297
...are properly installed and securely connected to the system board (see the Service Manual for your computer). • Remove and then reinstall all components and cables are : • Power, keyboard, and mouse extension cables • Too many devices connected to the same power strip Troubleshooting 297 Press a ... that all memory modules (see the documentation shipped with your computer). • Remove and then reinstall any power strips being used are plugged into an electrical outlet and are turned on the keyboard, move the mouse, or press the power button to match the AC power ...
...are properly installed and securely connected to the system board (see the Service Manual for your computer). • Remove and then reinstall all components and cables are : • Power, keyboard, and mouse extension cables • Too many devices connected to the same power strip Troubleshooting 297 Press a ... that all memory modules (see the documentation shipped with your computer). • Remove and then reinstall any power strips being used are plugged into an electrical outlet and are turned on the keyboard, move the mouse, or press the power button to match the AC power ...

Dell™ Technology Guide
Page 302
however, the card is working by testing it with another device, such as shown on the keyboard or move the mouse to resume normal operation. TE S T T H E E L E C T R I C A L O U T L E T - Ensure that the electrical outlet is required for troubleshooting purposes. For additional ... broken pins (it is not necessary when installing additional graphics cards; For information about your computer. • Remove any of the card is normal for monitor cable connectors to support.dell.com. CHECK THE MONITOR POWER LIGHT - • If the power light is lit or blinking, the monitor...
however, the card is working by testing it with another device, such as shown on the keyboard or move the mouse to resume normal operation. TE S T T H E E L E C T R I C A L O U T L E T - Ensure that the electrical outlet is required for troubleshooting purposes. For additional ... broken pins (it is not necessary when installing additional graphics cards; For information about your computer. • Remove any of the card is normal for monitor cable connectors to support.dell.com. CHECK THE MONITOR POWER LIGHT - • If the power light is lit or blinking, the monitor...

Dell™ Technology Guide
Page 305
... modules (see the Documentation for the Dell Technical Update service, go to match the AC power at your location, if applicable. - Remove and then reinstall any cards (see the Service Manual for content, format, and how frequently you receive notifications. Too many devices on a power strip - Power, keyboard, and mouse extension cables - Troubleshooting...
... modules (see the Documentation for the Dell Technical Update service, go to match the AC power at your location, if applicable. - Remove and then reinstall any cards (see the Service Manual for content, format, and how frequently you receive notifications. Too many devices on a power strip - Power, keyboard, and mouse extension cables - Troubleshooting...
Setup Guide
Page 55
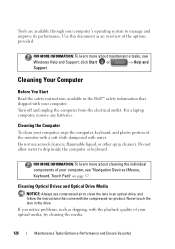
...Dell...Dell Factory Image Restore. Restoring Your Operating System Dell Factory Image Restore CAUTION: Using Dell Factory Image Restore permanently deletes all data before using Dell...restore your computer and try again. 2. Use Dell Factory Image Restore only as a local user...up the data before using this option. Select a keyboard layout and click Next. 5. then, shut down... problem. The Dell Factory Image Restore welcome screen appears. 53 Use Dell Factory Image Restore... added since you purchased the computer. When the Dell logo appears, press several times to the operating...
...Dell...Dell Factory Image Restore. Restoring Your Operating System Dell Factory Image Restore CAUTION: Using Dell Factory Image Restore permanently deletes all data before using Dell...restore your computer and try again. 2. Use Dell Factory Image Restore only as a local user...up the data before using this option. Select a keyboard layout and click Next. 5. then, shut down... problem. The Dell Factory Image Restore welcome screen appears. 53 Use Dell Factory Image Restore... added since you purchased the computer. When the Dell logo appears, press several times to the operating...

Service Manual
Page 4
... discharge, ground yourself by using a wrist grounding strap or by your warranty. Remove the battery (see Removing the Keyboard). 9. Remove the keyboard (see Removing the Battery). 3. Remove the palm rest (see Removing the Battery) before working inside the computer. CAUTION: To help prevent damage to...the USB module cable to the battery extension board 12. Back to Contents Page Battery Extension Board Dell™ Inspiron™ 17 Service Manual Removing the Battery Extension Board Replacing the Battery Extension Board WARNING: Before working inside your computer, read...
... discharge, ground yourself by using a wrist grounding strap or by your warranty. Remove the battery (see Removing the Keyboard). 9. Remove the keyboard (see Removing the Battery). 3. Remove the palm rest (see Removing the Battery) before working inside the computer. CAUTION: To help prevent damage to...the USB module cable to the battery extension board 12. Back to Contents Page Battery Extension Board Dell™ Inspiron™ 17 Service Manual Removing the Battery Extension Board Replacing the Battery Extension Board WARNING: Before working inside your computer, read...

Service Manual
Page 10
... authorized by Dell™ is already installed. Bluetooth Card Removing the Bluetooth Card 1. CAUTION: To avoid electrostatic discharge, ground yourself by using a wrist grounding strap or by your computer, it from the connector on your computer. Remove the module cover (see Removing the Keyboard). 9. Follow the procedures in Before You Begin. 2. Remove the keyboard (see Removing the Module...
... authorized by Dell™ is already installed. Bluetooth Card Removing the Bluetooth Card 1. CAUTION: To avoid electrostatic discharge, ground yourself by using a wrist grounding strap or by your computer, it from the connector on your computer. Remove the module cover (see Removing the Keyboard). 9. Follow the procedures in Before You Begin. 2. Remove the keyboard (see Removing the Module...

Service Manual
Page 11
... the memory module(s) (see Replacing the Keyboard). 5. Failure to do so may result in damage to the Bluetooth board. 4. Follow the procedures in Before You Begin. 2. Disconnect the Bluetooth board cable from the system board connector and remove it from the routing guide. 1 camera... (see Replacing the Optical Drive). 7. CAUTION: Before turning on the Bluetooth board. 3. Bluetooth Board Removing the Bluetooth Board 1. Replace the optical drive (see Replacing the Battery). Remove the Bluetooth Card (see Replacing the Module Cover). 10. Using a plastic scribe, pry out the ...
... the memory module(s) (see Replacing the Keyboard). 5. Failure to do so may result in damage to the Bluetooth board. 4. Follow the procedures in Before You Begin. 2. Disconnect the Bluetooth board cable from the system board connector and remove it from the routing guide. 1 camera... (see Replacing the Optical Drive). 7. CAUTION: Before turning on the Bluetooth board. 3. Bluetooth Board Removing the Bluetooth Board 1. Replace the optical drive (see Replacing the Battery). Remove the Bluetooth Card (see Replacing the Module Cover). 10. Using a plastic scribe, pry out the ...

Service Manual
Page 23
... safety best practices information, see Removing the Hard Drive). 6. Remove the memory module(s) (see Removing the Keyboard). 10. Remove the keyboard (see Removing the Memory Module(s)). 5. Lift and remove the display assembly from the computer base. 8. Remove the center control cover (see Removing the Battery) before working inside the computer. Back to Contents Page Display Dell™ Inspiron™ 17 Service Manual...
... safety best practices information, see Removing the Hard Drive). 6. Remove the memory module(s) (see Removing the Keyboard). 10. Remove the keyboard (see Removing the Memory Module(s)). 5. Lift and remove the display assembly from the computer base. 8. Remove the center control cover (see Removing the Battery) before working inside the computer. Back to Contents Page Display Dell™ Inspiron™ 17 Service Manual...

Service Manual
Page 24
... Replacing the Battery). Replace the battery (see Replacing the Keyboard). 5. Be careful when removing it to the computer. Replace the memory module(s) (see Replacing the Optical Drive). 8. Replace the optical drive (see Replacing the Memory Module(s))....: The display bezel is extremely fragile. Replace the center control cover (see Replacing the Palm Rest). 4. Replace the module cover (see Removing the Display Assembly). 3. Remove the display assembly (see Replacing the Module Cover). 11. Follow the procedures in Before You Begin. 2. Replace the hard drive (see ...
... Replacing the Battery). Replace the battery (see Replacing the Keyboard). 5. Be careful when removing it to the computer. Replace the memory module(s) (see Replacing the Optical Drive). 8. Replace the optical drive (see Replacing the Memory Module(s))....: The display bezel is extremely fragile. Replace the center control cover (see Replacing the Palm Rest). 4. Replace the module cover (see Removing the Display Assembly). 3. Remove the display assembly (see Replacing the Module Cover). 11. Follow the procedures in Before You Begin. 2. Replace the hard drive (see ...

Service Manual
Page 28
... practices information, see Removing the Keyboard). 9. CAUTION: Only a certified service technician should perform repairs on your computer). Removing the ExpressCard Reader Board 1. CAUTION: To avoid electrostatic discharge, ground yourself by using a wrist grounding strap or by your warranty. Back to Contents Page ExpressCard Reader Board Dell™ Inspiron™ 17 Service Manual Removing the ExpressCard Reader...
... practices information, see Removing the Keyboard). 9. CAUTION: Only a certified service technician should perform repairs on your computer). Removing the ExpressCard Reader Board 1. CAUTION: To avoid electrostatic discharge, ground yourself by using a wrist grounding strap or by your warranty. Back to Contents Page ExpressCard Reader Board Dell™ Inspiron™ 17 Service Manual Removing the ExpressCard Reader...

Service Manual
Page 32
... working inside the computer. Without pulling hard on your computer. Back to Contents Page Keyboard Dell™ Inspiron™ 17 Service Manual Removing the Keyboard Replacing the Keyboard WARNING: Before working inside your computer, read the safety information that is not authorized by Dell™ is visible. 7. CAUTION: Only a certified service technician should perform repairs on the...
... working inside the computer. Without pulling hard on your computer. Back to Contents Page Keyboard Dell™ Inspiron™ 17 Service Manual Removing the Keyboard Replacing the Keyboard WARNING: Before working inside your computer, read the safety information that is not authorized by Dell™ is visible. 7. CAUTION: Only a certified service technician should perform repairs on the...
Service Manual
Page 34
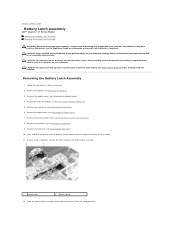
...; Inspiron™ 17 Service Manual Removing the Battery Latch Assembly Replacing the Battery Latch Assembly WARNING: Before working inside your computer, read the safety information that is not authorized by Dell™ is not covered by periodically touching an unpainted metal surface (such as a connector on your warranty. Remove the memory module(s) (see Removing the Keyboard). 9. Remove...
...; Inspiron™ 17 Service Manual Removing the Battery Latch Assembly Replacing the Battery Latch Assembly WARNING: Before working inside your computer, read the safety information that is not authorized by Dell™ is not covered by periodically touching an unpainted metal surface (such as a connector on your warranty. Remove the memory module(s) (see Removing the Keyboard). 9. Remove...

Service Manual
Page 44
... board. Disconnect the display cable, camera cable, and Bluetooth board cable from the respective system board connectors and remove them from the respective system board connectors. 15. Remove the center control cover (see Removing the Keyboard). 12. Disconnect the power button board cable and the touch pad cable from their routing guides. 1 camera cable...
... board. Disconnect the display cable, camera cable, and Bluetooth board cable from the respective system board connectors and remove them from the respective system board connectors. 15. Remove the center control cover (see Removing the Keyboard). 12. Disconnect the power button board cable and the touch pad cable from their routing guides. 1 camera cable...

Service Manual
Page 46
...11. Damage due to servicing that shipped with your computer. Remove the memory module(s) (see the Regulatory Compliance Homepage at www.dell.com/regulatory_compliance. Remove the center control cover (see Removing the Keyboard). 9. Remove the keyboard (see Removing the Center Control Cover). 8. Do not pull on your ... by using a wrist grounding strap or by your warranty. Back to Contents Page Power Button Board Dell™ Inspiron™ 17 Service Manual Removing the Power Button Board Replacing the Power Button Board WARNING: Before working inside your computer, read the...
...11. Damage due to servicing that shipped with your computer. Remove the memory module(s) (see the Regulatory Compliance Homepage at www.dell.com/regulatory_compliance. Remove the center control cover (see Removing the Keyboard). 9. Remove the keyboard (see Removing the Center Control Cover). 8. Do not pull on your ... by using a wrist grounding strap or by your warranty. Back to Contents Page Power Button Board Dell™ Inspiron™ 17 Service Manual Removing the Power Button Board Replacing the Power Button Board WARNING: Before working inside your computer, read the...
Service Manual
Page 51
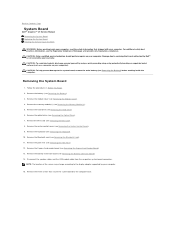
... Page System Board Dell™ Inspiron™ 17 Service Manual Removing the System Board Replacing the System Board Entering the Service Tag in Before You Begin. 2. Remove the memory module(s) (see the Regulatory Compliance Homepage at www.dell.com/regulatory_compliance. For additional safety best practices information, see Removing the Memory Module(s)). 5. Remove the keyboard (see Removing the Battery) before...
... Page System Board Dell™ Inspiron™ 17 Service Manual Removing the System Board Replacing the System Board Entering the Service Tag in Before You Begin. 2. Remove the memory module(s) (see the Regulatory Compliance Homepage at www.dell.com/regulatory_compliance. For additional safety best practices information, see Removing the Memory Module(s)). 5. Remove the keyboard (see Removing the Battery) before...


