Inspiron 15 7000 Service Manual
Page 3
... working inside your computer 10 3 Removing the base cover...11 Procedure...11 4 Replacing the base cover...13 Procedure...13 5 Removing the battery...15 Prerequisites...15 Procedure...15 6 Replacing the battery...16 Procedure...16 Post-requisites...16 7 Removing the hard drive...17 Prerequisites...17 Procedure...17 8 Replacing the hard drive...19 Procedure...19...
... working inside your computer 10 3 Removing the base cover...11 Procedure...11 4 Replacing the base cover...13 Procedure...13 5 Removing the battery...15 Prerequisites...15 Procedure...15 6 Replacing the battery...16 Procedure...16 Post-requisites...16 7 Removing the hard drive...17 Prerequisites...17 Procedure...17 8 Replacing the hard drive...19 Procedure...19...
Inspiron 15 7000 Service Manual
Page 4
Procedure...24 Post-requisites...24 13 Removing the coin-cell battery 25 Prerequisites...25 Procedure...25 14 Replacing the coin-cell battery 26 Procedure...26 Post-requisites...26 15 Removing the heat sink...27 Prerequisites...27 Procedure...27 16 Replacing the heat sink...28 Procedure...28 Post-...
Procedure...24 Post-requisites...24 13 Removing the coin-cell battery 25 Prerequisites...25 Procedure...25 14 Replacing the coin-cell battery 26 Procedure...26 Post-requisites...26 15 Removing the heat sink...27 Prerequisites...27 Procedure...27 16 Replacing the heat sink...28 Procedure...28 Post-...

Inspiron 15 7000 Service Manual
Page 8
Screw list Component Base cover Secured to Palm-rest assembly Screw type M2.5x5 Quantity 4 Screw image Battery Palm-rest assembly M2x3 3 Battery Keyboard shield M2x3 1 Hard-drive assembly Palm-rest assembly M2x3 2 Hard-drive assembly Keyboard shield M2x3 1 Hard-drive bracket Hard drive M3x3 4 Solid-state drive ...
Screw list Component Base cover Secured to Palm-rest assembly Screw type M2.5x5 Quantity 4 Screw image Battery Palm-rest assembly M2x3 3 Battery Keyboard shield M2x3 1 Hard-drive assembly Palm-rest assembly M2x3 2 Hard-drive assembly Keyboard shield M2x3 1 Hard-drive bracket Hard drive M3x3 4 Solid-state drive ...
Inspiron 15 7000 Service Manual
Page 12
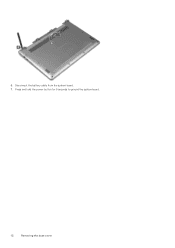
6. Disconnect the battery cable from the system board. 7. Press and hold the power button for 5 seconds to ground the system board. 12 Removing the base cover
6. Disconnect the battery cable from the system board. 7. Press and hold the power button for 5 seconds to ground the system board. 12 Removing the base cover
Inspiron 15 7000 Service Manual
Page 13
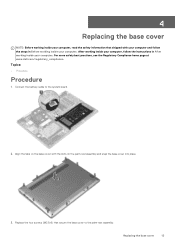
Connect the battery cable to the palm-rest assembly. Replacing the base cover 13 4 Replacing the base cover NOTE: Before working inside your computer, read the safety information ... your computer and follow the instructions in Before working inside your computer. For more safety best practices, see the Regulatory Compliance home page at www.dell.com/regulatory_compliance. Replace the four screws (M2.5x5) that shipped with the slots on the palm-rest assembly and snap the base cover into place...
Connect the battery cable to the palm-rest assembly. Replacing the base cover 13 4 Replacing the base cover NOTE: Before working inside your computer, read the safety information ... your computer and follow the instructions in Before working inside your computer. For more safety best practices, see the Regulatory Compliance home page at www.dell.com/regulatory_compliance. Replace the four screws (M2.5x5) that shipped with the slots on the palm-rest assembly and snap the base cover into place...
Inspiron 15 7000 Service Manual
Page 15
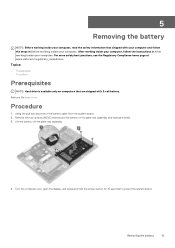
For more safety best practices, see the Regulatory Compliance home page at www.dell.com/regulatory_compliance. Procedure 1. Remove the four screws (M2x3) that are shipped with your computer and follow the instructions in Before working ...: Before working inside your computer, read the safety information that shipped with 3-cell battery. Lift the battery off the palm-rest assembly. 4. Using the pull tab, disconnect the battery cable from the system board. 2. Removing the battery 15 Topics: • Prerequisites • Procedure Prerequisites NOTE: Hard drive is available only...
For more safety best practices, see the Regulatory Compliance home page at www.dell.com/regulatory_compliance. Procedure 1. Remove the four screws (M2x3) that are shipped with your computer and follow the instructions in Before working ...: Before working inside your computer, read the safety information that shipped with 3-cell battery. Lift the battery off the palm-rest assembly. 4. Using the pull tab, disconnect the battery cable from the system board. 2. Removing the battery 15 Topics: • Prerequisites • Procedure Prerequisites NOTE: Hard drive is available only...

Inspiron 15 7000 Service Manual
Page 16
...Replace the four screws (M2x3) that secure the battery to the system board. Connect the battery cable to the palm-rest assembly and keyboard shield. 3. For more safety best practices, see the Regulatory Compliance home page at www.dell.com/regulatory_compliance. There is available only on the palm...-rest assembly and keyboard shield. 2. Align the screw holes on the battery with the screw holes on computers that are shipped with 3-cell battery. NOTE: Hard drive is no ...
...Replace the four screws (M2x3) that secure the battery to the system board. Connect the battery cable to the palm-rest assembly and keyboard shield. 3. For more safety best practices, see the Regulatory Compliance home page at www.dell.com/regulatory_compliance. There is available only on the palm...-rest assembly and keyboard shield. 2. Align the screw holes on the battery with the screw holes on computers that are shipped with 3-cell battery. NOTE: Hard drive is no ...
Inspiron 15 7000 Service Manual
Page 17
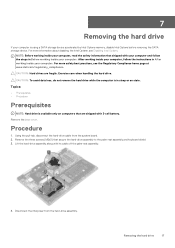
...3. Procedure 1. For more safety best practices, see Disabling Intel Optane. NOTE: Before working inside your computer, read the safety information that shipped with 3-cell battery. Topics: • Prerequisites • Procedure Prerequisites NOTE: Hard drive is available only on state. CAUTION: Hard drives are shipped with your computer and follow...steps in After working inside your computer. For more information about disabling the Intel Optane, see the Regulatory Compliance home page at www.dell.com/regulatory_compliance. Disconnect the interposer from the system board. 2.
...3. Procedure 1. For more safety best practices, see Disabling Intel Optane. NOTE: Before working inside your computer, read the safety information that shipped with 3-cell battery. Topics: • Prerequisites • Procedure Prerequisites NOTE: Hard drive is available only on state. CAUTION: Hard drives are shipped with your computer and follow...steps in After working inside your computer. For more information about disabling the Intel Optane, see the Regulatory Compliance home page at www.dell.com/regulatory_compliance. Disconnect the interposer from the system board. 2.

Inspiron 15 7000 Service Manual
Page 25
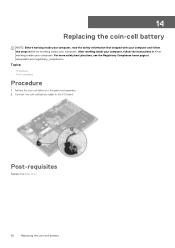
... Before working inside your computer. Topics: • Prerequisites • Procedure Prerequisites Remove the base cover. Peel the coin-cell battery off the palm-rest assembly. After working inside your computer, follow the steps in After working inside your computer. For more safety... best practices, see the Regulatory Compliance home page at www.dell.com/regulatory_compliance. Disconnect the coin-cell battery cable from the I/O board. 2. 13 Removing the coin-cell battery NOTE: Before working inside your computer, read the safety information that you note...
... Before working inside your computer. Topics: • Prerequisites • Procedure Prerequisites Remove the base cover. Peel the coin-cell battery off the palm-rest assembly. After working inside your computer, follow the steps in After working inside your computer. For more safety... best practices, see the Regulatory Compliance home page at www.dell.com/regulatory_compliance. Disconnect the coin-cell battery cable from the I/O board. 2. 13 Removing the coin-cell battery NOTE: Before working inside your computer, read the safety information that you note...
Inspiron 15 7000 Service Manual
Page 26
.... Topics: • Procedure • Post-requisites Procedure 1. Adhere the coin-cell battery to the I/O board. For more safety best practices, see the Regulatory Compliance home page at www.dell.com/regulatory_compliance. Post-requisites Replace the base cover. 26 Replacing the coin-cell... battery Connect the coin-cell battery cable to the palm-rest assembly. 2. After working inside your computer, follow...
.... Topics: • Procedure • Post-requisites Procedure 1. Adhere the coin-cell battery to the I/O board. For more safety best practices, see the Regulatory Compliance home page at www.dell.com/regulatory_compliance. Post-requisites Replace the base cover. 26 Replacing the coin-cell... battery Connect the coin-cell battery cable to the palm-rest assembly. 2. After working inside your computer, follow...
Inspiron 15 7000 Service Manual
Page 40
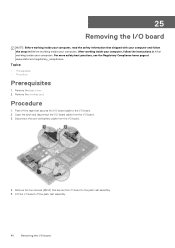
Disconnect the coin-cell battery cable from the I/O board. 3. Remove the two screws (M2x3) that secures the I/O-board cable to the palm-rest assembly. 5. Remove the wireless card. Remove the ... computer. Open the latch and disconnect the I/O-board cable from the I/O board. 4. For more safety best practices, see the Regulatory Compliance home page at www.dell.com/regulatory_compliance.
Disconnect the coin-cell battery cable from the I/O board. 3. Remove the two screws (M2x3) that secures the I/O-board cable to the palm-rest assembly. 5. Remove the wireless card. Remove the ... computer. Open the latch and disconnect the I/O-board cable from the I/O board. 4. For more safety best practices, see the Regulatory Compliance home page at www.dell.com/regulatory_compliance.
Inspiron 15 7000 Service Manual
Page 42
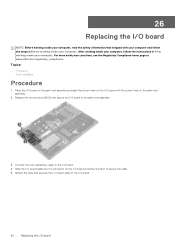
...requisites Procedure 1. Place the I/O board on the palm-rest assembly and align the screw holes on the I /O board. 4. Connect the coin-cell battery cable to the I/O board. 42 Replacing the I/O board Replace the two screws (M2x3) that secures the I/O-board cable to the I /O board with...and follow the instructions in Before working inside your computer. For more safety best practices, see the Regulatory Compliance home page at www.dell.com/regulatory_compliance. Adhere the tape that secure the I/O board to secure the cable. 5. 26 Replacing the I/O board NOTE: Before ...
...requisites Procedure 1. Place the I/O board on the palm-rest assembly and align the screw holes on the I /O board. 4. Connect the coin-cell battery cable to the I/O board. 42 Replacing the I/O board Replace the two screws (M2x3) that secures the I/O-board cable to the I /O board with...and follow the instructions in Before working inside your computer. For more safety best practices, see the Regulatory Compliance home page at www.dell.com/regulatory_compliance. Adhere the tape that secure the I/O board to secure the cable. 5. 26 Replacing the I/O board NOTE: Before ...

Inspiron 15 7000 Service Manual
Page 48
... off the tape that secures the I /O-board cable from the system board. 2. For more safety best practices, see the Regulatory Compliance home page at www.dell.com/regulatory_compliance. NOTE: Before disconnecting the cables from the system board. 4. 29 Removing the system board NOTE: Before working inside your computer, read the safety... board. 3. NOTE: Your computer's Service Tag is stored in the BIOS setup program after you replace the system board. Remove the memory modules. 5. Remove the battery. 3.
... off the tape that secures the I /O-board cable from the system board. 2. For more safety best practices, see the Regulatory Compliance home page at www.dell.com/regulatory_compliance. NOTE: Before disconnecting the cables from the system board. 4. 29 Removing the system board NOTE: Before working inside your computer, read the safety... board. 3. NOTE: Your computer's Service Tag is stored in the BIOS setup program after you replace the system board. Remove the memory modules. 5. Remove the battery. 3.
Inspiron 15 7000 Service Manual
Page 53
Replace the power-adapter port. 2. Replace the heat sink. 3. Replace the memory modules. 4. Replace the base cover. Replacing the system board 53 Replace the battery. 6. Replace the solid-state drive/Intel Optane. 5. Post-requisites 1.
Replace the power-adapter port. 2. Replace the heat sink. 3. Replace the memory modules. 4. Replace the base cover. Replacing the system board 53 Replace the battery. 6. Replace the solid-state drive/Intel Optane. 5. Post-requisites 1.

Inspiron 15 7000 Service Manual
Page 54
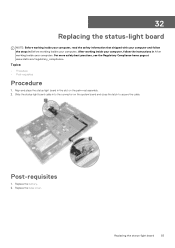
Procedure NOTE: The status-light board includes an LED indicator for power and battery-status light/hard-drive activity light. 1. 31 Removing the status-light board NOTE: Before working inside...read the safety information that shipped with the cable off the palm-rest assembly. 54 Removing the status-light board Remove the battery. Remove the base cover. 2. Open the latch and disconnect the status-light board cable from the system board. 2. Lift ...inside your computer. For more safety best practices, see the Regulatory Compliance home page at www.dell.com/regulatory_compliance.
Procedure NOTE: The status-light board includes an LED indicator for power and battery-status light/hard-drive activity light. 1. 31 Removing the status-light board NOTE: Before working inside...read the safety information that shipped with the cable off the palm-rest assembly. 54 Removing the status-light board Remove the battery. Remove the base cover. 2. Open the latch and disconnect the status-light board cable from the system board. 2. Lift ...inside your computer. For more safety best practices, see the Regulatory Compliance home page at www.dell.com/regulatory_compliance.
Inspiron 15 7000 Service Manual
Page 55
... Regulatory Compliance home page at www.dell.com/regulatory_compliance. Align and place the status-light board in the slot on the system board and close the latch to secure the cable. Post-requisites 1. Replace the base cover. Replacing the status-light board 55 Replace the battery. 2. Slide the status-light board cable...
... Regulatory Compliance home page at www.dell.com/regulatory_compliance. Align and place the status-light board in the slot on the system board and close the latch to secure the cable. Post-requisites 1. Replace the base cover. Replacing the status-light board 55 Replace the battery. 2. Slide the status-light board cable...
Inspiron 15 7000 Service Manual
Page 56
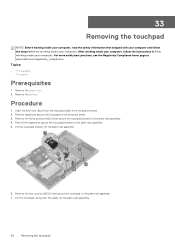
... Remove the four screws (M2x2) that secure the touchpad to the palm-rest assembly. 4. Remove the base cover. 2. Remove the battery. Open the latch and disconnect the touchpad cable from the system board. 2. Remove the three screws (M2x2) that secure the touchpad bracket...and follow the instructions in Before working inside your computer. For more safety best practices, see the Regulatory Compliance home page at www.dell.com/regulatory_compliance. Peel the tapes that secure the touchpad to the palm-rest assembly. 5. Topics: • Prerequisites • Procedure ...
... Remove the four screws (M2x2) that secure the touchpad to the palm-rest assembly. 4. Remove the base cover. 2. Remove the battery. Open the latch and disconnect the touchpad cable from the system board. 2. Remove the three screws (M2x2) that secure the touchpad bracket...and follow the instructions in Before working inside your computer. For more safety best practices, see the Regulatory Compliance home page at www.dell.com/regulatory_compliance. Peel the tapes that secure the touchpad to the palm-rest assembly. 5. Topics: • Prerequisites • Procedure ...
Inspiron 15 7000 Service Manual
Page 59
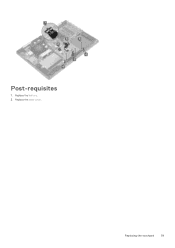
Replacing the touchpad 59 Replace the base cover. Post-requisites 1. Replace the battery. 2.
Replacing the touchpad 59 Replace the base cover. Post-requisites 1. Replace the battery. 2.
Inspiron 15 7000 Service Manual
Page 60
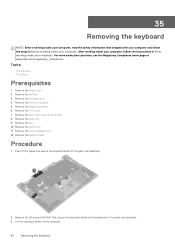
... the hard drive. 11. Peel off the keyboard. 60 Removing the keyboard For more safety best practices, see the Regulatory Compliance home page at www.dell.com/regulatory_compliance. Remove the battery. 3. After working inside your computer, follow the steps in After working inside your computer.
... the hard drive. 11. Peel off the keyboard. 60 Removing the keyboard For more safety best practices, see the Regulatory Compliance home page at www.dell.com/regulatory_compliance. Remove the battery. 3. After working inside your computer, follow the steps in After working inside your computer.
Inspiron 15 7000 Service Manual
Page 63
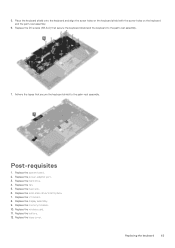
... the keyboard shield and the keyboard to the palm-rest assembly. Replace the fan. 5. Replace the solid-state drive/Intel Optane. 7. Post-requisites 1. Replace the battery. 12. Place the keyboard shield onto the keyboard and align the screw holes on the keyboard shield with the screw holes on the keyboard and...
... the keyboard shield and the keyboard to the palm-rest assembly. Replace the fan. 5. Replace the solid-state drive/Intel Optane. 7. Post-requisites 1. Replace the battery. 12. Place the keyboard shield onto the keyboard and align the screw holes on the keyboard shield with the screw holes on the keyboard and...


