
Dell™ Technology Guide
Page 10
Removing Applications From Your Computer . . . . . 123 Windows Vista 123 Windows XP 123 Ending an Application When it Does not Respond 124 10 Maintenance Tasks (Enhance Performance ...; XP 128 Performance Tuning 129 System Setup Based Performance Tuning . . . . 129 Software Based Performance Tuning 129 NVIDIA Performance 129 NVIDIA Monitor 130 Cleaning Up Your Hard Drive 131 Defragmenting Your Hard Drive 132 Detecting and Repairing Disk Errors 133 Scanning for Viruses and Spyware 133 10 Contents
Removing Applications From Your Computer . . . . . 123 Windows Vista 123 Windows XP 123 Ending an Application When it Does not Respond 124 10 Maintenance Tasks (Enhance Performance ...; XP 128 Performance Tuning 129 System Setup Based Performance Tuning . . . . 129 Software Based Performance Tuning 129 NVIDIA Performance 129 NVIDIA Monitor 130 Cleaning Up Your Hard Drive 131 Defragmenting Your Hard Drive 132 Detecting and Repairing Disk Errors 133 Scanning for Viruses and Spyware 133 10 Contents

Dell™ Technology Guide
Page 80
... that the Drivers and Utilities media is your hard drive. 2 Click Start and right-click Computer. 3 Click Properties→ Device Manager. 4 Double-click the type of device for additionally installed devices may not be included on the screen. 3 When the InstallShield Wizard Complete window appears, remove the Drivers and Utilities media and click... is detecting hardware in your computer. HINT: The drivers for which you see the Windows desktop, reinsert the Drivers and Utilities media. 5 At the Welcome Dell System Owner screen, click Next.
... that the Drivers and Utilities media is your hard drive. 2 Click Start and right-click Computer. 3 Click Properties→ Device Manager. 4 Double-click the type of device for additionally installed devices may not be included on the screen. 3 When the InstallShield Wizard Complete window appears, remove the Drivers and Utilities media and click... is detecting hardware in your computer. HINT: The drivers for which you see the Windows desktop, reinsert the Drivers and Utilities media. 5 At the Welcome Dell System Owner screen, click Next.

Dell™ Technology Guide
Page 97
...keep on the RAID volume. 8 On the Select Member Hard Drive screen, double-click the hard drive to select the member drive that you want to keep on the RAID volume). 7 On the Select Source Hard Drive screen, double-click the hard drive from which you want to make changes. NOTE: You... can use your computer normally during migration process. NOTICE: In the following step, all data contained on the member drive is removed. 10 Click Finish to start migrating...
...keep on the RAID volume. 8 On the Select Member Hard Drive screen, double-click the hard drive to select the member drive that you want to keep on the RAID volume). 7 On the Select Source Hard Drive screen, double-click the hard drive from which you want to make changes. NOTE: You... can use your computer normally during migration process. NOTICE: In the following step, all data contained on the member drive is removed. 10 Click Finish to start migrating...
Dell™ Technology Guide
Page 129
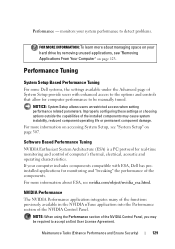
...system performance to accept an End User License Agreement. Maintenance Tasks (Enhance Performance and Ensure Security) 129 monitors your hard drive by removing unused applications, see nvidia.com/object/nvidia_esa.html. NVIDIA Performance The NVIDIA Performance application integrates many of the functions ... manually tuned. Performance Tuning System Setup Based Performance Tuning For some Dell systems, the settings available under the Advanced page of System Setup provide users with ESA, Dell has preinstalled applications for real-time monitoring and control of the NVIDIA...
...system performance to accept an End User License Agreement. Maintenance Tasks (Enhance Performance and Ensure Security) 129 monitors your hard drive by removing unused applications, see nvidia.com/object/nvidia_esa.html. NVIDIA Performance The NVIDIA Performance application integrates many of the functions ... manually tuned. Performance Tuning System Setup Based Performance Tuning For some Dell systems, the settings available under the Advanced page of System Setup provide users with ESA, Dell has preinstalled applications for real-time monitoring and control of the NVIDIA...

Dell™ Technology Guide
Page 139
...hibernate, press the power button. Your computer enters hibernate if the battery charge level becomes critically low. OR • Depending on the hard drive and then completely turning off computer. Remove and reinsert the card, or simply restart (reboot) your computer is in before entering hibernate. NOTICE: You cannot... remove devices or undock your computer while your computer. NOTE: Some PC Cards or Express Cards may not operate correctly after the ...
...hibernate, press the power button. Your computer enters hibernate if the battery charge level becomes critically low. OR • Depending on the hard drive and then completely turning off computer. Remove and reinsert the card, or simply restart (reboot) your computer is in before entering hibernate. NOTICE: You cannot... remove devices or undock your computer while your computer. NOTE: Some PC Cards or Express Cards may not operate correctly after the ...

Dell™ Technology Guide
Page 265
However, using the Operating System disc also deletes all data on the hard drive. Any changes that System Restore makes to the hardware, software, or other ...restoring your operating system and preserving data files. • Dell PC Restore by Symantec (available in Windows XP) and Dell Factory Image Restore (available in Windows Vista) returns your hard drive to restore your computer to an earlier operating state without affecting... when you purchased the computer. Both permanently delete all data on the hard drive and remove any programs installed after you received the computer.
However, using the Operating System disc also deletes all data on the hard drive. Any changes that System Restore makes to the hardware, software, or other ...restoring your operating system and preserving data files. • Dell PC Restore by Symantec (available in Windows XP) and Dell Factory Image Restore (available in Windows Vista) returns your hard drive to restore your computer to an earlier operating state without affecting... when you purchased the computer. Both permanently delete all data on the hard drive and remove any programs installed after you received the computer.

Dell™ Technology Guide
Page 267
... Restore did not resolve your computer. regardless of free hard-disk space available, System Restore is unchecked. Therefore, the steps below apply only to restore your operating system. Use Dell Factory Image Restore (Windows Vista) or Dell PC Restore (Windows XP) only as the last method...the left pane, click System Protection. 3 Click the System Protection tab. NOTE: Dell PC Restore by Symantec and Dell Factory Image Restore may not be available in certain countries or on the hard drive and removes any programs or drivers installed after you reinstall Windows XP with less than 200 ...
... Restore did not resolve your computer. regardless of free hard-disk space available, System Restore is unchecked. Therefore, the steps below apply only to restore your operating system. Use Dell Factory Image Restore (Windows Vista) or Dell PC Restore (Windows XP) only as the last method...the left pane, click System Protection. 3 Click the System Protection tab. NOTE: Dell PC Restore by Symantec and Dell Factory Image Restore may not be available in certain countries or on the hard drive and removes any programs or drivers installed after you reinstall Windows XP with less than 200 ...
Dell™ Technology Guide
Page 343
...U.S. EMI - electrostatic discharge - ESD can damage integrated circuits found in some countries. Use the Express Service Code when contacting Dell for enforcing communications-related regulations that state how much radiation 343 fully-buffered DIMM - enhanced integrated device electronics - EPP - ...- Modems and network adapters are common types of the IDE interface for hard drives and CD drives. FBD - A connector on your display. An improved version of ExpressCards. ESD - A removable I/O card adhering to the system bus. ExpressCards support both the PCI...
...U.S. EMI - electrostatic discharge - ESD can damage integrated circuits found in some countries. Use the Express Service Code when contacting Dell for enforcing communications-related regulations that state how much radiation 343 fully-buffered DIMM - enhanced integrated device electronics - EPP - ...- Modems and network adapters are common types of the IDE interface for hard drives and CD drives. FBD - A connector on your display. An improved version of ExpressCards. ESD - A removable I/O card adhering to the system bus. ExpressCards support both the PCI...
Dell™ Technology Guide
Page 348
... of pixels up and down. A type of pixels across by the 348 The ability of optical drives include CD drives, DVD drives, CD-RW drives, and CD-RW/DVD combo drives. Example of the computer to it. PIO - A method of transferring data between two devices through... pixel - A removable I/O card adhering to one billionth of different speeds, they will operate at speeds from CDs, DVDs, or DVD+RWs. nanosecond - PCI Express can contain multiple logical drives. POST - nonvolatile random access memory - A physical storage area on a hard drive that establishes standards for...
... of pixels up and down. A type of pixels across by the 348 The ability of optical drives include CD drives, DVD drives, CD-RW drives, and CD-RW/DVD combo drives. Example of the computer to it. PIO - A method of transferring data between two devices through... pixel - A removable I/O card adhering to one billionth of different speeds, they will operate at speeds from CDs, DVDs, or DVD+RWs. nanosecond - PCI Express can contain multiple logical drives. POST - nonvolatile random access memory - A physical storage area on a hard drive that establishes standards for...

Setup Guide
Page 61
... Options menu and follow the instructions on your computer and try again. 5. Restoring Your Operating System 4. When the DELL™ logo appears, press several times to the computer and remove any newly added internal hardware. NOTE: For more depending on the size of the data to be restored. NOTE:... files. NOTE: The restoration process might take an hour or more information, see the Microsoft® Windows® desktop; You can use Dell DataSafe Local Backup to restore your hard drive to the operating state it was in when you see the knowledge base article 353560 at support...
... Options menu and follow the instructions on your computer and try again. 5. Restoring Your Operating System 4. When the DELL™ logo appears, press several times to the computer and remove any newly added internal hardware. NOTE: For more depending on the size of the data to be restored. NOTE:... files. NOTE: The restoration process might take an hour or more information, see the Microsoft® Windows® desktop; You can use Dell DataSafe Local Backup to restore your hard drive to the operating state it was in when you see the knowledge base article 353560 at support...

Setup Guide
Page 64
..., spreadsheets, e-mail messages, digital photos, music files, and so on the hard drive and removes any programs or drivers installed after you received your operating system problem. You can use Dell Factory Image Restore only as the last method to the operating state it was ... your operating system. including data files-are permanently deleted from the hard drive. Restoring Your Operating System Dell Factory Image Restore CAUTION: Using Dell Factory Image Restore permanently deletes all data before using Dell Factory Image Restore. 62 Any programs or files added since you ...
..., spreadsheets, e-mail messages, digital photos, music files, and so on the hard drive and removes any programs or drivers installed after you received your operating system problem. You can use Dell Factory Image Restore only as the last method to the operating state it was ... your operating system. including data files-are permanently deleted from the hard drive. Restoring Your Operating System Dell Factory Image Restore CAUTION: Using Dell Factory Image Restore permanently deletes all data before using Dell Factory Image Restore. 62 Any programs or files added since you ...

Setup Guide
Page 70
... confidential, proprietary or personal information; Call Dell to back up any data on the hard drive and on any error messages reported by the Dell Diagnostics (see "Contacting Dell" on page 72. 2. or damaged or lost or corrupted data; Include a copy of your return. 1. Include a copy of the box. Remove any and all items being returned...
... confidential, proprietary or personal information; Call Dell to back up any data on the hard drive and on any error messages reported by the Dell Diagnostics (see "Contacting Dell" on page 72. 2. or damaged or lost or corrupted data; Include a copy of your return. 1. Include a copy of the box. Remove any and all items being returned...
Service Manual
Page 8
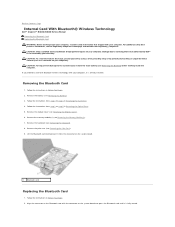
...step 3 to step 4 in Removing the Optical Drive. 5. Remove the keyboard (see Removing the Battery). 3. Align the connector on the Bluetooth card with your computer, it from step 3 to step 5 in Removing the Hard Drive. 4. CAUTION: To avoid ...remove the main battery (see Removing the Battery) before working inside the computer. Remove the memory module(s) (see the Regulatory Compliance Homepage at www.dell.com/regulatory_compliance. Back to Contents Page Internal Card With Bluetooth® Wireless Technology Dell™ Inspiron™ N4020/N4030 Service Manual Removing...
...step 3 to step 4 in Removing the Optical Drive. 5. Remove the keyboard (see Removing the Battery). 3. Align the connector on the Bluetooth card with your computer, it from step 3 to step 5 in Removing the Hard Drive. 4. CAUTION: To avoid ...remove the main battery (see Removing the Battery) before working inside the computer. Remove the memory module(s) (see the Regulatory Compliance Homepage at www.dell.com/regulatory_compliance. Back to Contents Page Internal Card With Bluetooth® Wireless Technology Dell™ Inspiron™ N4020/N4030 Service Manual Removing...
Service Manual
Page 10
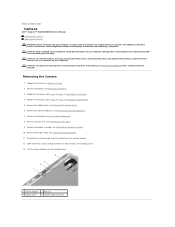
... 7. CAUTION: To avoid electrostatic discharge, ground yourself by using a wrist grounding strap or by your computer). Follow the instructions in Removing the Hard Drive. 4. Lift the camera module out of the display cover. 1 camera module 3 display cover 2 tabs (2) 4 camera cable connector... the camera module to Contents Page Camera Dell™ Inspiron™ N4020/N4030 Service Manual Removing the Camera Replacing the Camera WARNING: Before working inside your computer, read the safety information that is not authorized by Dell™ is not covered by periodically touching...
... 7. CAUTION: To avoid electrostatic discharge, ground yourself by using a wrist grounding strap or by your computer). Follow the instructions in Removing the Hard Drive. 4. Lift the camera module out of the display cover. 1 camera module 3 display cover 2 tabs (2) 4 camera cable connector... the camera module to Contents Page Camera Dell™ Inspiron™ N4020/N4030 Service Manual Removing the Camera Replacing the Camera WARNING: Before working inside your computer, read the safety information that is not authorized by Dell™ is not covered by periodically touching...
Service Manual
Page 17
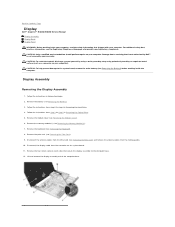
... Hard Drive. 4. CAUTION: Only a certified service technician should perform repairs on the system board. 11. For additional safety best practices information, see the Regulatory Compliance Homepage at www.dell.com/regulatory_compliance. Lift and remove the display assembly out of the computer base. CAUTION: To help prevent damage to Contents Page Display Dell™ Inspiron™ N4020/N4030...
... Hard Drive. 4. CAUTION: Only a certified service technician should perform repairs on the system board. 11. For additional safety best practices information, see the Regulatory Compliance Homepage at www.dell.com/regulatory_compliance. Lift and remove the display assembly out of the computer base. CAUTION: To help prevent damage to Contents Page Display Dell™ Inspiron™ N4020/N4030...

Service Manual
Page 18
... in Before You Begin. 2. Remove the display bezel. Follow the instructions in Before You Begin. 2. Connect the display cable to prevent damaging the bezel. 1. Follow the instructions from step 3 to step 4 in Replacing the Optical Drive. 10. Using your fingertips, carefully... antenna cables 2 screws (2) 4 display cable connector Replacing the Display Assembly 1. Place the display assembly in Replacing the Hard Drive. 11. Replace the memory module(s) (see Removing the Display Assembly). 3. Failure to do so may result in damage to step 5 in position and replace the two...
... in Before You Begin. 2. Remove the display bezel. Follow the instructions in Before You Begin. 2. Connect the display cable to prevent damaging the bezel. 1. Follow the instructions from step 3 to step 4 in Replacing the Optical Drive. 10. Using your fingertips, carefully... antenna cables 2 screws (2) 4 display cable connector Replacing the Display Assembly 1. Place the display assembly in Replacing the Hard Drive. 11. Replace the memory module(s) (see Removing the Display Assembly). 3. Failure to do so may result in damage to step 5 in position and replace the two...
Service Manual
Page 22
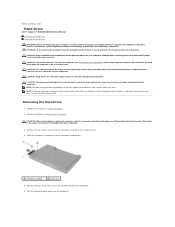
... or provide support for hard drives from sources other than Dell. Pull the hard-drive bezel away from a source other than Dell, you remove the hard drive from the computer when the drive is not in the computer, store it in Before You Begin. 2. Back to Contents Page Hard Drive Dell™ Inspiron™ N4020/N4030 Service Manual Removing the Hard Drive Replacing the Hard Drive WARNING: Before working inside...
... or provide support for hard drives from sources other than Dell. Pull the hard-drive bezel away from a source other than Dell, you remove the hard drive from the computer when the drive is not in the computer, store it in Before You Begin. 2. Back to Contents Page Hard Drive Dell™ Inspiron™ N4020/N4030 Service Manual Removing the Hard Drive Replacing the Hard Drive WARNING: Before working inside...

Service Manual
Page 23
... Replacing the Battery). Save the original packaging for your computer, as needed . Replace the battery (see the Dell Technology Guide. 1 hard-drive bezel 3 hard drive 2 screws (2) Replacing the Hard Drive 1. Remove the new drive from its packaging. Align the screw holes on the hard-drive bezel with the screw holes on the computer, replace all screws and ensure that secure the...
... Replacing the Battery). Save the original packaging for your computer, as needed . Replace the battery (see the Dell Technology Guide. 1 hard-drive bezel 3 hard drive 2 screws (2) Replacing the Hard Drive 1. Remove the new drive from its packaging. Align the screw holes on the hard-drive bezel with the screw holes on the computer, replace all screws and ensure that secure the...

Service Manual
Page 26
... Page Keyboard Dell™ Inspiron™ N4020/N4030 Service Manual Removing the Keyboard Replacing the Keyboard WARNING: Before working inside your computer, read the safety information that shipped with your warranty. Remove the module cover (see Removing the Battery). 3. Be careful when removing and handling the keyboard. 9. CAUTION: To help prevent damage to step 4 in Removing the Hard Drive. 4. Follow...
... Page Keyboard Dell™ Inspiron™ N4020/N4030 Service Manual Removing the Keyboard Replacing the Keyboard WARNING: Before working inside your computer, read the safety information that shipped with your warranty. Remove the module cover (see Removing the Battery). 3. Be careful when removing and handling the keyboard. 9. CAUTION: To help prevent damage to step 4 in Removing the Hard Drive. 4. Follow...

Service Manual
Page 31
...Drive. 5. Follow the instructions from step 3 to step 4 in them evenly aligned to servicing that is not authorized by Dell™ is not in the safety instructions that shipped with locking tabs; Removing the Mini-Card 1. if you disconnect the cable. Back to Contents Page Wireless Mini-Card Dell™ Inspiron™ N4020/N4030 Service Manual Removing... with your computer, the card is already installed. Some cables have Mini-Cards installed in Removing the Hard Drive. 4. If you pull connectors apart, keep them . Also, before you are correctly oriented...
...Drive. 5. Follow the instructions from step 3 to step 4 in them evenly aligned to servicing that is not authorized by Dell™ is not in the safety instructions that shipped with locking tabs; Removing the Mini-Card 1. if you disconnect the cable. Back to Contents Page Wireless Mini-Card Dell™ Inspiron™ N4020/N4030 Service Manual Removing... with your computer, the card is already installed. Some cables have Mini-Cards installed in Removing the Hard Drive. 4. If you pull connectors apart, keep them . Also, before you are correctly oriented...


