
Setup Guide
Page 5
... the Network Cable (Optional 7 Press the Power Button 8 Set Up the Operating System 9 Create System Recovery Media (Recommended 10 Install the SIM Card (Optional 12 Enable or Disable Wireless (Optional 14 Set Up Wireless Display (Optional 16 Connect to the Internet (Optional 17 Using Your Inspiron Laptop 20 Right View Features 20... Display Features 42 Touch Screen Gestures (Optional 44 Removing and Replacing the Top Cover (Optional 46 Removing and Replacing the Battery 50 Software Features 52 Dell DataSafe Online Backup 53...
... the Network Cable (Optional 7 Press the Power Button 8 Set Up the Operating System 9 Create System Recovery Media (Recommended 10 Install the SIM Card (Optional 12 Enable or Disable Wireless (Optional 14 Set Up Wireless Display (Optional 16 Connect to the Internet (Optional 17 Using Your Inspiron Laptop 20 Right View Features 20... Display Features 42 Touch Screen Gestures (Optional 44 Removing and Replacing the Top Cover (Optional 46 Removing and Replacing the Battery 50 Software Features 52 Dell DataSafe Online Backup 53...

Setup Guide
Page 6
... Problems 57 Network Problems 58 Power Problems 59 Memory Problems 61 Lockups and Software Problems 61 Using Support Tools 64 Dell Support Center 64 My Dell Downloads 65 Hardware Troubleshooter 66 Dell Diagnostics 66 Restoring Your Operating System 68 System Restore 69 Dell DataSafe Local Backup 70 System...Status Service 79 Product Information 79 Returning Items for Repair Under Warranty or for Credit 80 Before You Call 82 Contacting Dell 84 Finding More Information and Resources 86 Specifications 88 Appendix 95 Information for NOM, or Official Mexican Standard (Only for Mexico...
... Problems 57 Network Problems 58 Power Problems 59 Memory Problems 61 Lockups and Software Problems 61 Using Support Tools 64 Dell Support Center 64 My Dell Downloads 65 Hardware Troubleshooter 66 Dell Diagnostics 66 Restoring Your Operating System 68 System Restore 69 Dell DataSafe Local Backup 70 System...Status Service 79 Product Information 79 Returning Items for Repair Under Warranty or for Credit 80 Before You Call 82 Contacting Dell 84 Finding More Information and Resources 86 Specifications 88 Appendix 95 Information for NOM, or Official Mexican Standard (Only for Mexico...
Setup Guide
Page 7
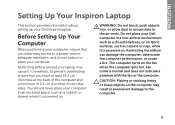
...inches) on . Restricting the airflow can damage the computer, deteriorate the computer performance, or cause a fire. You should never place your Dell computer in an enclosed space, such as carpets or rugs, while it to overheat. The computer turns on . Do not place your ...to accumulate in permanent damage to place your Dell Inspiron laptop. WARNING: Do not block, push objects into, or allow easy access to a power source, adequate ventilation, and a level surface to the computer. 5 INSPIRON Setting Up Your Inspiron Laptop This section provides information about setting up ...
...inches) on . Restricting the airflow can damage the computer, deteriorate the computer performance, or cause a fire. You should never place your Dell computer in an enclosed space, such as carpets or rugs, while it to overheat. The computer turns on . Do not place your ...to accumulate in permanent damage to place your Dell Inspiron laptop. WARNING: Do not block, push objects into, or allow easy access to a power source, adequate ventilation, and a level surface to the computer. 5 INSPIRON Setting Up Your Inspiron Laptop This section provides information about setting up ...

Setup Guide
Page 8
WARNING: The AC adapter works with electrical outlets worldwide. Using an incompatible cable or improperly connecting the cable to a power strip or electrical outlet may cause fire or permanent damage to the computer and then plug it into an electrical outlet or surge protector. Setting Up Your Inspiron Laptop Connect the AC Adapter Connect the AC adapter to your computer. 6 However, power connectors and power strips vary among countries.
WARNING: The AC adapter works with electrical outlets worldwide. Using an incompatible cable or improperly connecting the cable to a power strip or electrical outlet may cause fire or permanent damage to the computer and then plug it into an electrical outlet or surge protector. Setting Up Your Inspiron Laptop Connect the AC Adapter Connect the AC adapter to your computer. 6 However, power connectors and power strips vary among countries.

Setup Guide
Page 10
Setting Up Your Inspiron Laptop Press the Power Button 8
Setting Up Your Inspiron Laptop Press the Power Button 8

Setup Guide
Page 23
... read. 3 Optical drive eject button - Press to a microphone or inputs signal for use with audio programs. 7 USB 3.0 connector - Use to a powered speaker or sound system. 6 Audio-in/Microphone connector - For more information, see "Using the Optical Drive" on page 40. 5 Audio-out/Headphone connector...tray. 4 Emergency eject hole - Blinks when you press the optical drive eject button or when you press the eject button. Using Your Inspiron Laptop 1 Optical drive - Provides faster data transmission between your computer and USB devices. 21 Plays or records CDs, DVDs, and Blu...
... read. 3 Optical drive eject button - Press to a microphone or inputs signal for use with audio programs. 7 USB 3.0 connector - Use to a powered speaker or sound system. 6 Audio-in/Microphone connector - For more information, see "Using the Optical Drive" on page 40. 5 Audio-out/Headphone connector...tray. 4 Emergency eject hole - Blinks when you press the optical drive eject button or when you press the eject button. Using Your Inspiron Laptop 1 Optical drive - Provides faster data transmission between your computer and USB devices. 21 Plays or records CDs, DVDs, and Blu...

Setup Guide
Page 25
... Connects to USB devices, such as a mouse, keyboard, printer, external drive, or MP3 player). NOTE: The USB PowerShare feature is powered off when only 10% of the total battery life remains. 23 NOTE: Certain USB devices may not charge when the computer is automatically shut... off or in sleep state. To continue charging, disconnect the USB device and connect it again. Using Your Inspiron Laptop 1 USB 2.0 connector - Connects to charge the device. Connects to eSATA compatible storage devices (such as external hard drives or optical...
... Connects to USB devices, such as a mouse, keyboard, printer, external drive, or MP3 player). NOTE: The USB PowerShare feature is powered off when only 10% of the total battery life remains. 23 NOTE: Certain USB devices may not charge when the computer is automatically shut... off or in sleep state. To continue charging, disconnect the USB device and connect it again. Using Your Inspiron Laptop 1 USB 2.0 connector - Connects to charge the device. Connects to eSATA compatible storage devices (such as external hard drives or optical...
Setup Guide
Page 29
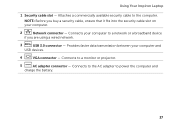
... security cable to power the computer and charge the battery. 27 Connects to the AC adapter to the computer. Provides faster data transmission between your computer. 2 Network connector - NOTE: Before you are using a wired network. 3 USB 3.0 connector - Connects your computer to a monitor or projector. 5 AC adapter connector - Using Your Inspiron Laptop 1 Security...
... security cable to power the computer and charge the battery. 27 Connects to the AC adapter to the computer. Provides faster data transmission between your computer. 2 Network connector - NOTE: Before you are using a wired network. 3 USB 3.0 connector - Connects your computer to a monitor or projector. 5 AC adapter connector - Using Your Inspiron Laptop 1 Security...

Setup Guide
Page 31
...wireless, see "Status Lights and Indicators" on . 3 Battery status light - A solid white light indicates hard drive activity. For more information on the power indicator light, see "Status Lights and Indicators" on page 14. 29 A solid white light indicates that wireless is enabled. For more information on the ... light, see "Enable or Disable Wireless" on page 30. 2 Hard drive activity light - Turns on when wireless is enabled. Indicates the power states. Turns on when the computer reads or writes data. Using Your Inspiron Laptop 1 Power indicator light -
...wireless, see "Status Lights and Indicators" on . 3 Battery status light - A solid white light indicates hard drive activity. For more information on the power indicator light, see "Status Lights and Indicators" on page 14. 29 A solid white light indicates that wireless is enabled. For more information on the ... light, see "Enable or Disable Wireless" on page 30. 2 Hard drive activity light - Turns on when wireless is enabled. Indicates the power states. Turns on when the computer reads or writes data. Using Your Inspiron Laptop 1 Power indicator light -

Setup Guide
Page 32
Using Your Inspiron Laptop Status Lights and Indicators Battery Status Light AC adapter Battery Indicator light status solid white off solid amber off Computer state(s) on/standby/off/ hibernate on/standby/off/ hibernate on/standby on/standby/off/ hibernate Battery charge status charging fully charged low battery (
Using Your Inspiron Laptop Status Lights and Indicators Battery Status Light AC adapter Battery Indicator light status solid white off solid amber off Computer state(s) on/standby/off/ hibernate on/standby/off/ hibernate on/standby on/standby/off/ hibernate Battery charge status charging fully charged low battery (

Setup Guide
Page 33
Using Your Inspiron Laptop Power Button Light/Power Indicator Light Indicator light status solid white breathing white off Computer state(s) on standby off Battery Charging and then click OK. Ensure that your computer is turned on page 59. Click Start . 3. In the search box, type Power Options and press . 4. Under Power Options window, click Dell Battery Meter...
Using Your Inspiron Laptop Power Button Light/Power Indicator Light Indicator light status solid white breathing white off Computer state(s) on standby off Battery Charging and then click OK. Ensure that your computer is turned on page 59. Click Start . 3. In the search box, type Power Options and press . 4. Under Power Options window, click Dell Battery Meter...

Setup Guide
Page 35
Using Your Inspiron Laptop 1 Power button and light - For more information, see "Touch Pad Gestures" on page 36. The dual display enable or disable key , wireless ...NOTE: To enable or disable the touch pad, press along with the < > key on the function key row on the button indicates the power states. The light on the keyboard. 4 Touch pad buttons - The touch pad supports the Scroll, Flick, and Zoom features. For more information...-click and right-click functions like those on page 38. 3 Touch pad - To change the touch pad settings, double-click the Dell Touch pad icon in this row.
Using Your Inspiron Laptop 1 Power button and light - For more information, see "Touch Pad Gestures" on page 36. The dual display enable or disable key , wireless ...NOTE: To enable or disable the touch pad, press along with the < > key on the function key row on the button indicates the power states. The light on the keyboard. 4 Touch pad buttons - The touch pad supports the Scroll, Flick, and Zoom features. For more information...-click and right-click functions like those on page 38. 3 Touch pad - To change the touch pad settings, double-click the Dell Touch pad icon in this row.

Setup Guide
Page 40
... function key to perform the associated multimedia action. For multimedia action, press + the required multimedia key. For function, press + the required function key. Using Your Inspiron Laptop Multimedia Control Keys The multimedia control keys are located on the function key row on the keyboard using the System Setup (BIOS) utility or...the Windows Mobility Center. Press any multimedia key to perform the associated function. To use the multimedia controls, press the required key. Press during the Power On Self Test (POST) to launch 38 Windows Mobility Center 1.
... function key to perform the associated multimedia action. For multimedia action, press + the required multimedia key. For function, press + the required function key. Using Your Inspiron Laptop Multimedia Control Keys The multimedia control keys are located on the function key row on the keyboard using the System Setup (BIOS) utility or...the Windows Mobility Center. Press any multimedia key to perform the associated function. To use the multimedia controls, press the required key. Press during the Power On Self Test (POST) to launch 38 Windows Mobility Center 1.

Setup Guide
Page 60
Check the network cable to ensure it is powered on and connected to your data source (cable modem or network hub). • Check if wireless is plugged in and not damaged. 58 The wireless ...
Check the network cable to ensure it is powered on and connected to your data source (cable modem or network hub). • Check if wireless is plugged in and not damaged. 58 The wireless ...

Setup Guide
Page 61
...AC adapter has a light, ensure that the power strip is not receiving power. • Press the power button. If the power light is solid white and the computer is on. • If the problem persists, contact Dell (see "Contacting Dell" on properly. • Ensure that the computer... turns on page 84). 59 The display may not be responding. • Press the power button until the computer turns off - Also bypass power protection devices, power strips, and power extension cables to ...
...AC adapter has a light, ensure that the power strip is not receiving power. • Press the power button. If the power light is solid white and the computer is on. • If the problem persists, contact Dell (see "Contacting Dell" on properly. • Ensure that the computer... turns on page 84). 59 The display may not be responding. • Press the power button until the computer turns off - Also bypass power protection devices, power strips, and power extension cables to ...

Setup Guide
Page 62
...creating interference by interrupting or blocking other signals. Some possible causes of interference are: • Power, keyboard, and mouse extension cables. • Too many devices connected to a power strip. • Multiple power strips connected to resume normal operation. • If the display is in standby mode or ... white - If you encounter interference that hinders reception on the touch pad, or press the power button to the same electrical outlet. 60 The computer is not responding, press the power button until the computer turns off and then turn it back on. • If the ...
...creating interference by interrupting or blocking other signals. Some possible causes of interference are: • Power, keyboard, and mouse extension cables. • Too many devices connected to a power strip. • Multiple power strips connected to resume normal operation. • If the display is in standby mode or ... white - If you encounter interference that hinders reception on the touch pad, or press the power button to the same electrical outlet. 60 The computer is not responding, press the power button until the computer turns off and then turn it back on. • If the ...

Setup Guide
Page 64
... Next. 3. CAUTION: You might lose data if you are unable to an earlier version of Windows. 2. Follow the instructions on the touch pad, press the power button for at least 8 to 10 seconds until the computer turns off and then restart your computer. To run the Program Compatibility Wizard: 1. Run the...
... Next. 3. CAUTION: You might lose data if you are unable to an earlier version of Windows. 2. Follow the instructions on the touch pad, press the power button for at least 8 to 10 seconds until the computer turns off and then restart your computer. To run the Program Compatibility Wizard: 1. Run the...

Setup Guide
Page 95
Input voltage 100-240 VAC Input current (maximum) 1.5 A/1.6 A/1.7 A/ 2.3 A/2.5 A Specifications AC Adapter Input frequency 50-60 Hz Output power 65 W/90 W/130 W Output current: 65 W 3.34 A 90 W 4.62 A 130 W 6.7 A Rated output voltage 19.5 VDC Temperature range: Operating Storage 0° to 40°C (32° ...
Input voltage 100-240 VAC Input current (maximum) 1.5 A/1.6 A/1.7 A/ 2.3 A/2.5 A Specifications AC Adapter Input frequency 50-60 Hz Output power 65 W/90 W/130 W Output current: 65 W 3.34 A 90 W 4.62 A 130 W 6.7 A Rated output voltage 19.5 VDC Temperature range: Operating Storage 0° to 40°C (32° ...
Setup Guide
Page 99
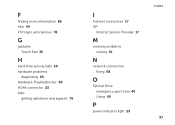
F finding more information 86 flick 44 FTP login, anonymous 78 G gestures Touch Pad 36 H hard drive activity light 29 hardware problems diagnosing 66 Hardware Troubleshooter 66 HDMI connector 23 help getting assistance and support 76 I Internet connection 17 ISP Internet Service Provider 17 M memory problems solving 61 N network connection fixing 58 O Optical Drive emergency eject hole 40 Using 40 P power indicator light 29 Index 97
F finding more information 86 flick 44 FTP login, anonymous 78 G gestures Touch Pad 36 H hard drive activity light 29 hardware problems diagnosing 66 Hardware Troubleshooter 66 HDMI connector 23 help getting assistance and support 76 I Internet connection 17 ISP Internet Service Provider 17 M memory problems solving 61 N network connection fixing 58 O Optical Drive emergency eject hole 40 Using 40 P power indicator light 29 Index 97

Setup Guide
Page 100
Index power problems, solving 59 power strips, using 6 problems, solving 56 products information and purchasing 79 R resources, finding more 86 restoring factory image 74 S Service Tag locating 82 setup, before you begin 5 shipping products for return or repair 80 SIM card 12 software features 52 software problems 61 98 solving problems 56 specifications 88 support e-mail addresses 78 support sites worldwide 77 System Recovery Media 73 system reinstall options 68 System Restore 69 T Touch Pad Gestures 36 Touch screen Gestures 44 U Using the Emergency Eject Hole 40 V ventilation, ensuring 5
Index power problems, solving 59 power strips, using 6 problems, solving 56 products information and purchasing 79 R resources, finding more 86 restoring factory image 74 S Service Tag locating 82 setup, before you begin 5 shipping products for return or repair 80 SIM card 12 software features 52 software problems 61 98 solving problems 56 specifications 88 support e-mail addresses 78 support sites worldwide 77 System Recovery Media 73 system reinstall options 68 System Restore 69 T Touch Pad Gestures 36 Touch screen Gestures 44 U Using the Emergency Eject Hole 40 V ventilation, ensuring 5


