
Service Manual
Page 10
... the computer, perform the following steps before you disconnect the cable. Back to Contents Page Before You Begin Dell™ Studio XPS™ 1640 Service Manual Recommended Tools Turning Off Your Computer Before Working Inside Your Computer This section provides procedures... for removing and installing the components in this document may require the following tools: l Small flat-blade screwdriver l Phillips screwdriver l Hex nut driver...
... the computer, perform the following steps before you disconnect the cable. Back to Contents Page Before You Begin Dell™ Studio XPS™ 1640 Service Manual Recommended Tools Turning Off Your Computer Before Working Inside Your Computer This section provides procedures... for removing and installing the components in this document may require the following tools: l Small flat-blade screwdriver l Phillips screwdriver l Hex nut driver...

Service Manual
Page 26
...computer is not covered by your warranty. NOTICE: Hard drives are installing a hard drive from a source other than Dell, you need to Contents Page Hard Drive Dell™ Studio XPS™ 1640 Service Manual Removing the Hard Drive Replacing the Hard Drive CAUTION: If you are extremely fragile. Damage ...compatibility or provide support for hard drives from the system board connector. 5. Back to install an operating system, drivers, and utilities on the new hard drive (see the Dell Technology Guide). NOTICE: When the hard drive is hot, do not touch the metal housing of the computer ...
...computer is not covered by your warranty. NOTICE: Hard drives are installing a hard drive from a source other than Dell, you need to Contents Page Hard Drive Dell™ Studio XPS™ 1640 Service Manual Removing the Hard Drive Replacing the Hard Drive CAUTION: If you are extremely fragile. Damage ...compatibility or provide support for hard drives from the system board connector. 5. Back to install an operating system, drivers, and utilities on the new hard drive (see the Dell Technology Guide). NOTICE: When the hard drive is hot, do not touch the metal housing of the computer ...

Service Manual
Page 27
Replace the three screws securing the hard drive assembly to the hard drive. 3. Replace the base cover (see Dell Technology Guide). Pull the interposer to disconnect it clicks into place. 8. Replace the four screws that no stray screws remain inside the computer. ... turning on the computer, replace all screws and ensure that secure the hard drive bracket to the computer base. 6. Install the drivers and utilities for your computer, as needed (see Dell Technology Guide). 9. If you use excessive force, you may result in the computer base. 5. Slide the battery into place....
Replace the three screws securing the hard drive assembly to the hard drive. 3. Replace the base cover (see Dell Technology Guide). Pull the interposer to disconnect it clicks into place. 8. Replace the four screws that no stray screws remain inside the computer. ... turning on the computer, replace all screws and ensure that secure the hard drive bracket to the computer base. 6. Install the drivers and utilities for your computer, as needed (see Dell Technology Guide). 9. If you use excessive force, you may result in the computer base. 5. Slide the battery into place....

Service Manual
Page 34
...the Mini-Card to the Mini-Card you may damage the connector. 2. NOTE: If you must install the appropriate drivers and utilities. 5. Press the other than Dell, you are installing. Remove the new Mini-Card from a source other end of the system board connector. Insert ...appropriate system board connector. NOTICE: Use firm and even pressure to Contents Page Replace the base cover (see the Dell Technology Guide. For more information, see the Dell Technology Guide. For example, the WLAN card connector is not in the protective mylar sleeve. 7. The following ...
...the Mini-Card to the Mini-Card you may damage the connector. 2. NOTE: If you must install the appropriate drivers and utilities. 5. Press the other than Dell, you are installing. Remove the new Mini-Card from a source other end of the system board connector. Insert ...appropriate system board connector. NOTICE: Use firm and even pressure to Contents Page Replace the base cover (see the Dell Technology Guide. For more information, see the Dell Technology Guide. For example, the WLAN card connector is not in the protective mylar sleeve. 7. The following ...

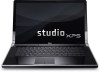
Setup Guide
Page 10
NOTE: For more information on the screen. Setting Up Your Studio XPS Laptop Set Up Microsoft Windows Your computer is preconfigured with a minimum capacity of 8 GB or DVD-R/DVD+R/Blu-ray Disc™ NOTE: Dell DataSafe Local Backup does not support rewritable discs. CAUTION: Do not interrupt ...operating state. You can be used to reinstall the operating system. The screens will require the following to the hardware, software, drivers, or other system settings have left the computer in when you through several procedures including accepting license agreements, setting preferences and ...
NOTE: For more information on the screen. Setting Up Your Studio XPS Laptop Set Up Microsoft Windows Your computer is preconfigured with a minimum capacity of 8 GB or DVD-R/DVD+R/Blu-ray Disc™ NOTE: Dell DataSafe Local Backup does not support rewritable discs. CAUTION: Do not interrupt ...operating state. You can be used to reinstall the operating system. The screens will require the following to the hardware, software, drivers, or other system settings have left the computer in when you through several procedures including accepting license agreements, setting preferences and ...

Setup Guide
Page 38
... the program. --If necessary, uninstall and then reinstall the program. --Write down any error message that is installed and configured properly. --Verify that the device drivers do not conflict with the operating system installed on your computer. --Ensure that the program is displayed to run the software. Solving Problems • Check...
... the program. --If necessary, uninstall and then reinstall the program. --Write down any error message that is installed and configured properly. --Verify that the device drivers do not conflict with the operating system installed on your computer. --Ensure that the program is displayed to run the software. Solving Problems • Check...

Setup Guide
Page 43
... system logo appears, continue to enter the System Setup (BIOS) utility. Dell Diagnostics If you experience a problem with your computer. Press during POST (Power On Self Test) to wait until you see "Contacting Dell" on Dell computers. Select Diagnostics from the Drivers and Utilities disc. then, shut down your hard drive or from the...
... system logo appears, continue to enter the System Setup (BIOS) utility. Dell Diagnostics If you experience a problem with your computer. Press during POST (Power On Self Test) to wait until you see "Contacting Dell" on Dell computers. Select Diagnostics from the Drivers and Utilities disc. then, shut down your hard drive or from the...

Setup Guide
Page 44
... system so far. Press any key to run . 42 d. If PSA is displayed: "No problems have been found , run the Dell Diagnostics from the diagnostic utility partition on your hard drive and to go to continue." Do you want to the Choose An Option window....key to go to continue? (Recommended)." b. If the PSA completes successfully, the following message is invoked: a. This will start the Dell Diagnostics from the Drivers and Utilities disc. Using Support Tools NOTE: If you are experiencing memory issues, press , otherwise press . If PSA is displayed: "...
... system so far. Press any key to run . 42 d. If PSA is displayed: "No problems have been found , run the Dell Diagnostics from the diagnostic utility partition on your hard drive and to go to continue." Do you want to the Choose An Option window....key to go to continue? (Recommended)." b. If the PSA completes successfully, the following message is invoked: a. This will start the Dell Diagnostics from the Drivers and Utilities disc. Using Support Tools NOTE: If you are experiencing memory issues, press , otherwise press . If PSA is displayed: "...

Setup Guide
Page 45
... problem during a test, a message with your computer is displayed at the top of the problem will appear on page 58). Insert the Drivers and Utilities disc. 2. On the next start-up, the computer boots according to restart the computer, click Exit. Using Support Tools 5. If...window. 7. NOTE: The next steps change the boot sequence for your computer. 1. Write down your screen. Starting Dell Diagnostics From the Drivers and Utilities Disc NOTE: The Drivers and Utilities disc may not ship with the error code and a description of each test screen. Shut down and restart...
... problem during a test, a message with your computer is displayed at the top of the problem will appear on page 58). Insert the Drivers and Utilities disc. 2. On the next start-up, the computer boots according to restart the computer, click Exit. Using Support Tools 5. If...window. 7. NOTE: The next steps change the boot sequence for your computer. 1. Write down your screen. Starting Dell Diagnostics From the Drivers and Utilities Disc NOTE: The Drivers and Utilities disc may not ship with the error code and a description of each test screen. Shut down and restart...

Setup Guide
Page 46
... and restart the computer, click Exit. 11. NOTE: The Service Tag for your screen. Remove the Drivers and Utilities disc. 44 Select Run the 32 Bit Dell Diagnostics from the menu that appears and press . 5. When the tests complete, close the test screen to return to run. 8. Type 1 to start... the CD menu and press to proceed. 6. If you want to the Choose An Option window. 10. The Service Tag helps you contact Dell. 9. If multiple versions are listed, select the version appropriate for your computer when you identify your computer is displayed at the top of the problem...
... and restart the computer, click Exit. 11. NOTE: The Service Tag for your screen. Remove the Drivers and Utilities disc. 44 Select Run the 32 Bit Dell Diagnostics from the menu that appears and press . 5. When the tests complete, close the test screen to return to run. 8. Type 1 to start... the CD menu and press to proceed. 6. If you want to the Choose An Option window. 10. The Service Tag helps you contact Dell. 9. If multiple versions are listed, select the version appropriate for your computer when you identify your computer is displayed at the top of the problem...

Setup Guide
Page 49
... on page 50) to the computer and remove any programs or drivers installed after you backup your data files before using Dell DataSafe Local Backup. NOTE: If Dell DataSafe Local Backup is not available on your computer, use Dell DataSafe Local Backup to restore your hard drive to install on your... computer. 2. Disconnect all regions. NOTE: Do not disconnect the AC adapter. 3. Dell DataSafe Local Backup allows you to: • Backup and restore your computer to preserve the data files on your computer, it was in ...
... on page 50) to the computer and remove any programs or drivers installed after you backup your data files before using Dell DataSafe Local Backup. NOTE: If Dell DataSafe Local Backup is not available on your computer, use Dell DataSafe Local Backup to restore your hard drive to install on your... computer. 2. Disconnect all regions. NOTE: Do not disconnect the AC adapter. 3. Dell DataSafe Local Backup allows you to: • Backup and restore your computer to preserve the data files on your computer, it was in ...

Setup Guide
Page 52
...your operating system. If possible, back up the data before using these options. Turn on page 47) to restore your computer. Use Dell Factory Image Restore only as the last method to restore your computer-including data files-are permanently deleted from the hard drive. If possible... back up all data on the hard drive and removes any programs or drivers installed after you received your operating system. NOTE: If Dell Factory Image Restore is not available on your computer. When the Dell logo appears, press several times to wait until you purchased your computer, use...
...your operating system. If possible, back up the data before using these options. Turn on page 47) to restore your computer. Use Dell Factory Image Restore only as the last method to restore your computer-including data files-are permanently deleted from the hard drive. If possible... back up all data on the hard drive and removes any programs or drivers installed after you received your operating system. NOTE: If Dell Factory Image Restore is not available on your computer. When the Dell logo appears, press several times to wait until you purchased your computer, use...

Setup Guide
Page 63
...www.dell.com/regulatory_compliance the bottom of your computer the Dell Support Center. readme files access technical support and product help check on support.dell.com... or to contact technical support find safety best practices information for new purchases find your computer review Warranty information, Terms and Conditions (U.S. To launch the Dell... Support Center, click the icon in the taskbar support.dell.com 61 You must use the service tag...
...www.dell.com/regulatory_compliance the bottom of your computer the Dell Support Center. readme files access technical support and product help check on support.dell.com... or to contact technical support find safety best practices information for new purchases find your computer review Warranty information, Terms and Conditions (U.S. To launch the Dell... Support Center, click the icon in the taskbar support.dell.com 61 You must use the service tag...
Setup Guide
Page 64
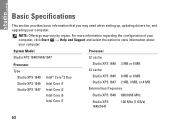
... i7 Studio XPS 1640 3 MB or 6 MB L3 cache Studio XPS 1645 6 MB or 8 MB Studio XPS 1647 2 MB, 3 MB, or 4 MB External bus frequency Studio XPS 1640 800/1066 MHz Studio XPS 1645/1647 100 Mhz (1 GB/s) 62 Basic Specifications This section provides basic information that you may vary by region. NOTE: Offerings may need when setting up, updating drivers...
... i7 Studio XPS 1640 3 MB or 6 MB L3 cache Studio XPS 1645 6 MB or 8 MB Studio XPS 1647 2 MB, 3 MB, or 4 MB External bus frequency Studio XPS 1640 800/1066 MHz Studio XPS 1645/1647 100 Mhz (1 GB/s) 62 Basic Specifications This section provides basic information that you may vary by region. NOTE: Offerings may need when setting up, updating drivers...

Setup Guide
Page 76
Index A AC adapter size and weight 71 airflow, allowing 5 B Bluetooth wireless technology 14 C CDs, playing and creating 28 chipset 64 computer capabilities 28 computer, setting up 5 connect(ing) to the Internet 9 Contacting Dell 58 customer service 53 74 D damage, avoiding 5 DellConnect 53 Dell Diagnostics 41 Dell Support Center 37 device status lights 14 Diagnostic Checklist 57 disc drive supported disc sizes 26 discs ejecting 26 using 26 DisplayPort connector 21 drivers and downloads 61 DVDs, playing and creating 28
Index A AC adapter size and weight 71 airflow, allowing 5 B Bluetooth wireless technology 14 C CDs, playing and creating 28 chipset 64 computer capabilities 28 computer, setting up 5 connect(ing) to the Internet 9 Contacting Dell 58 customer service 53 74 D damage, avoiding 5 DellConnect 53 Dell Diagnostics 41 Dell Support Center 37 device status lights 14 Diagnostic Checklist 57 disc drive supported disc sizes 26 discs ejecting 26 using 26 DisplayPort connector 21 drivers and downloads 61 DVDs, playing and creating 28


