Handling swollen Lithium-ion batteries
Page 1
... to pry on when the power button is pressed, the battery is the lithium-ion polymer battery. Replace the battery only with transportation regulations or disposed at https://www.dell.com/support for replacement by disconnecting the AC adapter and letting the battery drain. Lithium-ion polymer batteries have increased in popularity in recent years and have become...
... to pry on when the power button is pressed, the battery is the lithium-ion polymer battery. Replace the battery only with transportation regulations or disposed at https://www.dell.com/support for replacement by disconnecting the AC adapter and letting the battery drain. Lithium-ion polymer batteries have increased in popularity in recent years and have become...

Ownerss Manual
Page 8
... a port replicator or media base, and replace any installed ExpressCards or Smart Cards from the electrical outlet before turning on your computer. If the computer is flat and clean to the computer, use batteries designed for other Dell computers. 1. Remove any cards, such as...Disconnect all attached devices from being scratched. 2. Open the display. 7. Press and hold the power button for this particular Dell computer. Connect any replacement procedure, ensure that your work surface is connected to their electrical outlets. 6. CAUTION: If your computer has an RJ45 port...
... a port replicator or media base, and replace any installed ExpressCards or Smart Cards from the electrical outlet before turning on your computer. If the computer is flat and clean to the computer, use batteries designed for other Dell computers. 1. Remove any cards, such as...Disconnect all attached devices from being scratched. 2. Open the display. 7. Press and hold the power button for this particular Dell computer. Connect any replacement procedure, ensure that your work surface is connected to their electrical outlets. 6. CAUTION: If your computer has an RJ45 port...

Ownerss Manual
Page 10
... working inside your computer. 2. b) Lift the latch and disconnect the hard disk drive cable [2] from the battery [3]. 10 Removing and installing components c) Peel the hard disk drive cable from the connector on the system board. Replace the eight M2.5 x 6 screws to secure the base cover to the computer. 5. Follow the procedure in...
... working inside your computer. 2. b) Lift the latch and disconnect the hard disk drive cable [2] from the battery [3]. 10 Removing and installing components c) Peel the hard disk drive cable from the connector on the system board. Replace the eight M2.5 x 6 screws to secure the base cover to the computer. 5. Follow the procedure in...

Ownerss Manual
Page 12
Connect the hard disk drive cable to the system. 5. Replace the four M2.0 x 3 screws to secure the battery to the connector on the system board and close the latch. 4. Lift the speakers, along with the speaker cable, and ...routing channel [2]. 4. Follow the procedure in Before working inside your computer. Follow the procedure in After working inside your computer. 2. Remove the: a) base cover b) battery 3. To remove the speaker: a) Disconnect the speaker cable [1]. 3. Speaker Removing the speaker 1. Install the base cover. 6. b) Unroute the cable from the back...
Connect the hard disk drive cable to the system. 5. Replace the four M2.0 x 3 screws to secure the battery to the connector on the system board and close the latch. 4. Lift the speakers, along with the speaker cable, and ...routing channel [2]. 4. Follow the procedure in Before working inside your computer. Follow the procedure in After working inside your computer. 2. Remove the: a) base cover b) battery 3. To remove the speaker: a) Disconnect the speaker cable [1]. 3. Speaker Removing the speaker 1. Install the base cover. 6. b) Unroute the cable from the back...

Ownerss Manual
Page 26
... M2.5 x 4 screws to the system. 3. Follow the procedure in Before working inside your computer. Remove the: a) base cover b) battery c) system fan d) heat sink e) solid-state drive(SSD) 26 Removing and installing components Replace the screws to secure the power button to the system. 5. System board Removing the system board 1. Follow the procedure...
... M2.5 x 4 screws to the system. 3. Follow the procedure in Before working inside your computer. Remove the: a) base cover b) battery c) system fan d) heat sink e) solid-state drive(SSD) 26 Removing and installing components Replace the screws to secure the power button to the system. 5. System board Removing the system board 1. Follow the procedure...

Ownerss Manual
Page 29
... board. 5. b) Disconnect the touchpad cable from system [1, 2]. Install the: a) solid state drive(SSD) b) heat sink c) system fan d) battery e) base cover 7. Removing and installing components 29 Connect the Input output board cable, speaker cable, keyboard backlight cable, keyboard cable and touchpad cable ...in the system [2]. Touchpad Removing touchpad 1. c) Remove the three M2.0 x 2 screws that secure the touchpad to the system. 4. Replace the three M2.0 x 2 screws to secure the system board to the system and lift the touchpad away from the connector in Before working...
... board. 5. b) Disconnect the touchpad cable from system [1, 2]. Install the: a) solid state drive(SSD) b) heat sink c) system fan d) battery e) base cover 7. Removing and installing components 29 Connect the Input output board cable, speaker cable, keyboard backlight cable, keyboard cable and touchpad cable ...in the system [2]. Touchpad Removing touchpad 1. c) Remove the three M2.0 x 2 screws that secure the touchpad to the system. 4. Replace the three M2.0 x 2 screws to secure the system board to the system and lift the touchpad away from the connector in Before working...

Ownerss Manual
Page 30
... screws to secure the touchpad support bracket to the system. 4. Install the: a) hard drive b) battery c) base cover 5. Display assembly Removing display assembly 1. Remove the: a) base cover b) WLAN card 3. Replace the four screws to secure the touchpad to the system. 2. Follow the procedure in the system. 3. b) Remove the five M2.5 x 6 screws [2] that secure...
... screws to secure the touchpad support bracket to the system. 4. Install the: a) hard drive b) battery c) base cover 5. Display assembly Removing display assembly 1. Remove the: a) base cover b) WLAN card 3. Replace the four screws to secure the touchpad to the system. 2. Follow the procedure in the system. 3. b) Remove the five M2.5 x 6 screws [2] that secure...

Ownerss Manual
Page 65
...Description Auto OS Recovery Threshold The Auto OS Recovery Threshold setup option controls the automatic boot flow for Support Assist System Resolution Console and Dell OS Recovery tool. NOTE: If BitLocker is set by default. Allows you to view and clear the System Setup (BIOS) POST ... the BIOS in Windows It is recommended to update your computer battery is fully charged and connected to flash previous revisions of the following options: • OFF •1 • 2-Default •3 SupportAssist OS Recovery Allows you replace the system board or if an update is set by default...
...Description Auto OS Recovery Threshold The Auto OS Recovery Threshold setup option controls the automatic boot flow for Support Assist System Resolution Console and Dell OS Recovery tool. NOTE: If BitLocker is set by default. Allows you to view and clear the System Setup (BIOS) POST ... the BIOS in Windows It is recommended to update your computer battery is fully charged and connected to flash previous revisions of the following options: • OFF •1 • 2-Default •3 SupportAssist OS Recovery Allows you replace the system board or if an update is set by default...
Ownerss Manual
Page 77
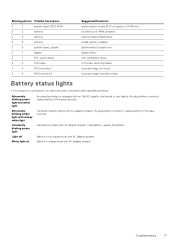
... mode with AC adapter present. Troubleshooting 77 Fetal battery, replace the battery. Re-plug battery connector, replace battery if the issue reoccurs. Temporary battery failure with AC adapter present. Fatal battery failure with AC adapter present. chipset 2 7 display 3 1 RTC power failure 3 2 PCI/Video 3 3 BIOS ... present. Re-plug battery connector, replace battery if the issue reoccurs. Battery in full charge mode with steady white light Constantly blinking amber light Light off White light on An unauthenticated or unsupported non-Dell AC adapter is attached...
... mode with AC adapter present. Troubleshooting 77 Fetal battery, replace the battery. Re-plug battery connector, replace battery if the issue reoccurs. Temporary battery failure with AC adapter present. Fatal battery failure with AC adapter present. chipset 2 7 display 3 1 RTC power failure 3 2 PCI/Video 3 3 BIOS ... present. Re-plug battery connector, replace battery if the issue reoccurs. Battery in full charge mode with steady white light Constantly blinking amber light Light off White light on An unauthenticated or unsupported non-Dell AC adapter is attached...


