
Owners Manual
Page 4
...Panel 5 Remote Control Unit 6 Connections Preparations 7 Cables Used for Connections 7 Video Conversion Function 8 Speaker Connections 9 Speaker Installation 9 Speaker Connections 9, 10 Connecting Equipment with HDMI connectors 11 Connecting the Monitor 12 Connecting the Playback Components 12 DVD Player 12 Record Player 13 CD Player 13 iPod 13 TV/CABLE Tuner 14 Satellite Receiver...Surround Mode 31 g Manual EQ 31 Network Setup 31 a Network Setup 32 s Other 32 d Network Information 32 Zone Setup 33 a ZONE2...16 Components Equipped with a DENON LINK connector 16 Video Camera ...
...Panel 5 Remote Control Unit 6 Connections Preparations 7 Cables Used for Connections 7 Video Conversion Function 8 Speaker Connections 9 Speaker Installation 9 Speaker Connections 9, 10 Connecting Equipment with HDMI connectors 11 Connecting the Monitor 12 Connecting the Playback Components 12 DVD Player 12 Record Player 13 CD Player 13 iPod 13 TV/CABLE Tuner 14 Satellite Receiver...Surround Mode 31 g Manual EQ 31 Network Setup 31 a Network Setup 32 s Other 32 d Network Information 32 Zone Setup 33 a ZONE2...16 Components Equipped with a DENON LINK connector 16 Video Camera ...
Owners Manual
Page 7
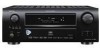
...AUDYSSEY MULTEQ XT indicator This lights when the room equalizer is selected. Q4 Input mode indicators Q5 HDMI indicator This lights when playing using DENON LINK connections. Front Panel oi u y W6 USB port 18) W7 STATUS button 45) W8 AUDIO DELAY button 44) W9 RESTORER button 43) E0 DIRECT/STEREO...For buttons not explained here, see the page indicated in the auto tuning mode. • STEREO In the FM mode, these light when receiving analog stereo broadcasts. • TUNED Lights when the broadcast is selected. Q0 Multi zone indicators These light when the power for the respective ...
...AUDYSSEY MULTEQ XT indicator This lights when the room equalizer is selected. Q4 Input mode indicators Q5 HDMI indicator This lights when playing using DENON LINK connections. Front Panel oi u y W6 USB port 18) W7 STATUS button 45) W8 AUDIO DELAY button 44) W9 RESTORER button 43) E0 DIRECT/STEREO...For buttons not explained here, see the page indicated in the auto tuning mode. • STEREO In the FM mode, these light when receiving analog stereo broadcasts. • TUNED Lights when the broadcast is selected. Q0 Multi zone indicators These light when the power for the respective ...

Owners Manual
Page 8
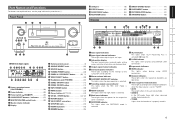
Getting Started Connections Setup Playback Remote Control Multi-Zone Information Troubleshooting Rear Panel Q6 Q5 Q4 Q3 Q2 Q1 Q0 o Q7 Q8 Q9 Q8 Q7 W0 qw e r t y q RS-232C connector 21) w REMOTE CONTROL jacks 21) e TRIGGER OUT jacks ... (AC IN 22) o Digital audio connectors (OPTICAL / COAXIAL 12, 14) Q0 ETHERNET connector 20) Q1 USB port 18) Q2 XM connector (SAT TU 18) Q3 DENON LINK connector 16) Q4 COMPONENT VIDEO connectors 12) Q5 HDMI connectors 11) Q6 VIDEO / S-VIDEO connectors 12) Q7 Analog audio connectors (AUDIO 12) Q8 PRE...
Getting Started Connections Setup Playback Remote Control Multi-Zone Information Troubleshooting Rear Panel Q6 Q5 Q4 Q3 Q2 Q1 Q0 o Q7 Q8 Q9 Q8 Q7 W0 qw e r t y q RS-232C connector 21) w REMOTE CONTROL jacks 21) e TRIGGER OUT jacks ... (AC IN 22) o Digital audio connectors (OPTICAL / COAXIAL 12, 14) Q0 ETHERNET connector 20) Q1 USB port 18) Q2 XM connector (SAT TU 18) Q3 DENON LINK connector 16) Q4 COMPONENT VIDEO connectors 12) Q5 HDMI connectors 11) Q6 VIDEO / S-VIDEO connectors 12) Q7 Analog audio connectors (AUDIO 12) Q8 PRE...

Owners Manual
Page 13
... • Connect the speaker cables in such a way that they do not stick out of 6 to the AVR-3808CI, and be activated if the core wires touch the rear panel or if the + and - Doing so could result in and turn the set's power back on the speakers being... with the volume turned up high, the temperature may be sure to interconnect the channels and polarities correctly. 1 Peel off , then contact a DENON service center. 4 Turn the speaker terminal clockwise to the hilt into the speaker terminal. Getting Started Connections Setup Playback Remote Control Multi-Zone Information ...
... • Connect the speaker cables in such a way that they do not stick out of 6 to the AVR-3808CI, and be activated if the core wires touch the rear panel or if the + and - Doing so could result in and turn the set's power back on the speakers being... with the volume turned up high, the temperature may be sure to interconnect the channels and polarities correctly. 1 Peel off , then contact a DENON service center. 4 Turn the speaker terminal clockwise to the hilt into the speaker terminal. Getting Started Connections Setup Playback Remote Control Multi-Zone Information ...

Owners Manual
Page 21
... page 54. NOTE • Set to the USB port you want to use. • The AVR-3808CI is not possible to use the extension cable for connecting the USB memory deveice to the AVR-3808CI's USB port. It is equipped with USB memory devices connected to the operating instructions of the extension... Mini-Tuner and Home Dock XM • In the initial status, USB memory devices can receive XM® Satellite Radio by connecting them to the USB port on the front panel. • To change the port to be used by connecting to the XM Mini-Tuner and Home Dock (includes home antenna...
... page 54. NOTE • Set to the USB port you want to use. • The AVR-3808CI is not possible to use the extension cable for connecting the USB memory deveice to the AVR-3808CI's USB port. It is equipped with USB memory devices connected to the operating instructions of the extension... Mini-Tuner and Home Dock XM • In the initial status, USB memory devices can receive XM® Satellite Radio by connecting them to the USB port on the front panel. • To change the port to be used by connecting to the XM Mini-Tuner and Home Dock (includes home antenna...

Owners Manual
Page 22
... is used, do not disconnect the AM loop antenna. • Make sure the AM loop antenna lead terminals do not touch metal parts of the panel. Insert the conductor. 3. a. With the antenna attached to the point of cable entry as close to a wall. Getting Started Connections Setup Playback Remote Control Multi...
... is used, do not disconnect the AM loop antenna. • Make sure the AM loop antenna lead terminals do not touch metal parts of the panel. Insert the conductor. 3. a. With the antenna attached to the point of cable entry as close to a wall. Getting Started Connections Setup Playback Remote Control Multi...
Owners Manual
Page 30
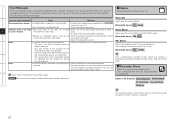
... Troubleshooting Error Messages If the auto setup procedure could be detected. • Connect the included setup microphone to the SETUP MIC jack on the front panel. reversed. • For some speakers, this happens, check the relevant items, be sure to make the measurements again.
... Troubleshooting Error Messages If the auto setup procedure could be detected. • Connect the included setup microphone to the SETUP MIC jack on the front panel. reversed. • For some speakers, this happens, check the relevant items, be sure to make the measurements again.

Owners Manual
Page 57
...not possible to use the set the files as for Internet radio stations. Playback starts once buffering reaches "100%". By default, the front panel's USB port will operate or receive power. "Playback Mode" - "Random" (vpage 39) Selecting tracks During playback, either press u (previous track) or i (next ...Use ui to select the file, then press ENTER or p. "USB Select" menu. • DENON will not work via the AVR-3808CI's USB port using a USB cable. • The AVR-3808CI is not compatible with USB memory devices connected to both the ports at the "Source Select" - Playback...
...not possible to use the set the files as for Internet radio stations. Playback starts once buffering reaches "100%". By default, the front panel's USB port will operate or receive power. "Playback Mode" - "Random" (vpage 39) Selecting tracks During playback, either press u (previous track) or i (next ...Use ui to select the file, then press ENTER or p. "USB Select" menu. • DENON will not work via the AVR-3808CI's USB port using a USB cable. • The AVR-3808CI is not compatible with USB memory devices connected to both the ports at the "Source Select" - Playback...

Owners Manual
Page 85
...3808CI's AC inlets and the wall power outlet. source. • Master volume is turned too • Adjust the master volume to play and set • Select an appropriate input input source do not match. For details, read appear on display. Symptom Power turns off the power and contact a DENON... IDs for the and remote control unit do not match. appropriate level. • Mute mode is set 's rear panel, then reconnect. digital inputs are being operated as indicated proper direction, following : 1. GRemote Control UnitH Symptom Cause Countermeasure...
...3808CI's AC inlets and the wall power outlet. source. • Master volume is turned too • Adjust the master volume to play and set • Select an appropriate input input source do not match. For details, read appear on display. Symptom Power turns off the power and contact a DENON... IDs for the and remote control unit do not match. appropriate level. • Mute mode is set 's rear panel, then reconnect. digital inputs are being operated as indicated proper direction, following : 1. GRemote Control UnitH Symptom Cause Countermeasure...

