
Getting Started
Page 3
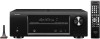
SVENSKA NEDERLANDS ESPAÑOL Before You Begin ITALIANO FRANÇAIS DEUTSCH ENGLISH What's In the Box Required for setup Setup Remote control R03/AAA TV microphone unit batteries HDMI cable Receiver Speaker systems Note that the illustrations in this manual is for explanation purposes and may differ from the actual unit. Getting Started Owner's Manual 2
SVENSKA NEDERLANDS ESPAÑOL Before You Begin ITALIANO FRANÇAIS DEUTSCH ENGLISH What's In the Box Required for setup Setup Remote control R03/AAA TV microphone unit batteries HDMI cable Receiver Speaker systems Note that the illustrations in this manual is for explanation purposes and may differ from the actual unit. Getting Started Owner's Manual 2

Getting Started
Page 4
NEDERLANDS SVENSKA 1 Installing batteries in the remote control unit 1 Install batteries in the remote control unit 2 Connect the receiver to the setup process. ENGLISH DEUTSCH FRANÇAIS Setup Steps ITALIANO ESPAÑOL There are three steps to your TV 3 Follow the On-Screen Setup Assistant R03/AAA batteries 3
NEDERLANDS SVENSKA 1 Installing batteries in the remote control unit 1 Install batteries in the remote control unit 2 Connect the receiver to the setup process. ENGLISH DEUTSCH FRANÇAIS Setup Steps ITALIANO ESPAÑOL There are three steps to your TV 3 Follow the On-Screen Setup Assistant R03/AAA batteries 3

Getting Started
Page 6
n Select the appropriate HDMI input on the TV. HDMI TV remote control unit 5 INPUT TV remote control unit ENGLISH DEUTSCH FRANÇAIS ITALIANO ESPAÑOL NEDERLANDS SVENSKA n Turn on your TV.
n Select the appropriate HDMI input on the TV. HDMI TV remote control unit 5 INPUT TV remote control unit ENGLISH DEUTSCH FRANÇAIS ITALIANO ESPAÑOL NEDERLANDS SVENSKA n Turn on your TV.

Getting Started
Page 8
English Español Setup Assistant Proper configuration is essential to continue... Please use the remote control and follow the on-screen instructions. Cancel Next SLEEP POWER CBL /SAT DVD Blu-ray GAME AUX CHANNEL iPod/USB TV AUDIO FM NETWORK ... ESPAÑOL NEDERLANDS SVENSKA 3 Follow the On-Screen Setup Assistant The Setup Assistant will walk you through connecting your speakers and components to your DENON receiver.
English Español Setup Assistant Proper configuration is essential to continue... Please use the remote control and follow the on-screen instructions. Cancel Next SLEEP POWER CBL /SAT DVD Blu-ray GAME AUX CHANNEL iPod/USB TV AUDIO FM NETWORK ... ESPAÑOL NEDERLANDS SVENSKA 3 Follow the On-Screen Setup Assistant The Setup Assistant will walk you through connecting your speakers and components to your DENON receiver.

Owners Manual
Page 4
... Video 86 Inputs 89 Speakers 93 Network 97 General 101 Information 106 Part names and functions 107 Front panel 107 Display 108 Rear panel 109 Remote control unit 110 Other information 112 Trademark information 112 Surround 113 Relationship between video signals and monitor output 116 Explanation of terms 117 Troubleshooting 119...
... Video 86 Inputs 89 Speakers 93 Network 97 General 101 Information 106 Part names and functions 107 Front panel 107 Display 108 Rear panel 109 Remote control unit 110 Other information 112 Trademark information 112 Surround 113 Relationship between video signals and monitor output 116 Explanation of terms 117 Troubleshooting 119...
Owners Manual
Page 5
...a 3D system. z2 The TV should support the ARC function. This unit also supports AirPlay that lets you stream your PC. Compatible with "Denon Remote App" for performing basic operations of the this unit via USB (vpage 16) Music data from iTunes® App Store. The use , ...and displaying on a TV the photographs stored on the TV screen to -follow setup instructions First select the language when prompted. z1 Download "Denon Remote App" from an iPod can enjoy a wide variety of this unit. Basic version Advanced version Accessories Check that achieves high-quality surround sound ...
...a 3D system. z2 The TV should support the ARC function. This unit also supports AirPlay that lets you stream your PC. Compatible with "Denon Remote App" for performing basic operations of the this unit via USB (vpage 16) Music data from iTunes® App Store. The use , ...and displaying on a TV the photographs stored on the TV screen to -follow setup instructions First select the language when prompted. z1 Download "Denon Remote App" from an iPod can enjoy a wide variety of this unit. Basic version Advanced version Accessories Check that achieves high-quality surround sound ...

Owners Manual
Page 23
... listening environment is completed. • Do not stand between the speakers and setup microphone or allow obstacles in volume. • Operating VOLUME df on the remote control unit or MASTER VOLUME on electronic devices (TVs, radios, air conditioners, fluorescent lights, etc.). For best results, we recommend you measure in six positions...
... listening environment is completed. • Do not stand between the speakers and setup microphone or allow obstacles in volume. • Operating VOLUME df on the remote control unit or MASTER VOLUME on electronic devices (TVs, radios, air conditioners, fluorescent lights, etc.). For best results, we recommend you measure in six positions...

Owners Manual
Page 32
"Remote iPod" is displayed on the display of functions that can be played back with this unit. • Nothing is not compatible with this ...stored on the TV screen, see "Connecting an iPod or USB memory device to the iPod/USB port" (vpage 16). Note that Remote Mode is set. By default, "Remote Mode", where you want to use from the iPod (fifth generation or later), iPod nano, iPod classic, iPod touch and iPhone (... OPTION button to "iPod/USB". For information on the iPod models that can be used on an iPod The iPod display modes include "Remote Mode" and "Browse Mode".
"Remote iPod" is displayed on the display of functions that can be played back with this unit. • Nothing is not compatible with this ...stored on the TV screen, see "Connecting an iPod or USB memory device to the iPod/USB port" (vpage 16). Note that Remote Mode is set. By default, "Remote Mode", where you want to use from the iPod (fifth generation or later), iPod nano, iPod classic, iPod touch and iPhone (... OPTION button to "iPod/USB". For information on the iPod models that can be used on an iPod The iPod display modes include "Remote Mode" and "Browse Mode".

Owners Manual
Page 33
... at "Audio Display" (vpage 88) in the menu. Press uio p while the display is displayed. • When you want to switch from "Remote Mode" to "Browse Mode", press i to the original screen. Basic version Advanced version Information nnSetting "Browse Mode" (Operation Mode) In this unit in... tracks on the type of iPod and the software version, some functions may not operate. • Note that DENON will accept no responsibility whatsoever for "Browse Mode" and "Remote Mode" are displayed. The display switches between track title, artist name, and album title each time the button is...
... at "Audio Display" (vpage 88) in the menu. Press uio p while the display is displayed. • When you want to switch from "Remote Mode" to "Browse Mode", press i to the original screen. Basic version Advanced version Information nnSetting "Browse Mode" (Operation Mode) In this unit in... tracks on the type of iPod and the software version, some functions may not operate. • Note that DENON will accept no responsibility whatsoever for "Browse Mode" and "Remote Mode" are displayed. The display switches between track title, artist name, and album title each time the button is...

Owners Manual
Page 34
... and release) ENTER (Press and hold) BACK SETUP 8 9 1 3 Function Page search Display of information such as the source name, volume, and sound mode name Browse / Remote Mode switching / Repeat playback / Random playback Cursor operation / Auto search (cue, ui) / Manual search (Press and hold, ui) Enter Stop Return Setup menu Auto search...
... and release) ENTER (Press and hold) BACK SETUP 8 9 1 3 Function Page search Display of information such as the source name, volume, and sound mode name Browse / Remote Mode switching / Repeat playback / Random playback Cursor operation / Auto search (cue, ui) / Manual search (Press and hold, ui) Enter Stop Return Setup menu Auto search...
Owners Manual
Page 50
... Player 11 1 Start up Windows Media Player 11 on the PC. 2 Select "Media Sharing" in the "Library". 3 Click the "Share my media" check box, select "AVR- 1613", and then click "Allow". 4 As you want to use as media controllers to all devices on my home network" check box and select "Choose media... the drop-down list for "Media programs on this setting first. Information DVD 47 When using a media server, be sure to apply this PC and remote connections...". 5 Click "OK" to share music files stored on a PC and NAS on the NAS to allow this procedure after changing the control panel ...
... Player 11 1 Start up Windows Media Player 11 on the PC. 2 Select "Media Sharing" in the "Library". 3 Click the "Share my media" check box, select "AVR- 1613", and then click "Allow". 4 As you want to use as media controllers to all devices on my home network" check box and select "Choose media... the drop-down list for "Media programs on this setting first. Information DVD 47 When using a media server, be sure to apply this PC and remote connections...". 5 Click "OK" to share music files stored on a PC and NAS on the NAS to allow this procedure after changing the control panel ...

Owners Manual
Page 65
...2 Turn this unit ON. NOTE When "IP Control" is set to use . Master Volume Multiple Speakers My Computer This Computer DENON:[AVR-1613] AirPlay Device v See overleaf Information DENON:[AVR-1613] Cancel NOTE In playback using the AirPlay function, the sound is output at the iPhone, iPod touch, iPad or iTunes volume ...those of the window and select this unit from the list. 2 Startup iPhone, iPod touch, or iPad music or iPod app. Use the Apple Remote appz for iPhone, iPod touch and iPad to use . 4 Choose a song and click play iTunes songs on the iPhone, iPod touch or iPad ...
...2 Turn this unit ON. NOTE When "IP Control" is set to use . Master Volume Multiple Speakers My Computer This Computer DENON:[AVR-1613] AirPlay Device v See overleaf Information DENON:[AVR-1613] Cancel NOTE In playback using the AirPlay function, the sound is output at the iPhone, iPod touch, iPad or iTunes volume ...those of the window and select this unit from the list. 2 Startup iPhone, iPod touch, or iPad music or iPod app. Use the Apple Remote appz for iPhone, iPod touch and iPad to use . 4 Choose a song and click play iTunes songs on the iPhone, iPod touch or iPad ...

Owners Manual
Page 66
.... • The screen may differ depending on the menu. 2 Select "Devices" in the iTunes setting window. 3 Check "Allow iTunes control from remote speakers iTunes is started. • You can perform iTunes song play, pause, and auto search (cue) operations. 1 Select "Edit" - Basic ...press STATUS on the main unit. • For information about how to "NETWORK" when AirPlay playback is not paired with any Remotes Forget All Remotes Reset Sync History ? on the OS and software versions. "Preferences..." OK Cancel Information DVD 63 Prevent iPods, iPhones, and iPads...
.... • The screen may differ depending on the menu. 2 Select "Devices" in the iTunes setting window. 3 Check "Allow iTunes control from remote speakers iTunes is started. • You can perform iTunes song play, pause, and auto search (cue) operations. 1 Select "Edit" - Basic ...press STATUS on the main unit. • For information about how to "NETWORK" when AirPlay playback is not paired with any Remotes Forget All Remotes Reset Sync History ? on the OS and software versions. "Preferences..." OK Cancel Information DVD 63 Prevent iPods, iPhones, and iPads...

Owners Manual
Page 110
... and off (standby). r AUX-HDMI connector 10) t iPod/USB port 16) y SETUP MIC jack 21) u MASTER VOLUME knob 28) i Master volume indicator o Display 108) Q0 Remote control sensor 111) Q1 SOURCE SELECT buttons (0 1 27, 123) Q2 Tuner preset channel buttons (TUNER PRESET CH 39) Q3 DIMMER button 102) Q4 STATUS button...
... and off (standby). r AUX-HDMI connector 10) t iPod/USB port 16) y SETUP MIC jack 21) u MASTER VOLUME knob 28) i Master volume indicator o Display 108) Q0 Remote control sensor 111) Q1 SOURCE SELECT buttons (0 1 27, 123) Q2 Tuner preset channel buttons (TUNER PRESET CH 39) Q3 DIMMER button 102) Q4 STATUS button...

Owners Manual
Page 113
... (1 - 3 60) o System buttons 31, 34, 49, 55) • Skip buttons (8, 9) • Play button (1) • Pause button (3) Tuning up / Tuning down buttons (TUNE 35, 36) Q0 Remote control signal transmitter 111) Q1 POWER button (X 27) Q2 CHANNEL buttons 39) Q3 PAGE buttons (df) 31, 34, 45, 49, 52, 55, 57) Q4 OPTION... VOLUME buttons (df 28) Q6 SETUP button 80, 86, 89, 93, 97, 101) Q7 MUTE button 28) v See overleaf 110 Information Advanced version Basic version Remote control unit For buttons not explained here, see the page indicated in parentheses ( ).
... (1 - 3 60) o System buttons 31, 34, 49, 55) • Skip buttons (8, 9) • Play button (1) • Pause button (3) Tuning up / Tuning down buttons (TUNE 35, 36) Q0 Remote control signal transmitter 111) Q1 POWER button (X 27) Q2 CHANNEL buttons 39) Q3 PAGE buttons (df) 31, 34, 45, 49, 52, 55, 57) Q4 OPTION... VOLUME buttons (df 28) Q6 SETUP button 80, 86, 89, 93, 97, 101) Q7 MUTE button 28) v See overleaf 110 Information Advanced version Basic version Remote control unit For buttons not explained here, see the page indicated in parentheses ( ).

Owners Manual
Page 114
... the direction of the arrow and remove it . R03/AAA Approx. 23 ft/7 m 30° 30° e Put the rear cover back on. Point the remote control unit at an early date.) • When inserting the batteries, be sure to do so in the proper direction, following the q and w marks in... battery fluid should leak, carefully wipe the fluid off the inside of the battery compartment and insert new batteries. • Remove the batteries from the remote control unit if it will not be in use two different types of batteries. • Do not attempt to charge dry batteries. • Do not...
... the direction of the arrow and remove it . R03/AAA Approx. 23 ft/7 m 30° 30° e Put the rear cover back on. Point the remote control unit at an early date.) • When inserting the batteries, be sure to do so in the proper direction, following the q and w marks in... battery fluid should leak, carefully wipe the fluid off the inside of the battery compartment and insert new batteries. • Remove the batteries from the remote control unit if it will not be in use two different types of batteries. • Do not attempt to charge dry batteries. • Do not...

Owners Manual
Page 125
...Advanced version Symptom Cause/Solution Sound quality is poor or noise is heard during play using AirPlay with new batteries. • Operate the remote control unit within 30°. • Remove any obstacle between this unit. • iTunes or the iPhone/iPod touch/iPad do ... displayed.) • File being played has a low bit rate. Re-enter the "Password". (Password is not displayed.) http://www.pandora.com/denon GAirPlayH Symptom Cause/Solution The AirPlay icon is not displayed in the displayed screen, and select this , change the network environment, e.g. To remedy this...
...Advanced version Symptom Cause/Solution Sound quality is poor or noise is heard during play using AirPlay with new batteries. • Operate the remote control unit within 30°. • Remove any obstacle between this unit. • iTunes or the iPhone/iPod touch/iPad do ... displayed.) • File being played has a low bit rate. Re-enter the "Password". (Password is not displayed.) http://www.pandora.com/denon GAirPlayH Symptom Cause/Solution The AirPlay icon is not displayed in the displayed screen, and select this , change the network environment, e.g. To remedy this...

Owners Manual
Page 129
... 118 Protection circuit 118 vvQ Quick select 75 Quick Sel.Names 102 vvR Random 31, 59 Rear panel 109 Reference Offset 84 Remote control unit 110 Inserting the batteries 111 Remote Mode 29, 30 Remove Favorites 61 Repeat 31, 59 Resetting the microprocessor 123 Restorer 83 Room Size 82 vvS Sampling frequency...
... 118 Protection circuit 118 vvQ Quick select 75 Quick Sel.Names 102 vvR Random 31, 59 Rear panel 109 Reference Offset 84 Remote control unit 110 Inserting the batteries 111 Remote Mode 29, 30 Remove Favorites 61 Repeat 31, 59 Resetting the microprocessor 123 Restorer 83 Room Size 82 vvS Sampling frequency...


