User Guide 1
Page 2
...Pack 8 Inserting and Removing the Tape Cassette 8 Setting the Tape Width 8 Selecting a Language 8 Selecting Units of Measure 9 Getting to Know Your Printer 9 Power 9 LCD Display 9 Using the Backlight 9 Adjusting the Display Contrast 9 Hiding the Caption Bar 10 CAPS Mode 10 Shift Key 10 ... 10 Clear Key 10 Cutter Button 10 Pausing between Labels on page 20Hot Keys 10 Working with Label Files 11 Creating a Label File 11 Adding Labels to a Label File 11 Removing Labels from a File 11 Printing a Label File 11 Formatting a Label 11 Changing the Text Size 11 Changing the Text...
...Pack 8 Inserting and Removing the Tape Cassette 8 Setting the Tape Width 8 Selecting a Language 8 Selecting Units of Measure 9 Getting to Know Your Printer 9 Power 9 LCD Display 9 Using the Backlight 9 Adjusting the Display Contrast 9 Hiding the Caption Bar 10 CAPS Mode 10 Shift Key 10 ... 10 Clear Key 10 Cutter Button 10 Pausing between Labels on page 20Hot Keys 10 Working with Label Files 11 Creating a Label File 11 Adding Labels to a Label File 11 Removing Labels from a File 11 Printing a Label File 11 Formatting a Label 11 Changing the Text Size 11 Changing the Text...
User Guide 1
Page 4
Using Simultaneous Serialization 19 Using Advanced Serialization 19 Printing Options 20 Printing Multiple Copies 20 Collating Multiple Copies 20 Pausing between Labels 20 Using the Auto-Cut Option 20 Advancing the Label Tape 20 Adjusting Print Contrast 21 Using Printer Memory 21 Saving a Label File 21 Recalling a Label File from Memory 21 Deleting a Label File from Memory 21 Cleaning Your Printer 21 Using RHINO Connect Software 22 Connecting to your Computer 22 Symbols 23 Library Text 24 Troubleshooting 26 Contacting Customer Support 31 4
Using Simultaneous Serialization 19 Using Advanced Serialization 19 Printing Options 20 Printing Multiple Copies 20 Collating Multiple Copies 20 Pausing between Labels 20 Using the Auto-Cut Option 20 Advancing the Label Tape 20 Adjusting Print Contrast 21 Using Printer Memory 21 Saving a Label File 21 Recalling a Label File from Memory 21 Deleting a Label File from Memory 21 Cleaning Your Printer 21 Using RHINO Connect Software 22 Connecting to your Computer 22 Symbols 23 Library Text 24 Troubleshooting 26 Contacting Customer Support 31 4
User Guide 1
Page 6
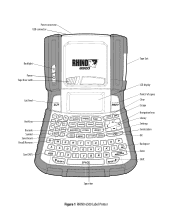
Power connector USB connector Backlight Power Tape Door Latch Cut/Feed Hot Keys Barcode Symbol Save/Insert Recall/Remove Size/CAPS Space bar Figure 1 RHINO 6500 Label Printer Tape Exit LCD display Print/# of copies Clear Escape Navigation keys Library Settings Serialization OK Backspace Enter Shift
Power connector USB connector Backlight Power Tape Door Latch Cut/Feed Hot Keys Barcode Symbol Save/Insert Recall/Remove Size/CAPS Space bar Figure 1 RHINO 6500 Label Printer Tape Exit LCD display Print/# of copies Clear Escape Navigation keys Library Settings Serialization OK Backspace Enter Shift
User Guide 1
Page 7
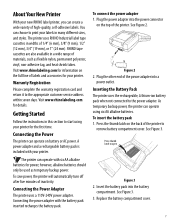
...with six AA alkaline batteries for details. Connecting the power adapter with your printer. To insert the battery pack 1. See Figure 3. About Your New Printer With your new RHINO label printer, you can choose to print your labels in many different sizes, and styles. Visit www.rhinolabeling.com for power;... into the power connector on battery or AC power. Insert the battery pack into the battery compartment. The printer uses RHINO Industrial label tape cassettes in this section to start using six AA alkaline batteries. See Figure 2. As temporary backup power, the...
...with six AA alkaline batteries for details. Connecting the power adapter with your printer. To insert the battery pack 1. See Figure 3. About Your New Printer With your new RHINO label printer, you can choose to print your labels in many different sizes, and styles. Visit www.rhinolabeling.com for power;... into the power connector on battery or AC power. Insert the battery pack into the battery compartment. The printer uses RHINO Industrial label tape cassettes in this section to start using six AA alkaline batteries. See Figure 2. As temporary backup power, the...

User Guide 1
Page 8
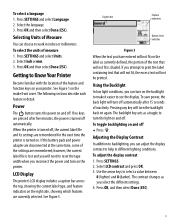
.... The Settings menu appears on the front of the printer) to the right to open the tape cassette door. 2. Charging the battery pack for a tape width different than what size label tape you use to design labels are dependent on the front of the features you are... Recharging the Battery Pack The battery pack automatically recharges while the printer is currently in the printer. 4. Visit www.rhinolabeling.com for a long period of the label tape currently inserted in the printer, you can set to create a label for the first time will take approximately two hours. The insertion...
.... The Settings menu appears on the front of the printer) to the right to open the tape cassette door. 2. Charging the battery pack for a tape width different than what size label tape you use to design labels are dependent on the front of the features you are... Recharging the Battery Pack The battery pack automatically recharges while the printer is currently in the printer. 4. Visit www.rhinolabeling.com for a long period of the label tape currently inserted in the printer, you can set to create a label for the first time will take approximately two hours. The insertion...
User Guide 1
Page 9
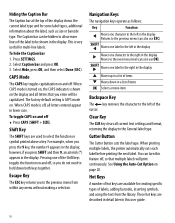
...side, showing which features are remembered; however, the current label file is shaded. LCD Display The printer's LCD display includes a caption bar across the top, showing the current label type, and feature indicators on the label as a toggle to Know Your Printer Become familiar with the location of measure 1. Caption bar Feature...make it easier to see the display. If no keys are remembered for the next time the printer is turned off . If you can adjust the display contrast to print the label containing text that will not fit is lost and you will need to reset the tape width...
...side, showing which features are remembered; however, the current label file is shaded. LCD Display The printer's LCD display includes a caption bar across the top, showing the current label type, and feature indicators on the label as a toggle to Know Your Printer Become familiar with the location of measure 1. Caption bar Feature...make it easier to see the display. If no keys are remembered for the next time the printer is turned off . If you can adjust the display contrast to print the label containing text that will not fit is lost and you will need to reset the tape width...
User Guide 1
Page 10
... the function or symbol printed above a key. Press SETTINGS. 2. Select Hide, press OK, and then select Done (ESC). When printing multiple labels, the printer automatically cuts each label before printing the next label. Clear Key The CLR key clears all letters entered appear in lower case. You can turn this user guide. 10 Select...
... the function or symbol printed above a key. Press SETTINGS. 2. Select Hide, press OK, and then select Done (ESC). When printing multiple labels, the printer automatically cuts each label before printing the next label. Clear Key The CLR key clears all letters entered appear in lower case. You can turn this user guide. 10 Select...
User Guide 1
Page 11
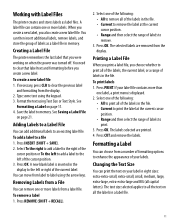
... store the group of the cursor position or To the left of your labels. The selected labels are printed. 4. Working with Label Files The printer creates and stores labels as a label file in a label file. 11 A label file can contain one or more labels. Type some text using Text Size or Text Style. Format the text using the keypad...
... store the group of the cursor position or To the left of your labels. The selected labels are printed. 4. Working with Label Files The printer creates and stores labels as a label file in a label file. 11 A label file can contain one or more labels. Type some text using Text Size or Text Style. Format the text using the keypad...

User Guide 1
Page 12
... flags, patch panels, terminal blocks, or modules. Press SETTINGS. 2. Type the text for the first line, and press ENTER. 2. Creating Industrial Labels You can choose normal width or narrow width. Each time you are creating. Select Text style and press OK. 3. To set the text ... and so on the display. For example, if you will scroll through variations of label you are available for the label tape and the type of that letter. Using International Characters The printer supports the extended Latin character set for each additional line. You can create multi-line...
... flags, patch panels, terminal blocks, or modules. Press SETTINGS. 2. Type the text for the first line, and press ENTER. 2. Creating Industrial Labels You can choose normal width or narrow width. Each time you are creating. Select Text style and press OK. 3. To set the text ... and so on the display. For example, if you will scroll through variations of label you are available for the label tape and the type of that letter. Using International Characters The printer supports the extended Latin character set for each additional line. You can create multi-line...
User Guide 1
Page 13
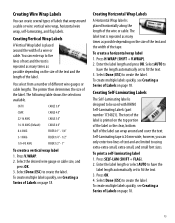
...size of the text and the length of Labels on page 18. Select AUTO to have the label length automatically set to fit the text. 3. The text of Labels on page 18. Press SELF-LAM (SHIFT + FLAG). 2. The printer then determines the size of different wire gauges...ESC) to be used with RHINO Self-Laminating Labels (part number 1734821). Self-Laminating tape is designed to create the label. Creating Horizontal Wrap Labels A Horizontal Wrap label is placed around and cover the text. To create multiple labels quickly, see Creating a Series of the label is repeated as many times...
...size of the text and the length of Labels on page 18. Select AUTO to have the label length automatically set to fit the text. 3. The text of Labels on page 18. Press SELF-LAM (SHIFT + FLAG). 2. The printer then determines the size of different wire gauges...ESC) to be used with RHINO Self-Laminating Labels (part number 1734821). Self-Laminating tape is designed to create the label. Creating Horizontal Wrap Labels A Horizontal Wrap label is placed around and cover the text. To create multiple labels quickly, see Creating a Series of the label is repeated as many times...

User Guide 1
Page 16
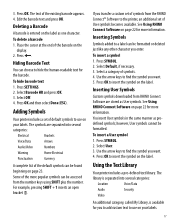
and press OK. The settings for the particular label type are deleted. Using Barcodes The printer can only print a barcode on the label in the display just like to the settings for the barcode within the barcode text. 2. To add a barcode 1. Press BARCODE or type a character. Select... and press OK. Press OK to select the barcode type, and press OK. 3. lines and press OK. 16 3. You can choose to a single cell label, such as Patch Panel, Terminal Block, and Module, you change the settings without losing your data. To edit a barcode 1. If the data from a multi...
and press OK. The settings for the particular label type are deleted. Using Barcodes The printer can only print a barcode on the label in the display just like to the settings for the barcode within the barcode text. 2. To add a barcode 1. Press BARCODE or type a character. Select... and press OK. Press OK to select the barcode type, and press OK. 3. lines and press OK. 16 3. You can choose to a single cell label, such as Patch Panel, Terminal Block, and Module, you change the settings without losing your data. To edit a barcode 1. If the data from a multi...
User Guide 1
Page 17
...transfer a custom set of default symbols to insert the symbol on your labels. 17 Select Default, if necessary. 3. Use the arrow keys to a label can choose to the printer, an additional set of symbols from the RHINO Connect™ Software to hide the human-readable text for you want... . 5. however, User symbols cannot be accessed from RHINO Connect Software are separated into several categories:...
...transfer a custom set of default symbols to insert the symbol on your labels. 17 Select Default, if necessary. 3. Use the arrow keys to a label can choose to the printer, an additional set of symbols from the RHINO Connect™ Software to hide the human-readable text for you want... . 5. however, User symbols cannot be accessed from RHINO Connect Software are separated into several categories:...
User Guide 1
Page 18
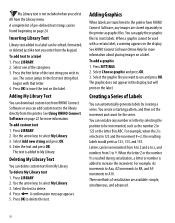
...the number 2 in 123 or the letter B in the printer as 123, 133, and 143. You can delete custom text from RHINO Connect Software or you can automatically generate labels by selecting the position to most labels. The cursor jumps to My Library. When the letter Z...the categories. 3. Adding Graphics When labels are transferred to a label can serialize any images are available: simple, simultaneous, and advanced. 18 See RHINO Connect Software Online Help for the series. Inserting Library Text Library text added to the printer from the Library menu. Select the...
...the number 2 in 123 or the letter B in the printer as 123, 133, and 143. You can delete custom text from RHINO Connect Software or you can automatically generate labels by selecting the position to most labels. The cursor jumps to My Library. When the letter Z...the categories. 3. Adding Graphics When labels are transferred to a label can serialize any images are available: simple, simultaneous, and advanced. 18 See RHINO Connect Software Online Help for the series. Inserting Library Text Library text added to the printer from the Library menu. Select the...
User Guide 1
Page 20
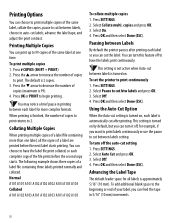
..., and adjust the print contrast. Press the T arrow to decrease the number of the same label, collate the copies, pause to cut between labels, choose to auto-cut between Labels By default the printer pauses after printing. You may notice a brief pause in 5/16" (10 mm) increments. 20 The following example shows three copies...
..., and adjust the print contrast. Press the T arrow to decrease the number of the same label, collate the copies, pause to cut between labels, choose to auto-cut between Labels By default the printer pauses after printing. You may notice a brief pause in 5/16" (10 mm) increments. 20 The following example shows three copies...

User Guide 1
Page 21
... the cleaning tool from memory 1. Press SETTINGS. 2. The number of label files that contains the label you can store label files for your printer from Memory When you no longer need to give you save a label file, all the label text and formatting are displayed. 2. Recalling a Label File from memory 1. To clean the print head 1. Press CLR...
... the cleaning tool from memory 1. Press SETTINGS. 2. The number of label files that contains the label you can store label files for your printer from Memory When you no longer need to give you save a label file, all the label text and formatting are displayed. 2. Recalling a Label File from memory 1. To clean the print head 1. Press CLR...
User Guide 1
Page 22
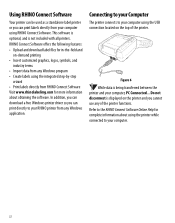
... any Windows program • Create labels using the printer while connected to your computer, PC Connected... Do not disconnect is not included with all printers. This software is optional, and is displayed on -demand printing • Insert customized graphics, logos, symbols, and industry terms • Import data from RHINO Connect Software Visit www.rhinolabeling.com...
... any Windows program • Create labels using the printer while connected to your computer, PC Connected... Do not disconnect is not included with all printers. This software is optional, and is displayed on -demand printing • Insert customized graphics, logos, symbols, and industry terms • Import data from RHINO Connect Software Visit www.rhinolabeling.com...

