
User Manual (English)
Page 2
2 Dynex DX-LCD42HD-09 42" HD LCD TV Contents Important safety instructions 4 TV components 6 Front 6 Side 6 Back 7 Remote control 8 Setting up your TV 9 Installing remote control batteries 9 Connecting an antenna, cable TV, or satellite TV box 9 Connecting an HDMI device 9 Connecting a component video device ...12 Connecting a digital sound system 12 Connecting headphones 12 Using your TV 13 Turning your TV on or off 13 Using the remote control 13 Selecting the video input source 13 Selecting the TV signal source 13 Scanning for channels 13 Deleting channels 14 Changing ...
2 Dynex DX-LCD42HD-09 42" HD LCD TV Contents Important safety instructions 4 TV components 6 Front 6 Side 6 Back 7 Remote control 8 Setting up your TV 9 Installing remote control batteries 9 Connecting an antenna, cable TV, or satellite TV box 9 Connecting an HDMI device 9 Connecting a component video device ...12 Connecting a digital sound system 12 Connecting headphones 12 Using your TV 13 Turning your TV on or off 13 Using the remote control 13 Selecting the video input source 13 Selecting the TV signal source 13 Scanning for channels 13 Deleting channels 14 Changing ...
User Manual (English)
Page 6
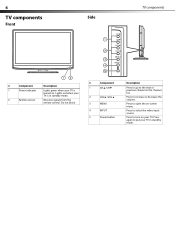
... to select the video input source. 6 TV components Side Front TV components # Component Description 1 Power indicator Lights green when your TV is in standby mode. 2 Remote sensor Receives signals from the remote control. Lights red when your TV in the channel list.
... to select the video input source. 6 TV components Side Front TV components # Component Description 1 Power indicator Lights green when your TV is in standby mode. 2 Remote sensor Receives signals from the remote control. Lights red when your TV in the channel list.
User Manual (English)
Page 8
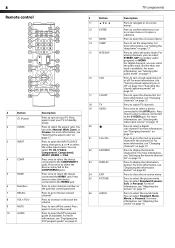
... to the HDMI2 jack. Press to display the information banner. Press to watch TV channels. For more information, see "Adjusting the sound" on page 16. 8 Remote control # Button 11 12 ENTER 13 MENU 14 SLEEP 15 MTS/SAP 16 CCD # Button 1 (Power) 2 ZOOM 3 INPUT 4 COMP 5 HDMI 6 Numbers 7 RECALL 8 VOL+/VOL- 9 MUTE...
... to the HDMI2 jack. Press to display the information banner. Press to watch TV channels. For more information, see "Adjusting the sound" on page 16. 8 Remote control # Button 11 12 ENTER 13 MENU 14 SLEEP 15 MTS/SAP 16 CCD # Button 1 (Power) 2 ZOOM 3 INPUT 4 COMP 5 HDMI 6 Numbers 7 RECALL 8 VOL+/VOL- 9 MUTE...

User Manual (English)
Page 9
... may leak into the battery compartment. To play from radio waves. Note: If the external device has DVI output only, use the remote control for an extended amount of batteries in the battery compartment. Make sure that your TV. symbols in a fire. See the HDMI...Replace the cover. Battery chemicals can also press HDMI once for HDMI1 or twice for more information. Back of your TV Installing remote control batteries To install remote control batteries: 1 Open the battery compartment cover. 2 Insert two AAA batteries into the battery compartment. RF jack Antenna, cable ...
... may leak into the battery compartment. To play from radio waves. Note: If the external device has DVI output only, use the remote control for an extended amount of batteries in the battery compartment. Make sure that your TV. symbols in a fire. See the HDMI...Replace the cover. Battery chemicals can also press HDMI once for HDMI1 or twice for more information. Back of your TV Installing remote control batteries To install remote control batteries: 1 Open the battery compartment cover. 2 Insert two AAA batteries into the battery compartment. RF jack Antenna, cable ...
User Manual (English)
Page 13
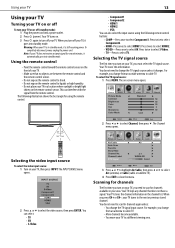
... not place your TV in your area. You can also select the input source using the following illustration shows the best angle for using the remote control. • Component1 • Component2 • HDMI1 • HDMI2 • VGA You can select: • TV • AV • S-Video ...to a different viewing area. You do not need to scan for channels available in a location where sunlight or bright light shines on the remote control sensor. For example, you turn off your TV. Picture Sound Time Picture Mode Contrast Brightness Color Tint Sharpness Color Mode Setup Lock ...
... not place your TV in your area. You can also select the input source using the following illustration shows the best angle for using the remote control. • Component1 • Component2 • HDMI1 • HDMI2 • VGA You can select: • TV • AV • S-Video ...to a different viewing area. You do not need to scan for channels available in a location where sunlight or bright light shines on the remote control sensor. For example, you turn off your TV. Picture Sound Time Picture Mode Contrast Brightness Color Tint Sharpness Color Mode Setup Lock ...

User Manual (English)
Page 25
... Sharpness Color Mode Standard 50 50 50 0 50 Cool Select Move MENU Exit 2 Press or to close the menu. For more information, see "Installing remote control batteries" on page 9. • Make sure that the power cord is plugged into a power outlet. 25 Video and audio Problem Solution No picture..., then press . It does not affect the operation of this TV. • Increase the volume. • Press MUTE to repair your TV or the remote control. • Try another channel. Picture has a few bright or dark dots on an LCD screen is not correct. • Select the correct picture...
... Sharpness Color Mode Standard 50 50 50 0 50 Cool Select Move MENU Exit 2 Press or to close the menu. For more information, see "Installing remote control batteries" on page 9. • Make sure that the power cord is plugged into a power outlet. 25 Video and audio Problem Solution No picture..., then press . It does not affect the operation of this TV. • Increase the volume. • Press MUTE to repair your TV or the remote control. • Try another channel. Picture has a few bright or dark dots on an LCD screen is not correct. • Select the correct picture...


