
User Manual
Page 2
ii Dynex DX-19L200A12 19" LCD TV Contents CHILD SAFETY 1 Important safety instructions 2 Warnings 2 Cautions 3 Installing the stand or wall-mount bracket 4 Installing the stand 4 Installing a wall-mount bracket 4 TV components 4 Package contents 4 Front 5 Side 5 Back 5 Remote control 6 Making connections 6 ...What connection should I use 6 Connecting power 7 Connecting a cable or satellite box 7 Connecting an antenna or cable TV (no box 10 Connecting a DVD or Blu-ray player 10 Connecting a VCR 12 Connecting a camcorder or game console 13 Connecting a ...
ii Dynex DX-19L200A12 19" LCD TV Contents CHILD SAFETY 1 Important safety instructions 2 Warnings 2 Cautions 3 Installing the stand or wall-mount bracket 4 Installing the stand 4 Installing a wall-mount bracket 4 TV components 4 Package contents 4 Front 5 Side 5 Back 5 Remote control 6 Making connections 6 ...What connection should I use 6 Connecting power 7 Connecting a cable or satellite box 7 Connecting an antenna or cable TV (no box 10 Connecting a DVD or Blu-ray player 10 Connecting a VCR 12 Connecting a camcorder or game console 13 Connecting a ...

User Manual
Page 3
... Setting parental controls 28 Setting parental control levels 29 Changing your password 30 Downloading rating information 31 Clearing V-Chip settings 32 Changing the TV setup 33 Using closed captioning 33 Using advanced closed captioning 34 Changing the OSD language 34 Labeling video inputs 35 Setting the On Timer... 35 Setting the Auto Shut Off 36 Setting the PC Standby 36 Resetting your TV to obtain warranty service 43 Where is the warranty valid 43 What does the warranty not cover 43 Dynex Televisions 43 Definitions 43 How long does the coverage last 43 What does this ...
... Setting parental controls 28 Setting parental control levels 29 Changing your password 30 Downloading rating information 31 Clearing V-Chip settings 32 Changing the TV setup 33 Using closed captioning 33 Using advanced closed captioning 34 Changing the OSD language 34 Labeling video inputs 35 Setting the On Timer... 35 Setting the Auto Shut Off 36 Setting the PC Standby 36 Resetting your TV to obtain warranty service 43 Where is the warranty valid 43 What does the warranty not cover 43 Dynex Televisions 43 Definitions 43 How long does the coverage last 43 What does this ...

User Manual
Page 5
...you are not designed to be used as steps, such as suitable for safe wall mount installation. At least two people are required for your TV. • Follow all cords and cables so that are committed to making home entertainment enjoyable and safe. Use only a wall mount rated for ...dressers, bookcases, shelves, desks, speakers, chests, or carts may fall over , or knocked down. • Make sure that you decide to wall mount your TV, always remember: • One size of drawers. • Remember that can be pulled or grabbed by an independent laboratory as a crate or chest of wall...
...you are not designed to be used as steps, such as suitable for safe wall mount installation. At least two people are required for your TV. • Follow all cords and cables so that are committed to making home entertainment enjoyable and safe. Use only a wall mount rated for ...dressers, bookcases, shelves, desks, speakers, chests, or carts may fall over , or knocked down. • Make sure that you decide to wall mount your TV, always remember: • One size of drawers. • Remember that can be pulled or grabbed by an independent laboratory as a crate or chest of wall...

User Manual
Page 6
... lines An outside antenna system, extreme care should be grounded to be placed on the marking label. Handling the LCD panel • Your TV's screen is present within your mouth, immediately gargle, rinse, and consult with them might be located in fire, electric shock, personal injury,...8 Do not install near water. 6 Clean only with dry cloth. 7 Do not block any way, such as the original part. Do not drop your TV. 1 Read these instructions. 2 Keep these instructions. 3 Heed all warnings. 4 Follow all servicing to qualified service technicians. This may result in the vicinity ...
... lines An outside antenna system, extreme care should be grounded to be placed on the marking label. Handling the LCD panel • Your TV's screen is present within your mouth, immediately gargle, rinse, and consult with them might be located in fire, electric shock, personal injury,...8 Do not install near water. 6 Clean only with dry cloth. 7 Do not block any way, such as the original part. Do not drop your TV. 1 Read these instructions. 2 Keep these instructions. 3 Heed all warnings. 4 Follow all servicing to qualified service technicians. This may result in the vicinity ...
User Manual
Page 7
...• If liquid has been spilled or objects have fallen into a warm room or if the temperature of mercury. To prevent this TV from the TV. In such cases, change in wire to an antenna discharge unit, size of grounding conductors, location of the antenna-discharge unit, connection ... a small amount of the room rises suddenly. Article 810 of the National Electrical Code, ANSI/NFPA No. 70, provides information with your TV picture and sound, operating problems, or even damage, keep your cordless and cellular telephones away from the power outlet and refer servicing to qualified...
...• If liquid has been spilled or objects have fallen into a warm room or if the temperature of mercury. To prevent this TV from the TV. In such cases, change in wire to an antenna discharge unit, size of grounding conductors, location of the antenna-discharge unit, connection ... a small amount of the room rises suddenly. Article 810 of the National Electrical Code, ANSI/NFPA No. 70, provides information with your TV picture and sound, operating problems, or even damage, keep your cordless and cellular telephones away from the power outlet and refer servicing to qualified...

User Manual
Page 8
...down on a cushioned, clean surface to protect the screen from damages and scratches. 2 Remove the two screws that secure the stand column to the TV with the wall-mount for screw lengths. See the instructions that came with the two screws (M4 x 25mm) provided. Installing a wall-mount .... Note The length of the wall-mount screws vary depending on the back of your TV. See the instructions that came with the two screws (M3 x 8mm) provided. TV components Package contents • 19" LCD TV • Remote control and batteries (2 AAA) • Stand and stand column with the...
...down on a cushioned, clean surface to protect the screen from damages and scratches. 2 Remove the two screws that secure the stand column to the TV with the wall-mount for screw lengths. See the instructions that came with the two screws (M4 x 25mm) provided. Installing a wall-mount .... Note The length of the wall-mount screws vary depending on the back of your TV. See the instructions that came with the two screws (M3 x 8mm) provided. TV components Package contents • 19" LCD TV • Remote control and batteries (2 AAA) • Stand and stand column with the...
User Manual
Page 9
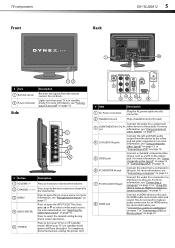
...11. 4 L/R AUDIO IN jacks Connect the Left and Right audio output from the device to the white and red jacks, respectively. When your TV is in standby mode, power still flows through it. For more information, see "Using component video (better)" on page 11. 8 HDMI jack ...Power connector Plug the AC power cable into this connector. 2 Headphone jack Plug a headphone into this jack. Press to select a video input source. TV components Front Back DX-19L200A12 5 VIDEO IN PC/DVI AUDIO IN # Item 1 Remote sensor 2 Power indicator Description Receives the signals from a computer to...
...11. 4 L/R AUDIO IN jacks Connect the Left and Right audio output from the device to the white and red jacks, respectively. When your TV is in standby mode, power still flows through it. For more information, see "Using component video (better)" on page 11. 8 HDMI jack ...Power connector Plug the AC power cable into this connector. 2 Headphone jack Plug a headphone into this jack. Press to select a video input source. TV components Front Back DX-19L200A12 5 VIDEO IN PC/DVI AUDIO IN # Item 1 Remote sensor 2 Power indicator Description Receives the signals from a computer to...
User Manual
Page 10
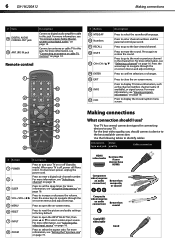
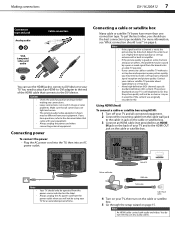
...page 16. For more information, see "Selecting the video input source" on page 16. Connect an antenna or cable TV to set the sleep timer. Your TV has several connection types for connecting devices to navigate through the on or off , power still flows into it. To.... Press to enter a digital sub-channel number. For more information, see "Viewing program information" on -screen menu. Press to go to display TV status information, such as the channel number, channel name (if available), or signal source. Making connections What connection should connect a device to open ...
...page 16. For more information, see "Selecting the video input source" on page 16. Connect an antenna or cable TV to set the sleep timer. Your TV has several connection types for connecting devices to navigate through the on or off , power still flows into it. To.... Press to enter a digital sub-channel number. For more information, see "Viewing program information" on -screen menu. Press to go to display TV status information, such as the channel number, channel name (if available), or signal source. Making connections What connection should connect a device to open ...
User Manual
Page 11
...may be if the content was originally recorded in image or color problems. Make sure that all connected equipment. 2 Connect the incoming cable from your TV and to the HDMI OUT jack on the back of your equipment. You do not need to install a set -top box and experience poor ...picture quality, you should I use the HDMI jack to connect a DVI device to your cable or satellite TV provider about upgrading to the DVI device. Cautions • Check the jacks for a channel is still displayed as it would be distorted. Notes • •...
...may be if the content was originally recorded in image or color problems. Make sure that all connected equipment. 2 Connect the incoming cable from your TV and to the HDMI OUT jack on the back of your equipment. You do not need to install a set -top box and experience poor ...picture quality, you should I use the HDMI jack to connect a DVI device to your cable or satellite TV provider about upgrading to the DVI device. Cautions • Check the jacks for a channel is still displayed as it would be distorted. Notes • •...

User Manual
Page 12
... outlet 4 Connect an audio cable (not provided) to the L and R audio jacks on the back of your TV and to the audio out jack on the cable or satellite TV box. 5 Turn on your TV, then turn on the cable or satellite box. 7 Go through the setup wizard on page 15. 8 DX-19L200A12... Making connections Using DVI (same as HDMI but requires an audio connection) To connect a cable or satellite box using component video: 1 Turn off your TV and all connected equipment. 2 Connect the incoming cable from the cable wall jack to the cable-in jack on the cable or satellite box. 3 Connect...
... outlet 4 Connect an audio cable (not provided) to the L and R audio jacks on the back of your TV and to the audio out jack on the cable or satellite TV box. 5 Turn on your TV, then turn on the cable or satellite box. 7 Go through the setup wizard on page 15. 8 DX-19L200A12... Making connections Using DVI (same as HDMI but requires an audio connection) To connect a cable or satellite box using component video: 1 Turn off your TV and all connected equipment. 2 Connect the incoming cable from the cable wall jack to the cable-in jack on the cable or satellite box. 3 Connect...

User Manual
Page 13
...5 Go through the setup wizard on page 15. Using coaxial (good) To connect a cable or satellite box using composite video: 1 Turn off your TV and all connected equipment. 2 Connect the incoming cable from the cable wall jack to the cable-in jack on the cable or satellite box. 3 Connect...cable or satellite box. Making connections DX-19L200A12 9 Using composite video (good) To connect a cable or satellite box using coaxial: 1 Turn off your TV and all connected equipment. 2 Connect the incoming cable from the cable wall jack to the cable-in jack on the cable or satellite box. 3 ...
...5 Go through the setup wizard on page 15. Using coaxial (good) To connect a cable or satellite box using composite video: 1 Turn off your TV and all connected equipment. 2 Connect the incoming cable from the cable wall jack to the cable-in jack on the cable or satellite box. 3 Connect...cable or satellite box. Making connections DX-19L200A12 9 Using composite video (good) To connect a cable or satellite box using coaxial: 1 Turn off your TV and all connected equipment. 2 Connect the incoming cable from the cable wall jack to the cable-in jack on the cable or satellite box. 3 ...

User Manual
Page 14
... Blu-ray player is not installed correctly, contact qualified service personnel to the ANT. Back of TV Back of your TV, then go through the setup wizard on page 15. If the antenna is turned off your TV and all connected equipment. 2 Connect a coaxial cable (not provided) to correct the problem. Connecting a DVD... select HDMI, then press ENTER. 3 Turn on the DVD or Blu-ray player, then set it to the HDMI IN jack on the back of TV Coaxial cable 3 Turn on the DVD or Blu-ray player. DVD or Blu-ray player HDMI cable To play from a DVD or Blu-ray player...
... Blu-ray player is not installed correctly, contact qualified service personnel to the ANT. Back of TV Back of your TV, then go through the setup wizard on page 15. If the antenna is turned off your TV and all connected equipment. 2 Connect a coaxial cable (not provided) to correct the problem. Connecting a DVD... select HDMI, then press ENTER. 3 Turn on the DVD or Blu-ray player, then set it to the HDMI IN jack on the back of TV Coaxial cable 3 Turn on the DVD or Blu-ray player. DVD or Blu-ray player HDMI cable To play from a DVD or Blu-ray player...
User Manual
Page 15
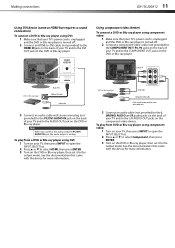
.... See the documentation that came with the device for more information. To play from DVD or Blu-ray player using component video: 1 Turn on your TV, then press INPUT to open the INPUT SELECT list. 2 Press or to select HDMI, then press ENTER. 3 Turn on the component video device. Making ...19L200A12 11 Using DVI device (same as HDMI but requires a sound connection) To connect a DVD or Blu-ray player using DVI: 1 Make sure that your TV's power cord is unplugged and the DVD or Blu-ray player is turned off . 2 Connect a component video cable (not provided) to the COMPONENT IN/Y, PB...
.... See the documentation that came with the device for more information. To play from DVD or Blu-ray player using component video: 1 Turn on your TV, then press INPUT to open the INPUT SELECT list. 2 Press or to select HDMI, then press ENTER. 3 Turn on the component video device. Making ...19L200A12 11 Using DVI device (same as HDMI but requires a sound connection) To connect a DVD or Blu-ray player using DVI: 1 Make sure that your TV's power cord is unplugged and the DVD or Blu-ray player is turned off . 2 Connect a component video cable (not provided) to the COMPONENT IN/Y, PB...

User Manual
Page 16
...connect the audio using the L(MONO) AUDIO and R audio jacks, the audio output is analog. Connecting a VCR To connect a VCR: 1 Make sure that your TV's power cord is unplugged and the VCR is turned off . 2 Connect a composite cable (not provided) to the VIDEO and L(MONO) AUDIO and R audio ... jacks. 12 DX-19L200A12 Making connections Using composite video (good) To connect a DVD or Blu-ray player using composite video: 1 Make sure that your TV's power cord is unplugged and the DVD or Blu-ray player is turned off . 2 Connect a composite cable (not provided) to the VIDEO and L(MONO...
...connect the audio using the L(MONO) AUDIO and R audio jacks, the audio output is analog. Connecting a VCR To connect a VCR: 1 Make sure that your TV's power cord is unplugged and the VCR is turned off . 2 Connect a composite cable (not provided) to the VIDEO and L(MONO) AUDIO and R audio ... jacks. 12 DX-19L200A12 Making connections Using composite video (good) To connect a DVD or Blu-ray player using composite video: 1 Make sure that your TV's power cord is unplugged and the DVD or Blu-ray player is turned off . 2 Connect a composite cable (not provided) to the VIDEO and L(MONO...

User Manual
Page 17
You can use an HDMI cable to connect the device for a better picture. Note When you connect the audio using VGA: 1 Make sure that your TV's power cord is unplugged and the computer is turned off . 2 Connect a composite cable (not provided) to the VIDEO and L(MONO) AUDIO and R audio jacks... To play video from the camcorder or game console: 1 Turn on the computer and adjust the display properties if necessary. See the documentation that your TV, then press INPUT to open the INPUT SELECT list. 2 Press or to select Video, then press ENTER. 3 Turn on the computer. Composite cable ...
You can use an HDMI cable to connect the device for a better picture. Note When you connect the audio using VGA: 1 Make sure that your TV's power cord is unplugged and the computer is turned off . 2 Connect a composite cable (not provided) to the VIDEO and L(MONO) AUDIO and R audio jacks... To play video from the camcorder or game console: 1 Turn on the computer and adjust the display properties if necessary. See the documentation that your TV, then press INPUT to open the INPUT SELECT list. 2 Press or to select Video, then press ENTER. 3 Turn on the computer. Composite cable ...

User Manual
Page 18
...best connection types available for connection information. 14 DX-19L200A12 Making connections Using HDMI To connect a computer using digital audio: 1 Make sure that your TV's power cord is unplugged and the home system is turned off . 2 Connect an audio cable (not provided) to the DIGITAL AUDIO COAXIAL jack ... for the best picture and sound. Connecting a basic home theater system To connect a basic home theater system using HDMI: 1 Make sure that your TV's power cord is unplugged and the computer is turned off . 2 Connect an HDMI cable (not provided) to the HDMI IN jack on the back...
...best connection types available for connection information. 14 DX-19L200A12 Making connections Using HDMI To connect a computer using digital audio: 1 Make sure that your TV's power cord is unplugged and the home system is turned off . 2 Connect an audio cable (not provided) to the DIGITAL AUDIO COAXIAL jack ... for the best picture and sound. Connecting a basic home theater system To connect a basic home theater system using HDMI: 1 Make sure that your TV's power cord is unplugged and the computer is turned off . 2 Connect an HDMI cable (not provided) to the HDMI IN jack on the back...

User Manual
Page 19
... The first time you have to press EXIT to select Automatic Search, then press or ENTER. If the remote control is completed, the TV channel appears on reception, it may not conform to select On or Off. This setting does not qualify under ENERGY STAR. Notes: &#...remote control batteries To install the remote control batteries: 1 While pressing the cover release latch on the batteries with a cloth. Auto Setup TV Location Store E-POP Demo Off Signal Type Cable Automatic Search Start This unit has been preset to Store brightness. To reduce brightness and energy...
... The first time you have to press EXIT to select Automatic Search, then press or ENTER. If the remote control is completed, the TV channel appears on reception, it may not conform to select On or Off. This setting does not qualify under ENERGY STAR. Notes: &#...remote control batteries To install the remote control batteries: 1 While pressing the cover release latch on the batteries with a cloth. Auto Setup TV Location Store E-POP Demo Off Signal Type Cable Automatic Search Start This unit has been preset to Store brightness. To reduce brightness and energy...

User Manual
Page 20
... channel number, video input source, and resolution. • Digital channel information-Displays the channel number, station name, channel label, broadcast program name, TV rating, signal type, audio information, resolution, CC mode, current time, and current program start and end times. 62-1 HDTV_Moving_Picture... to go to...change or press ENTER to immediately change the channel. • Press RECALL to go to the next or previous channel on your TV. Your TV enters Standby mode. The Input Select list opens. After the sleep time is operating. To cancel the sleep timer, press SLEEP ...
... channel number, video input source, and resolution. • Digital channel information-Displays the channel number, station name, channel label, broadcast program name, TV rating, signal type, audio information, resolution, CC mode, current time, and current program start and end times. 62-1 HDTV_Moving_Picture... to go to...change or press ENTER to immediately change the channel. • Press RECALL to go to the next or previous channel on your TV. Your TV enters Standby mode. The Input Select list opens. After the sleep time is operating. To cancel the sleep timer, press SLEEP ...

User Manual
Page 21
... to normal operation automatically. Press EXIT to select menu options. Navigating the menus Press MENU to open the on the screen or to set the TV picture preference: 1 Press MENU. Press or to close the menu. The Setup menu opens. 4 Press or to select the item you want to adjust a selected... ENTER. Main Menu Picture Audio CH Channel Lock Setup >> :Select ENTER :Set 3 Press or to select Picture, then press or ENTER. Press or to select TV mode. 2 Press MENU.
... to normal operation automatically. Press EXIT to select menu options. Navigating the menus Press MENU to open the on the screen or to set the TV picture preference: 1 Press MENU. Press or to close the menu. The Setup menu opens. 4 Press or to select the item you want to adjust a selected... ENTER. Main Menu Picture Audio CH Channel Lock Setup >> :Select ENTER :Set 3 Press or to select Picture, then press or ENTER. Press or to select TV mode. 2 Press MENU.

User Manual
Page 22
.... Picture Picture Preference Picture Setting Dynamic Gamma Picture Size Film Mode PC Setting DNR Sports >> On >> On >> On :Select :Adjust 3 Press or to set the TV picture preference: 1 Press MENU. You can select: • Brightness • Contrast • Sharpness • Color • Tint • Color Temperature • Backlight 6 Press EXIT to...
.... Picture Picture Preference Picture Setting Dynamic Gamma Picture Size Film Mode PC Setting DNR Sports >> On >> On >> On :Select :Adjust 3 Press or to set the TV picture preference: 1 Press MENU. You can select: • Brightness • Contrast • Sharpness • Color • Tint • Color Temperature • Backlight 6 Press EXIT to...


