
Initialization Guide
Page 3
...can manage the storage systems from any server that shares a LAN with your system. EMC CLARiiON CX300, CX500, and CX700 Initialization Guide 3 To access EMC Powerlink, use the link, http://powerlink.emc.com. Working Installation Requirements ❑ A Windows®, Linux®, Solaris™,... connected ❑ TCP/IP network ❑ Properly configured management workstation(s) Refer to female-male connectors (supplied with each storage system). ❑ A crossover LAN cable (supplied with each storage system). ❑ For a CX500, you will need the RJ45/DB9 serial adapter...
...can manage the storage systems from any server that shares a LAN with your system. EMC CLARiiON CX300, CX500, and CX700 Initialization Guide 3 To access EMC Powerlink, use the link, http://powerlink.emc.com. Working Installation Requirements ❑ A Windows®, Linux®, Solaris™,... connected ❑ TCP/IP network ❑ Properly configured management workstation(s) Refer to female-male connectors (supplied with each storage system). ❑ A crossover LAN cable (supplied with each storage system). ❑ For a CX500, you will need the RJ45/DB9 serial adapter...
Initialization Guide
Page 5
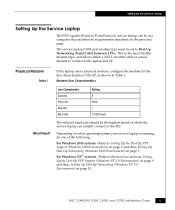
...Stop bits Baud rate Setting 8 None 1 115200 baud What Next? For Windows NT® systems - EMC CLARiiON CX300, CX500, and CX700 Initialization Guide 5 This is running, do one of the SP, as shown in... Table 1. The selected baud rate should be set to Dial-Up Networking Serial Cable between 2 PCs. Depending on what operating system your service laptop is the most flexible modem... type, and allows either a NULL modem cable or actual modem to connect to the next two sections, Setting Up the Dial-Up PPP Support (Windows NT 4.0 Environment) on...
...Stop bits Baud rate Setting 8 None 1 115200 baud What Next? For Windows NT® systems - EMC CLARiiON CX300, CX500, and CX700 Initialization Guide 5 This is running, do one of the SP, as shown in... Table 1. The selected baud rate should be set to Dial-Up Networking Serial Cable between 2 PCs. Depending on what operating system your service laptop is the most flexible modem... type, and allows either a NULL modem cable or actual modem to connect to the next two sections, Setting Up the Dial-Up PPP Support (Windows NT 4.0 Environment) on...
Initialization Guide
Page 10
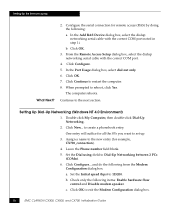
...exit the Modem Configuration dialog box. 10 EMC CLARiiON CX300, CX500, and CX700 Initialization Guide Click OK to the new entry (for remote access (RAS) by doing the following: a. In the Add RAS Device dialog box, select the dialup networking serial cable with the correct COM port. 4.... to create a phonebook entry. Leave the Phone number field blank. 5. Click OK. 7. and do the following items: Enable hardware flow control and Disable modem speaker. Setting Up the Service Laptop What Next? 2. Configure the serial connection for...
...exit the Modem Configuration dialog box. 10 EMC CLARiiON CX300, CX500, and CX700 Initialization Guide Click OK to the new entry (for remote access (RAS) by doing the following: a. In the Add RAS Device dialog box, select the dialup networking serial cable with the correct COM port. 4.... to create a phonebook entry. Leave the Phone number field blank. 5. Click OK. 7. and do the following items: Enable hardware flow control and Disable modem speaker. Setting Up the Service Laptop What Next? 2. Configure the serial connection for...

Initialization Guide
Page 13
EMC CLARiiON CX300, CX500, and CX700 Initialization Guide 13 Connect the NULL modem cable between the laptop serial port (COM 1) and the SP A service port (|0|0|on a CX700, or on . For a CX500, you can start the initialization process with either SP. 1. Be sure that ... the storage system. The SP's power LED should be a steady green, and no amber LEDs should be blinking. However you will need the RJ45/DB9 serial adapter that shipped with SP A. lOlOl Service Laptop RS-232 Cable Figure 1 COM 1 to initialize the storage system from the service laptop. Turn the service...
EMC CLARiiON CX300, CX500, and CX700 Initialization Guide 13 Connect the NULL modem cable between the laptop serial port (COM 1) and the SP A service port (|0|0|on a CX700, or on . For a CX500, you can start the initialization process with either SP. 1. Be sure that ... the storage system. The SP's power LED should be a steady green, and no amber LEDs should be blinking. However you will need the RJ45/DB9 serial adapter that shipped with SP A. lOlOl Service Laptop RS-232 Cable Figure 1 COM 1 to initialize the storage system from the service laptop. Turn the service...

Initialization Guide
Page 17
... Screen (SP A) 8. Remove the NULL modem cable from SP A and connect it between the laptop serial port (COM 1) and the SP B service port (|0|0|, or ). 9. c. Click Connect and click OK on your operating system, do one of the following: For Windows 2000 a. b. Depending on the Connection Complete dialog box. EMC CLARiiON CX300, CX500, and CX700 Initialization Guide 17
... Screen (SP A) 8. Remove the NULL modem cable from SP A and connect it between the laptop serial port (COM 1) and the SP B service port (|0|0|, or ). 9. c. Click Connect and click OK on your operating system, do one of the following: For Windows 2000 a. b. Depending on the Connection Complete dialog box. EMC CLARiiON CX300, CX500, and CX700 Initialization Guide 17

Initialization Guide
Page 21
...Security dialog box opens indicating that global security is not initialized. EMC CLARiiON CX300, CX500, and CX700 Initialization Guide 21 Initializing the Storage System Figure 5 Network Configuration Confirmation Screen (SP B) 15. The system asks you to select a connection type. As shown in Figure 6, right-click the SP ... and select Properties. On the service laptop, launch the Navisphere® Manager software (Management UI). Select the Serial Connection button, and then press OK. 19. Wait until SP B has finished rebooting, then open another PPP session (see page 32). 18...
...Security dialog box opens indicating that global security is not initialized. EMC CLARiiON CX300, CX500, and CX700 Initialization Guide 21 Initializing the Storage System Figure 5 Network Configuration Confirmation Screen (SP B) 15. The system asks you to select a connection type. As shown in Figure 6, right-click the SP ... and select Properties. On the service laptop, launch the Navisphere® Manager software (Management UI). Select the Serial Connection button, and then press OK. 19. Wait until SP B has finished rebooting, then open another PPP session (see page 32). 18...

Initialization Guide
Page 25
...Settings > Network and Dial up networking. EMC CLARiiON CX300, CX500, and CX700 Initialization Guide 25 Depending on your operating system, do one of the following: For Windows 2000 a. In the Connect to dialog box, log in as user clariion with password clariion!. See Figure 9. 27. Figure 9 ...Network Tab 28. Remove the NULL modem cable from SP B and connect it between the laptop serial port (COM 1) and the SP A service...
...Settings > Network and Dial up networking. EMC CLARiiON CX300, CX500, and CX700 Initialization Guide 25 Depending on your operating system, do one of the following: For Windows 2000 a. In the Connect to dialog box, log in as user clariion with password clariion!. See Figure 9. 27. Figure 9 ...Network Tab 28. Remove the NULL modem cable from SP B and connect it between the laptop serial port (COM 1) and the SP A service...
Initialization Guide
Page 30
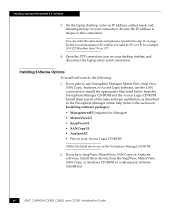
...All the UIs listed above are on the Navisphere Manager CD-ROM. 2. for your desktop taskbar, and disconnect the laptop-array serial connection. If you have SnapView, MirrorView, SAN Copy, or Analyzer software, install those drivers from the Navisphere Manager CD-ROM... SAN Copy, or Analyzer CD-ROM in the Navisphere Manager online help (refer to this connection. Installing Optional Navisphere 6.X Software 3. Install them as part of the same software installation, as described in a subsequent software installation. 30 EMC CLARiiON CX300, CX500, and CX700 Initialization Guide
...All the UIs listed above are on the Navisphere Manager CD-ROM. 2. for your desktop taskbar, and disconnect the laptop-array serial connection. If you have SnapView, MirrorView, SAN Copy, or Analyzer software, install those drivers from the Navisphere Manager CD-ROM... SAN Copy, or Analyzer CD-ROM in the Navisphere Manager online help (refer to this connection. Installing Optional Navisphere 6.X Software 3. Install them as part of the same software installation, as described in a subsequent software installation. 30 EMC CLARiiON CX300, CX500, and CX700 Initialization Guide

Initialization Guide
Page 33
Installing Optional Navisphere 6.X Software Using the Serial Cable Via the Serial Port (Alternate Method) To set for the other SP. Security is automatically set initial security parameters while connected to the SP via serial connection: 1. In the URL window, enter the following IP address: 192.168.1.1/setup 3. In the Navisphere 6.X Setup Pages that appear, set Security and/or Privileged Users as needed. EMC CLARiiON CX300, CX500, and CX700 Initialization Guide 33 Open your web browser on the service laptop. 2.
Installing Optional Navisphere 6.X Software Using the Serial Cable Via the Serial Port (Alternate Method) To set for the other SP. Security is automatically set initial security parameters while connected to the SP via serial connection: 1. In the URL window, enter the following IP address: 192.168.1.1/setup 3. In the Navisphere 6.X Setup Pages that appear, set Security and/or Privileged Users as needed. EMC CLARiiON CX300, CX500, and CX700 Initialization Guide 33 Open your web browser on the service laptop. 2.