Manual
Page 3
...III. Basic Settings ...33 III-2-1. Enable 802.1x Authentication 52 III-5-3. WPA Radius ...56 III-6. System Utility ...59 III-7-1.Password Settings ...59 III-7-2. Upgrade ...64 III-10. Product Information ...5 I -3. Description...5 I -1. Quick Installation ...10 II-1.... Home...31 III-2. AP Bridge-WDS...41 III-2-6. Management IP...60 III-7-3. Reset ...65 IV. Browser Based Configuration Interface 28 III-1. Configuring your IP address 68 IV-1-1. Contents I. Configuration Tool...63 III-9....
...III. Basic Settings ...33 III-2-1. Enable 802.1x Authentication 52 III-5-3. WPA Radius ...56 III-6. System Utility ...59 III-7-1.Password Settings ...59 III-7-2. Upgrade ...64 III-10. Product Information ...5 I -3. Description...5 I -1. Quick Installation ...10 II-1.... Home...31 III-2. AP Bridge-WDS...41 III-2-6. Management IP...60 III-7-3. Reset ...65 IV. Browser Based Configuration Interface 28 III-1. Configuring your IP address 68 IV-1-1. Contents I. Configuration Tool...63 III-9....
Manual
Page 6
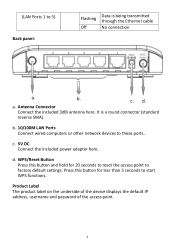
... Ethernet cable Off No connection a. d. Product Label The product label on the underside of the device displays the default IP address, username and password of the access point. 6 (LAN Ports 1 to these ports.. b. a. b. 10/100M LAN Ports Connect wired computers or other network devices...(standard reverse SMA). Press this button and hold for less than 5 seconds to factory default settings. d. WPS/Reset Button Press this button for 20 seconds to reset the access point to start WPS functions. c. Antenna Connector Connect the included 3dBi antenna here. c. 5V DC ...
... Ethernet cable Off No connection a. d. Product Label The product label on the underside of the device displays the default IP address, username and password of the access point. 6 (LAN Ports 1 to these ports.. b. a. b. 10/100M LAN Ports Connect wired computers or other network devices...(standard reverse SMA). Press this button and hold for less than 5 seconds to factory default settings. d. WPS/Reset Button Press this button for 20 seconds to reset the access point to start WPS functions. c. Antenna Connector Connect the included 3dBi antenna here. c. 5V DC ...

Manual
Page 61
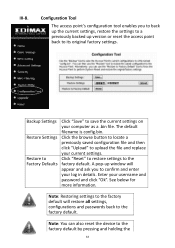
Click "APPLY" to factory defaults. By default DHCP is disabled. Be aware that doing so restores all settings and passwords back to save the changes but not apply them all at once. This allows you enable this function by selecting "Enabled" from the drop down ... will be configured to make further changes in the browser-based management interface, before applying them yet. The following message will restart itself. Note: To reset the IP address back to its default value of 192.168.2.1, press and hold the WPS...
Click "APPLY" to factory defaults. By default DHCP is disabled. Be aware that doing so restores all settings and passwords back to save the changes but not apply them all at once. This allows you enable this function by selecting "Enabled" from the drop down ... will be configured to make further changes in the browser-based management interface, before applying them yet. The following message will restart itself. Note: To reset the IP address back to its default value of 192.168.2.1, press and hold the WPS...
Manual
Page 63
..., restore the settings to a previously backed up window will restore all settings, configurations and passwords back to upload the file and replace your username and password and click "Ok". See below for more information. Note: You can also reset the device to its original factory settings. Click the browse button to locate a previously...
..., restore the settings to a previously backed up window will restore all settings, configurations and passwords back to upload the file and replace your username and password and click "Ok". See below for more information. Note: You can also reset the device to its original factory settings. Click the browse button to locate a previously...


