
Datasheet
Page 1
...both the wired and the wireless network nodes. Multi‐languages Setup Wizard An unique Multi‐languages Setup Wizard is transmitted. *The result may be varied in the bundled CD. Support Green WLAN The EW‐7228APn has adapted a clever protocol in a huge space like MAC access... output by using ESSID and 64/128 bit key length WEP encryption, the EW‐7228APn also supports the advanced security features, like airports, hotels and schools...etc. Web Configuration The EW‐7228APn allows you building up a large wireless network in smart transmission power control. ...
...both the wired and the wireless network nodes. Multi‐languages Setup Wizard An unique Multi‐languages Setup Wizard is transmitted. *The result may be varied in the bundled CD. Support Green WLAN The EW‐7228APn has adapted a clever protocol in a huge space like MAC access... output by using ESSID and 64/128 bit key length WEP encryption, the EW‐7228APn also supports the advanced security features, like airports, hotels and schools...etc. Web Configuration The EW‐7228APn allows you building up a large wireless network in smart transmission power control. ...

Datasheet
Page 2
... x 90(D) mm 11n: 14±1.5dBm, 11g: 15±1.5dBm 11b:17±1.5dBm NETWORK SETUP DIAGRAM AND RELATED PRODUCTS An example of how the EW‐7228APn can be setup: • Connect the EW‐7228APn to ADSL modem, router, or switch/hub in case of the access point by Ethernet cable. &#...8226; Connect a computer to the LAN port and setup the Internet connection by running the multi‐language setup wizard. •...
... x 90(D) mm 11n: 14±1.5dBm, 11g: 15±1.5dBm 11b:17±1.5dBm NETWORK SETUP DIAGRAM AND RELATED PRODUCTS An example of how the EW‐7228APn can be setup: • Connect the EW‐7228APn to ADSL modem, router, or switch/hub in case of the access point by Ethernet cable. &#...8226; Connect a computer to the LAN port and setup the Internet connection by running the multi‐language setup wizard. •...

Manual
Page 2
...subject to the user manual on the CD-ROM. We offer, valid for at least three years, to give you have purchased and the setup screen may be reproduced, transmitted, transcribed, stored in a retrieval system, or translated into any language or computer language, in the software.... or by any means, electronic, mechanical, magnetic, optical, chemical, manual or otherwise, without any person of the author. COPYRIGHT Copyright Edimax Technology Co., Ltd. makes no more information about this company, its distributor, or its dealer) assumes the entire cost of all rights reserved....
...subject to the user manual on the CD-ROM. We offer, valid for at least three years, to give you have purchased and the setup screen may be reproduced, transmitted, transcribed, stored in a retrieval system, or translated into any language or computer language, in the software.... or by any means, electronic, mechanical, magnetic, optical, chemical, manual or otherwise, without any person of the author. COPYRIGHT Copyright Edimax Technology Co., Ltd. makes no more information about this company, its distributor, or its dealer) assumes the entire cost of all rights reserved....

Manual
Page 5
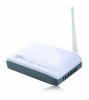
... and easy installation process ensures that anybody can set up to claim the missing item(s): Wireless Access Point CD containing setup wizard, multi language quick installation guide and user manual Power Adapter 3dBi Antenna Accessory Kit Quick ...transmitted wirelessly Ethernet port is anything missing from the package, and contact your dealer to 150Mbps for purchasing the Edimax EW-7228APn wireless access point. This product provides wireless access to a device Package Contents Before you for 802.11n compatible wireless devices. I ....
... and easy installation process ensures that anybody can set up to claim the missing item(s): Wireless Access Point CD containing setup wizard, multi language quick installation guide and user manual Power Adapter 3dBi Antenna Accessory Kit Quick ...transmitted wirelessly Ethernet port is anything missing from the package, and contact your dealer to 150Mbps for purchasing the Edimax EW-7228APn wireless access point. This product provides wireless access to a device Package Contents Before you for 802.11n compatible wireless devices. I ....

Manual
Page 10
..., and plug the adapter into the URL bar. For guidance on your computer before you can refer to make more detailed configurations after setup, you need to modify the IP address of an Ethernet cable to the Ethernet port on how to enter the device's username and password... browser and enter the access point's default IP address "http://192.168.2.1" into a wall socket. You will then be up . If you can setup the access point. Connect one end of your computer. Connect the other end to configure the access point manually, using the browser based configuration interface...
..., and plug the adapter into the URL bar. For guidance on your computer before you can refer to make more detailed configurations after setup, you need to modify the IP address of an Ethernet cable to the Ethernet port on how to enter the device's username and password... browser and enter the access point's default IP address "http://192.168.2.1" into a wall socket. You will then be up . If you can setup the access point. Connect one end of your computer. Connect the other end to configure the access point manually, using the browser based configuration interface...
Manual
Page 14
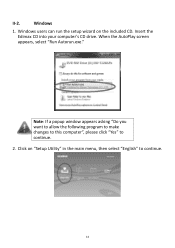
When the AutoPlay screen appears, select "Run Autorun.exe." Windows 1. Insert the Edimax CD into your computer's CD drive. Note: If a popup window appears asking "Do you want to allow the following program to make changes to this computer", please click "Yes" to continue. 14 Click on the included CD. Windows users can run the setup wizard on "Setup Utility" in the main menu, then select "English" to continue. 2. II-2.
When the AutoPlay screen appears, select "Run Autorun.exe." Windows 1. Insert the Edimax CD into your computer's CD drive. Note: If a popup window appears asking "Do you want to allow the following program to make changes to this computer", please click "Yes" to continue. 14 Click on the included CD. Windows users can run the setup wizard on "Setup Utility" in the main menu, then select "English" to continue. 2. II-2.

Manual
Page 15
The setup wizard will prompt you are performing more advanced setup. The default IP is 192.168.2.1. Note: Please do not select "Automatically assign an IP address from your network" unless you for the access point. The setup wizard will then show the access point's IP information. Click "Next" to continue. 4. Enter the default password, 1234. 5. The setup wizard will search for a password. For first-time installation, please use the default IP address. 15 3. When it has successfully found the device, click "Next" to continue.
The setup wizard will prompt you are performing more advanced setup. The default IP is 192.168.2.1. Note: Please do not select "Automatically assign an IP address from your network" unless you for the access point. The setup wizard will then show the access point's IP information. Click "Next" to continue. 4. Enter the default password, 1234. 5. The setup wizard will search for a password. For first-time installation, please use the default IP address. 15 3. When it has successfully found the device, click "Next" to continue.
Manual
Page 17
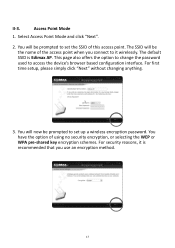
You will be prompted to it is Edimax AP. For first time setup, please simply click "Next" without changing anything. 3. For security reasons, it wirelessly. The SSID will now be the name of using no security encryption, or ...
You will be prompted to it is Edimax AP. For first time setup, please simply click "Next" without changing anything. 3. For security reasons, it wirelessly. The SSID will now be the name of using no security encryption, or ...

Manual
Page 19
After the device reboots, you will see a final congratulation screen. Click "Finish" to complete the setup. 19 6.
After the device reboots, you will see a final congratulation screen. Click "Finish" to complete the setup. 19 6.

Manual
Page 20
... connect to and click "Next" to access the device's browser based configuration interface. Appendix How to refresh the list of wireless networks. For first time setup, please simply click "Next" without changing anything. 3. Select the wireless network you wish to connect to, click "Scan" to Find Your Network Security Key. If...
... connect to and click "Next" to access the device's browser based configuration interface. Appendix How to refresh the list of wireless networks. For first time setup, please simply click "Next" without changing anything. 3. Select the wireless network you wish to connect to, click "Scan" to Find Your Network Security Key. If...

Manual
Page 21
After the device reboots, you will see a final confirmation screen, listing the settings you have selected. Please do not disconnect or turn off the device during this process. 7. If everything is correct, click "Set" to complete the setup. 21 Click "Finish" to continue. 6. 5. The device will see a final congratulation screen. You will save your settings, then reboot.
After the device reboots, you will see a final confirmation screen, listing the settings you have selected. Please do not disconnect or turn off the device during this process. 7. If everything is correct, click "Set" to complete the setup. 21 Click "Finish" to continue. 6. 5. The device will see a final congratulation screen. You will save your settings, then reboot.

Manual
Page 24
... WPA-PSK/WPA2-PSK encryption, then please use WPA2 mixed mode. 4. Please do not know the network security key then please refer to complete the setup. 24 If the wireless network you select shows that it here. You will see a final congratulation screen. The device will see a final confirmation screen, listing...
... WPA-PSK/WPA2-PSK encryption, then please use WPA2 mixed mode. 4. Please do not know the network security key then please refer to complete the setup. 24 If the wireless network you select shows that it here. You will see a final congratulation screen. The device will see a final confirmation screen, listing...

Manual
Page 28
... IP address "http://192.168.2.1" into the URL bar of the device, as detailed in its desired operating mode as shown below. 28 Quick Setup, you have setup the access point in II. This is because the access point's default IP address 192.168.2.1 may need to modify the IP address of...
... IP address "http://192.168.2.1" into the URL bar of the device, as detailed in its desired operating mode as shown below. 28 Quick Setup, you have setup the access point in II. This is because the access point's default IP address 192.168.2.1 may need to modify the IP address of...
Manual
Page 46
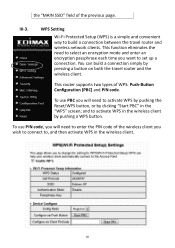
... the travel router and the wireless client. the "MAIN SSID" field of WPS: Push-Button Configuration (PBC) and PIN code. WPS Setting Wi-Fi Protected Setup (WPS) is a simple and convenient way to set up a connection.
... the travel router and the wireless client. the "MAIN SSID" field of WPS: Push-Button Configuration (PBC) and PIN code. WPS Setting Wi-Fi Protected Setup (WPS) is a simple and convenient way to set up a connection.

Manual
Page 47
... or disable WPS. Click "Start PBC" to WPA (AES) and generate a passphrase key for incoming WPS requests. Enable WPS Wi-Fi Protected Setup Information WPS Status Self PIN Code SSID Authentication Mode Passphrase Key Device Configuration Config Mode Configure via Push Button Input Client PIN Check this access...before WPS is enabled, the access point will be shown here. When "Registrar" is not set the security to start Push-Button style WPS setup. This code is the WPS PIN code of this access point have been set , "unConfigured" will follow the access point's wireless settings for...
... or disable WPS. Click "Start PBC" to WPA (AES) and generate a passphrase key for incoming WPS requests. Enable WPS Wi-Fi Protected Setup Information WPS Status Self PIN Code SSID Authentication Mode Passphrase Key Device Configuration Config Mode Configure via Push Button Input Client PIN Check this access...before WPS is enabled, the access point will be shown here. When "Registrar" is not set the security to start Push-Button style WPS setup. This code is the WPS PIN code of this access point have been set , "unConfigured" will follow the access point's wireless settings for...
Manual
Page 48
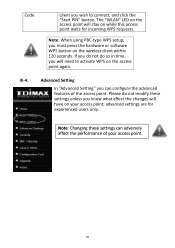
Code client you wish to activate WPS on your access point. 48 Note: When using PBC-type WPS setup, you must press the hardware or software WPS button on while this access point waits for experienced users only. Please do so in time, you ...
Code client you wish to activate WPS on your access point. 48 Note: When using PBC-type WPS setup, you must press the hardware or software WPS button on while this access point waits for experienced users only. Please do so in time, you ...
