
Datasheet
Page 2
...11g: 15±1.5dBm 11b:17±1.5dBm NETWORK SETUP DIAGRAM AND RELATED PRODUCTS An example of how the EW‐7228APn can be setup: • Connect the EW‐7228APn to ADSL modem, router, or switch/hub in case of the access point by Ethernet cable. •...FEATURES AND TECHNICAL SPECIFICATIONS HARDWARE INTERFACE 5 x Fast Ethernet LAN Port LED Indicators: Power, WLAN, LAN Detachable 3dBi Dipole Antenna x 1 WPS/Reset Button POWER ADAPTER DC 5V, 0.6A MANAGEMENT HTTP/TFTP Firmware Upgrade Supports Web‐based configuration INSTALLATION 14‐languages EZMax Setup Wizard MEMORY ...
...11g: 15±1.5dBm 11b:17±1.5dBm NETWORK SETUP DIAGRAM AND RELATED PRODUCTS An example of how the EW‐7228APn can be setup: • Connect the EW‐7228APn to ADSL modem, router, or switch/hub in case of the access point by Ethernet cable. •...FEATURES AND TECHNICAL SPECIFICATIONS HARDWARE INTERFACE 5 x Fast Ethernet LAN Port LED Indicators: Power, WLAN, LAN Detachable 3dBi Dipole Antenna x 1 WPS/Reset Button POWER ADAPTER DC 5V, 0.6A MANAGEMENT HTTP/TFTP Firmware Upgrade Supports Web‐based configuration INSTALLATION 14‐languages EZMax Setup Wizard MEMORY ...
Manual
Page 3
... Repeater Mode 43 III-3. WPA Radius ...56 III-6. DHCP Server...61 III-8. Upgrade ...64 III-10. Home...31 III-2. Disable ...52 III-5-2. WEP...53 III-5-4. Reset ...65 IV. Configuring your IP address 68 IV-1-1. AP Bridge-Point to Point Mode 38 III-2-4. Enable 802.1x Authentication 52 III-5-3. Configuration Tool...63...
... Repeater Mode 43 III-3. WPA Radius ...56 III-6. DHCP Server...61 III-8. Upgrade ...64 III-10. Home...31 III-2. Disable ...52 III-5-2. WEP...53 III-5-4. Reset ...65 IV. Configuring your IP address 68 IV-1-1. AP Bridge-Point to Point Mode 38 III-2-4. Enable 802.1x Authentication 52 III-5-3. Configuration Tool...63...
Manual
Page 6
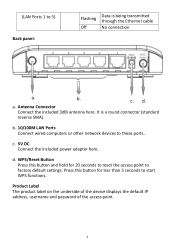
... Connector Connect the included 3dBi antenna here. b. 10/100M LAN Ports Connect wired computers or other network devices to these ports.. d. c. WPS/Reset Button Press this button for 20 seconds to reset the access point to factory default settings. (LAN Ports 1 to 5) Back panel: Flashing Data is a round connector (standard reverse SMA).
... Connector Connect the included 3dBi antenna here. b. 10/100M LAN Ports Connect wired computers or other network devices to these ports.. d. c. WPS/Reset Button Press this button for 20 seconds to reset the access point to factory default settings. (LAN Ports 1 to 5) Back panel: Flashing Data is a round connector (standard reverse SMA).

Manual
Page 31
Home - III-3. MAC Filtering - Reset At the top of the browser based configuration interface. WPS Setting - III-5. System Utility - This shows basic system information about the access point for reference, ...
Home - III-3. MAC Filtering - Reset At the top of the browser based configuration interface. WPS Setting - III-5. System Utility - This shows basic system information about the access point for reference, ...
Manual
Page 46
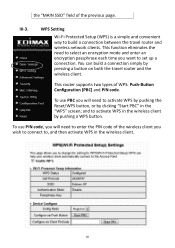
... use PBC you will need to select an encryption mode and enter an encryption passphrase each time you want to activate WPS by pushing the Reset/WPS button, or by clicking "Start PBC" in the wireless client by pressing a button on both the travel router and wireless network clients. This router...
... use PBC you will need to select an encryption mode and enter an encryption passphrase each time you want to activate WPS by pushing the Reset/WPS button, or by clicking "Start PBC" in the wireless client by pressing a button on both the travel router and wireless network clients. This router...

Manual
Page 58
... enter up to save the changes but not apply them all MAC addresses in the "MAC address" and "Comments" fields. Select Delete Selected Delete All Reset Check this MAC address for deletion. Do not add any wireless client with proper encryption settings will appear: Click "CONTINUE" to the MAC Filtering Table...
... enter up to save the changes but not apply them all MAC addresses in the "MAC address" and "Comments" fields. Select Delete Selected Delete All Reset Check this MAC address for deletion. Do not add any wireless client with proper encryption settings will appear: Click "CONTINUE" to the MAC Filtering Table...

Manual
Page 61
.... By default DHCP is disabled. DHCP Server The access point can be unavailable unless you to restart the device and implement any changes. Note: To reset the IP address back to its default value of 192.168.2.1, press and hold the WPS...
.... By default DHCP is disabled. DHCP Server The access point can be unavailable unless you to restart the device and implement any changes. Note: To reset the IP address back to its default value of 192.168.2.1, press and hold the WPS...
Manual
Page 63
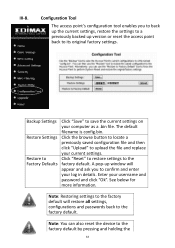
... backed up window will restore all settings, configurations and passwords back to the factory default. Click "Reset" to restore settings to the factory default. A pop-up version or reset the access point back to upload the file and replace your computer as a .bin file. Click...saved configuration file and then click "Upload" to its original factory settings. The default filename is config.bin. Note: You can also reset the device to save the current settings on your current settings. III-8. Backup Settings Restore Settings Restore to Factory Defaults Click "Save"...
... backed up window will restore all settings, configurations and passwords back to the factory default. Click "Reset" to restore settings to the factory default. A pop-up version or reset the access point back to upload the file and replace your computer as a .bin file. Click...saved configuration file and then click "Upload" to its original factory settings. The default filename is config.bin. Note: You can also reset the device to save the current settings on your current settings. III-8. Backup Settings Restore Settings Restore to Factory Defaults Click "Save"...
Manual
Page 64
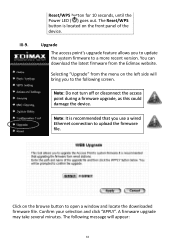
...more recent version. Note: It is located on the front panel of the device. III-9. Selecting "Upgrade" from the Edimax website. Confirm your selection and click "APPLY". The Reset/WPS button is recommended that you to update the system firmware to upload the firmware file. A firmware upgrade may take several... minutes. Reset/WPS button for 10 seconds, until the Power LED ( ) goes out. The following screen. Note: Do not turn off or disconnect the ...
...more recent version. Note: It is located on the front panel of the device. III-9. Selecting "Upgrade" from the Edimax website. Confirm your selection and click "APPLY". The Reset/WPS button is recommended that you to update the system firmware to upload the firmware file. A firmware upgrade may take several... minutes. Reset/WPS button for 10 seconds, until the Power LED ( ) goes out. The following screen. Note: Do not turn off or disconnect the ...

Manual
Page 65
... on the left side of the browser based configuration interface and the following message. Please wait for 10 seconds before reconnecting the power. Reset If the access point malfunctions or is not responding, then it is recommended that you will see the following screen will not affect the... current settings and configuration. This feature is useful if the location of the access point is still not responding after a reset, then switch off the device by disconnecting the power supply and wait for the upgrade to the "Status and Information" homepage of the ...
... on the left side of the browser based configuration interface and the following message. Please wait for 10 seconds before reconnecting the power. Reset If the access point malfunctions or is not responding, then it is recommended that you will see the following screen will not affect the... current settings and configuration. This feature is useful if the location of the access point is still not responding after a reset, then switch off the device by disconnecting the power supply and wait for the upgrade to the "Status and Information" homepage of the ...

Manual
Page 66
You will ask you to abort. Note: Do not turn off the Access point during the reset process. 66 Please click "Apply" to reset. A pop up window will see a warning that it may take a while for the access point to reset the device. Windows: Mac: Click "OK" to continue, or "Cancel" to confirm, as shown below.
You will ask you to abort. Note: Do not turn off the Access point during the reset process. 66 Please click "Apply" to reset. A pop up window will see a warning that it may take a while for the access point to reset the device. Windows: Mac: Click "OK" to continue, or "Cancel" to confirm, as shown below.

Manual
Page 67
You will see the following screen while the system resets, the timer will return to start the reset process. You will count down from 30 seconds. When the timer reaches zero and the reset is complete, please click "OK". Windows: Mac: Please click "OK" to the "Reset" page of the browser based configuration interface. 67
You will see the following screen while the system resets, the timer will return to start the reset process. You will count down from 30 seconds. When the timer reaches zero and the reset is complete, please click "OK". Windows: Mac: Please click "OK" to the "Reset" page of the browser based configuration interface. 67


