
Datasheet
Page 1
...can set this network camera to illuminate the monitored area when it gets dark, ensuring that you go. It automatically switches to the cloud in a few simple steps and access it perfect for capturing crisp and clear videos in low light conditions. You can easily connect ... viewing angle than the average network camera. Free EdiView viewer app for iPhone & Android phones IC-7110 / IC-7110W / IC-7110P 1.3Mpx H.264 Day & Night PT Network Camera Fast Ethernet / Wireless / PoE The Edimax IC‐7110 series pan and tilt network camera is detected in the specified areas, this network ...
...can set this network camera to illuminate the monitored area when it gets dark, ensuring that you go. It automatically switches to the cloud in a few simple steps and access it perfect for capturing crisp and clear videos in low light conditions. You can easily connect ... viewing angle than the average network camera. Free EdiView viewer app for iPhone & Android phones IC-7110 / IC-7110W / IC-7110P 1.3Mpx H.264 Day & Night PT Network Camera Fast Ethernet / Wireless / PoE The Edimax IC‐7110 series pan and tilt network camera is detected in the specified areas, this network ...

Datasheet
Page 2
...edimax.com FEATURES & TECHNICAL SPECIFICATIONS Video / Audio 1.3 megapixel CMOS sensor 1.0 lux 3.58mm, f/2.0 Recording format: AVI Video compression: H.264, MPEG‐4 & M‐JPEG 2‐way audio Standards Interface Fast Ethernet IEEE 802.3/802.3u Wireless IEEE 802.11b/g/n (IC‐7110W only) PoE IEEE 802.3af (IC...; 16dBm 11n: 11dBm ‐ 13dBm (IC‐7110W only) LAN Wi‐Fi (IC‐7110W only) ACT (IC‐7110P only) Power/Cloud Memory 4MB flash 64MB SDRAM Frequency Band 2.4000 ‐ 2.4835GHz (IC‐7110W only) Operating Conditions 0‐40˚ Celsius...
...edimax.com FEATURES & TECHNICAL SPECIFICATIONS Video / Audio 1.3 megapixel CMOS sensor 1.0 lux 3.58mm, f/2.0 Recording format: AVI Video compression: H.264, MPEG‐4 & M‐JPEG 2‐way audio Standards Interface Fast Ethernet IEEE 802.3/802.3u Wireless IEEE 802.11b/g/n (IC‐7110W only) PoE IEEE 802.3af (IC...; 16dBm 11n: 11dBm ‐ 13dBm (IC‐7110W only) LAN Wi‐Fi (IC‐7110W only) ACT (IC‐7110P only) Power/Cloud Memory 4MB flash 64MB SDRAM Frequency Band 2.4000 ‐ 2.4835GHz (IC‐7110W only) Operating Conditions 0‐40˚ Celsius...

Quick Install Guide
Page 3
...-language QIG 1 x Mounting kit 1 x Accessory kit 2 x Detachable antenna (IC-7110W only) 1 x Cloud ID card LED Indicators LED Name Power/Cloud Audio LAN Activity (IC-7110P only) Wi-Fi (IC-7110W only) Description The power LED will flash and light up when the camera is powered on and... ready for access over the cloud. PRODUCT INTRODUCTION Package Contents Before you start using ...
...-language QIG 1 x Mounting kit 1 x Accessory kit 2 x Detachable antenna (IC-7110W only) 1 x Cloud ID card LED Indicators LED Name Power/Cloud Audio LAN Activity (IC-7110P only) Wi-Fi (IC-7110W only) Description The power LED will flash and light up when the camera is powered on and... ready for access over the cloud. PRODUCT INTRODUCTION Package Contents Before you start using ...

Quick Install Guide
Page 7
...: You may also find MAC address. 6 Log onto the camera web configuration page (Default IP:192.168.2.3). Viewing the Camera with a Cloud ID card which contains the camera's Cloud ID (MAC address), username ( default : admin ) and password ( default : 1234 ). The sticker on the bottom of the camera... says MAC:xxxxxxxxxxxxxx. 2. Enter the Cloud ID, Username and Password to get MAC address. 3. Note: Each network camera comes with a Smartphone 8. Run the Ediview Finder application to finish ...
...: You may also find MAC address. 6 Log onto the camera web configuration page (Default IP:192.168.2.3). Viewing the Camera with a Cloud ID card which contains the camera's Cloud ID (MAC address), username ( default : admin ) and password ( default : 1234 ). The sticker on the bottom of the camera... says MAC:xxxxxxxxxxxxxx. 2. Enter the Cloud ID, Username and Password to get MAC address. 3. Note: Each network camera comes with a Smartphone 8. Run the Ediview Finder application to finish ...
Quick Install Guide
Page 8
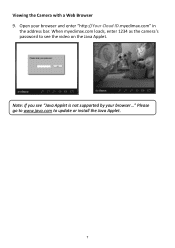
Viewing the Camera with a Web Browser 9. When myedimax.com loads, enter 1234 as the camera's password to update or install the Java Applet. 7 Note: If you see the video on the Java Applet. Please go to www.java.com to see "Java Applet is not supported by your browser and enter "http://Your Cloud ID.myedimax.com" in the address bar. Open your browser..."
Viewing the Camera with a Web Browser 9. When myedimax.com loads, enter 1234 as the camera's password to update or install the Java Applet. 7 Note: If you see the video on the Java Applet. Please go to www.java.com to see "Java Applet is not supported by your browser and enter "http://Your Cloud ID.myedimax.com" in the address bar. Open your browser..."

Manual
Page 9
The LED will flash and light up . 1.4 Key Components Front View Focus Ring IR LED Microphone Wired & Wireless: Power LED Audio LED LAN LED WLAN LED POE model: Power LED Audio LED ACT LED LAN LED Item Power/Cloud Audio Description The power LED will flash while data is transmitted. 8 The LED will light up when the camera is powered on and ready for access to a wired network, this LED will flash while video is linked to Cloud. Indicates Audio status LAN ACT (IC-7110P only) When the Network Camera is transmitted or received through a wired network.
The LED will flash and light up . 1.4 Key Components Front View Focus Ring IR LED Microphone Wired & Wireless: Power LED Audio LED LAN LED WLAN LED POE model: Power LED Audio LED ACT LED LAN LED Item Power/Cloud Audio Description The power LED will flash while data is transmitted. 8 The LED will light up when the camera is powered on and ready for access to a wired network, this LED will flash while video is linked to Cloud. Indicates Audio status LAN ACT (IC-7110P only) When the Network Camera is transmitted or received through a wired network.

Manual
Page 27
Password: Input new password Confirm: Input new password again for confirmation Click „OK‟ button to the cloud), and the connection type (wired or wireless). 4. This message will tell you if your network camera is connected to Internet (connected to keep changes 26 ...
Password: Input new password Confirm: Input new password again for confirmation Click „OK‟ button to the cloud), and the connection type (wired or wireless). 4. This message will tell you if your network camera is connected to Internet (connected to keep changes 26 ...

Manual
Page 133
To add an network camera manually or add an network camera on Internet, click 'Add Camera Manually' button. In cloud mode you have to input Cloud ID**; In this page, you have to input IP address or host name of network camera. 132 In IP mode you can input network camera‟s parameters manually Camera Type: Switch operating mode between Cloud and IP.
To add an network camera manually or add an network camera on Internet, click 'Add Camera Manually' button. In cloud mode you have to input Cloud ID**; In this page, you have to input IP address or host name of network camera. 132 In IP mode you can input network camera‟s parameters manually Camera Type: Switch operating mode between Cloud and IP.

Manual
Page 146
... IP. In IP mode you to remember the purpose / location of this network camera Cloud / IP Mode Switch: Click this button to input IP address or host name of network camera User Name: Input the user name of network camera. ...;admin‟ Password: Input the password of network camera. If you want to add a Ediamx network camera on your Edimax network camera is „1234‟ Click „Add‟ to input Cloud ID**; Default user name is located on Internet, please click 'Manually' button to abort and setup network camera manually...
... IP. In IP mode you to remember the purpose / location of this network camera Cloud / IP Mode Switch: Click this button to input IP address or host name of network camera User Name: Input the user name of network camera. ...;admin‟ Password: Input the password of network camera. If you want to add a Ediamx network camera on your Edimax network camera is „1234‟ Click „Add‟ to input Cloud ID**; Default user name is located on Internet, please click 'Manually' button to abort and setup network camera manually...
