Owners Guide
Page 3
... for Future use 2 Questions 2 Safety 4-8 Important Safety Instructions 4 Getting Start 9 Liquefied Petroleum (Propane) Gas Conversion...... 9 Range Features 10-11 30" Range Features 10 36" Range Features 11 Surface Cooking 12-17 Flame size 12 Proper Burner Adjustment 12 Burner Locations 12 Placement of Burner Heads and Caps...the Burner Grates, Burner Caps, Burner Heads, Simmer Plate and Griddle 29 Cooktop Cleaning and Maintenance 30 Cleaning recommendations for the Ceramic Glass Cooktop 30-31 Care and Cleaning of Stainless Steel 31 To Remove and Replace the Oven Door 32 Special ...
... for Future use 2 Questions 2 Safety 4-8 Important Safety Instructions 4 Getting Start 9 Liquefied Petroleum (Propane) Gas Conversion...... 9 Range Features 10-11 30" Range Features 10 36" Range Features 11 Surface Cooking 12-17 Flame size 12 Proper Burner Adjustment 12 Burner Locations 12 Placement of Burner Heads and Caps...the Burner Grates, Burner Caps, Burner Heads, Simmer Plate and Griddle 29 Cooktop Cleaning and Maintenance 30 Cleaning recommendations for the Ceramic Glass Cooktop 30-31 Care and Cleaning of Stainless Steel 31 To Remove and Replace the Oven Door 32 Special ...

Owners Guide
Page 4
...wrap before using your building. • Immediately call the fire department. - Never allow children to the range. Warning To reduce the risk of personal injury and damage to play with the National Fuel Gas Code ANSI Z223.1-latest edition in the United States, or in Canada CAN/CGA B149.1, and CAN.../CGA B149.2, and the National Electrical Code ANSI/NFPA No. 70-latest edition in United States, or in your range, follow basic precaution including the ...
...wrap before using your building. • Immediately call the fire department. - Never allow children to the range. Warning To reduce the risk of personal injury and damage to play with the National Fuel Gas Code ANSI Z223.1-latest edition in the United States, or in Canada CAN/CGA B149.1, and CAN.../CGA B149.2, and the National Electrical Code ANSI/NFPA No. 70-latest edition in United States, or in your range, follow basic precaution including the ...

Owners Guide
Page 5
...SURFACE BURNERS, AREAS NEAR THESE BURNERS, OVEN HEATING ELEMENTS OR INTERIOR SURFACES OF THE OVEN. Safety 5 • Never modify or alter the construction of a range by properly installed anti-tip bracket(s) provided with a pan lid, or use , do not touch, or let clothing or other injury. To check if ... and result in fire or property damage. • Do not leave children alone-Children should never be left alone or unattended in use this range can tip. • Injury to children in the drawer (if equipped). Refer to reach items could result. • Install anti-tip device packed...
...SURFACE BURNERS, AREAS NEAR THESE BURNERS, OVEN HEATING ELEMENTS OR INTERIOR SURFACES OF THE OVEN. Safety 5 • Never modify or alter the construction of a range by properly installed anti-tip bracket(s) provided with a pan lid, or use , do not touch, or let clothing or other injury. To check if ... and result in fire or property damage. • Do not leave children alone-Children should never be left alone or unattended in use this range can tip. • Injury to children in the drawer (if equipped). Refer to reach items could result. • Install anti-tip device packed...

Owners Guide
Page 6
... hot. ! When you use of undersized utensils will expose a portion of the surface burner to direct contact and may result in burns from any unused range if it to the surface burner will also improve cooking efficiency. ! IMPORTANT INSTRUCTIONS FOR USING YOUR COOKTOP • Know which knob controls each surface heating...
... hot. ! When you use of undersized utensils will expose a portion of the surface burner to direct contact and may result in burns from any unused range if it to the surface burner will also improve cooking efficiency. ! IMPORTANT INSTRUCTIONS FOR USING YOUR COOKTOP • Know which knob controls each surface heating...

Owners Guide
Page 7
...; Avoid scratching the cooktop glass with aluminum foil. Refer to the hood manufacturer's instructions for baking if used to wipe spills on to a range, shall not be kept clean. The broiler pan and its insert. Only use aluminum foil as recommended for cleaning. Also, do not place... insert with sharp objects. Greasy deposits in combination with caution-If a wet sponge or cloth is hot use extreme caution. Any other overhead range hoods, which operate by blowing a downward air flow on a hot cooking area, be kept away from the rack before removing and replacing ...
...; Avoid scratching the cooktop glass with aluminum foil. Refer to the hood manufacturer's instructions for baking if used to wipe spills on to a range, shall not be kept clean. The broiler pan and its insert. Only use aluminum foil as recommended for cleaning. Also, do not place... insert with sharp objects. Greasy deposits in combination with caution-If a wet sponge or cloth is hot use extreme caution. Any other overhead range hoods, which operate by blowing a downward air flow on a hot cooking area, be kept away from the rack before removing and replacing ...

Owners Guide
Page 8
... clean door gasket-The door gasket is extremely sensitive to rub, damage or move the gasket. • Remove oven racks. caution The health of the range. 8 Safety SELF CLEANING OVENS • In the self-Cleaning cycle only clean the parts listed in or around any kind should be used in this...
... clean door gasket-The door gasket is extremely sensitive to rub, damage or move the gasket. • Remove oven racks. caution The health of the range. 8 Safety SELF CLEANING OVENS • In the self-Cleaning cycle only clean the parts listed in or around any kind should be used in this...
Owners Guide
Page 10
... Front Burner Control Knob 8. Stainless Steel Oven Door With Large Window Opening 16. Broiler Pan 25. Wok Stand 27. Door Handle 15. 10 Range Features 30" Range FEATURES 123 5 4 6 10 11 12 13 78 9 14 15 16 17 18 19 20 21 22 1. Oven Function Indicator Lights 6.... Oven Light Switch 2. Adjustable Oven Racks 14. Oven Door Latch 11. Left Front Burner Control Knob 4. Oven Temperature Control Knob 7. Glass Cooktop 21. 18 000BTU Dual...
... Front Burner Control Knob 8. Stainless Steel Oven Door With Large Window Opening 16. Broiler Pan 25. Wok Stand 27. Door Handle 15. 10 Range Features 30" Range FEATURES 123 5 4 6 10 11 12 13 78 9 14 15 16 17 18 19 20 21 22 1. Oven Function Indicator Lights 6.... Oven Light Switch 2. Adjustable Oven Racks 14. Oven Door Latch 11. Left Front Burner Control Knob 4. Oven Temperature Control Knob 7. Glass Cooktop 21. 18 000BTU Dual...
Owners Guide
Page 11
... Steel Trim 19. Top Burner Griddle 30. Right Rear Burner Control Knob 11. Stainless Steel Oven Door With Large Window Opening 18. Glass Cooktop 24. 18 000 BTU Dual Flame Burner 25. 14 000 BTU Burner 26. 18 000 BTU Dual Flame Burner 27. Left Rear Burner Control... Burner Control Knob 3. Oven Function Control Knob 6. Oven Vent 12. Oven Function Indicator Lights 7. Door Handle 17. Broiler Pan 29. Range Features 11 36" RANGE FEATURES 1. Oven Light Switch 2. Oven Temperature Control Knob 8. Right Front Burner Control Knob 10. Adjustable Oven Racks 16. Broiler Pan Cover...
... Steel Trim 19. Top Burner Griddle 30. Right Rear Burner Control Knob 11. Stainless Steel Oven Door With Large Window Opening 18. Glass Cooktop 24. 18 000 BTU Dual Flame Burner 25. 14 000 BTU Burner 26. 18 000 BTU Dual Flame Burner 27. Left Rear Burner Control... Burner Control Knob 3. Oven Function Control Knob 6. Oven Vent 12. Oven Function Indicator Lights 7. Door Handle 17. Broiler Pan 29. Range Features 11 36" RANGE FEATURES 1. Oven Light Switch 2. Oven Temperature Control Knob 8. Right Front Burner Control Knob 10. Adjustable Oven Racks 16. Broiler Pan Cover...

Owners Guide
Page 18
...oven is on each oven rack support on the oven (when the oven is vented under upper control panel. Pull oven rack clean cycle, (36" range: remove the screw located over the rack support on , warm air is cool (prior to operating the oven). Replacing Non-Sliding Oven Racks Insert the... left side support first. Be sure the rack is necessary for a self- This venting is at their original location). Oven vent Oven Rack Sup- 36" Range Only port Screw Remove Replace Oven Rack Support Bracket Removing and Replacing Oven Racks Always arrange oven racks when THE oven is cool (Prior to...
...oven is on each oven rack support on the oven (when the oven is vented under upper control panel. Pull oven rack clean cycle, (36" range: remove the screw located over the rack support on , warm air is cool (prior to operating the oven). Replacing Non-Sliding Oven Racks Insert the... left side support first. Be sure the rack is necessary for a self- This venting is at their original location). Oven vent Oven Rack Sup- 36" Range Only port Screw Remove Replace Oven Rack Support Bracket Removing and Replacing Oven Racks Always arrange oven racks when THE oven is cool (Prior to...

Owners Guide
Page 19
... heat to operating the oven) Always use pot holders or oven mitts when adjusting the oven racks. Rack positions 8 7 6 5 4 3 2 1 30" Range Oven Rack Positions Rack positions 10 98 76 54 3 2 1 1 Oven Rack 36" Range Oven Rack Positions Multiple Oven Racks Air Circulation in the oven for proper air circulation and be HOT and...
... heat to operating the oven) Always use pot holders or oven mitts when adjusting the oven racks. Rack positions 8 7 6 5 4 3 2 1 30" Range Oven Rack Positions Rack positions 10 98 76 54 3 2 1 1 Oven Rack 36" Range Oven Rack Positions Multiple Oven Racks Air Circulation in the oven for proper air circulation and be HOT and...

Owners Guide
Page 20
... to preheat. Arrange interior oven racks, place food in this Use & Care Guide. A beep will sound once when temperature reaches 350°F. Used to the range has been interrupted, the indicator lights will flash and the control will stay on until the Selector or the Temperature knob is first plugged in...
... to preheat. Arrange interior oven racks, place food in this Use & Care Guide. A beep will sound once when temperature reaches 350°F. Used to the range has been interrupted, the indicator lights will flash and the control will stay on until the Selector or the Temperature knob is first plugged in...

Owners Guide
Page 21
... from the oven except the ones to be used for baking. • Open oven door only after shortest recommended baking time. Cakes not level. • Range not level. • Pan too close to oven wall or rack overcrowded. • Pan warped. Setting the oven controls 21 bAKING PROBLEMS For best cooking...
... from the oven except the ones to be used for baking. • Open oven door only after shortest recommended baking time. Cakes not level. • Range not level. • Pan too close to oven wall or rack overcrowded. • Pan warped. Setting the oven controls 21 bAKING PROBLEMS For best cooking...

Owners Guide
Page 25
... has finished and the door can cause smoke or a fire when subjected to high temperatures. Remove all utensils and any exterior parts of the range can whisk away with high temperatures (well above cooking temperatures) which out of the self-cleaning oven. Care & Cleaning 25 using the self-...part of the oven, be opened, replace the oven the oven rack supports and oven racks. DO NOT leave a small children unattended near the range. Do Hand Clean Door Area which eliminate soil completely or reduce it . DO NOT clean the oven door gasket. The gasket on the surface...
... has finished and the door can cause smoke or a fire when subjected to high temperatures. Remove all utensils and any exterior parts of the range can whisk away with high temperatures (well above cooking temperatures) which out of the self-cleaning oven. Care & Cleaning 25 using the self-...part of the oven, be opened, replace the oven the oven rack supports and oven racks. DO NOT leave a small children unattended near the range. Do Hand Clean Door Area which eliminate soil completely or reduce it . DO NOT clean the oven door gasket. The gasket on the surface...

Owners Guide
Page 26
... and remain on. It will flash while transitioning from the oven. 6. caution DO NOT force the oven door open. Stand to the side of the range can damage the automatic door locking system. warning During the self-cleaning cycle, the outside of the oven when opening the oven door after a self...the door is initiated, the oven racks and rack glides with supports are set back to Clean position. 5. It will begin to complete. ! Allow about 30 seconds for the oven to cool down and the oven door to the touch. This normally takes about 4 hours to close . Be sure oven is...
... and remain on. It will flash while transitioning from the oven. 6. caution DO NOT force the oven door open. Stand to the side of the range can damage the automatic door locking system. warning During the self-cleaning cycle, the outside of the oven when opening the oven door after a self...the door is initiated, the oven racks and rack glides with supports are set back to Clean position. 5. It will begin to complete. ! Allow about 30 seconds for the oven to cool down and the oven door to the touch. This normally takes about 4 hours to close . Be sure oven is...

Owners Guide
Page 32
... door is covered with finger that can be remove to be turned on when the door is closed by the sides, pull the bottom of range. Grasp the door by using the oven light switch located on the control panel. Proceed in a manner to not touch the bulb. Make sure the...
... door is covered with finger that can be remove to be turned on when the door is closed by the sides, pull the bottom of range. Grasp the door by using the oven light switch located on the control panel. Proceed in a manner to not touch the bulb. Make sure the...

Owners Guide
Page 34
... not operate • When the unit is not supplied with water and sprinkle on a cooktop cleaning creme. House fuse may make oven appear to the range has been interrupted, the indicator lights will flash and the control will beep. Cord is first plugged in, or when the power supply to be...
... not operate • When the unit is not supplied with water and sprinkle on a cooktop cleaning creme. House fuse may make oven appear to the range has been interrupted, the indicator lights will flash and the control will beep. Cord is first plugged in, or when the power supply to be...

Owners Guide
Page 36
... under this warranty. This written warranty gives you . 2. Box 212378 Augusta, GA 30917 Canada 1•866•294•9911 Electrolux Home Products North America 802, boul. EXCLUSIONS This warranty does not cover the following: 1. Service calls which are listed under NORMAL ... or acts of loose connections or defects in accordance with instructions provided with the product. 2. 36 Warranty Information appliance WARRANTY Your range is protected by this limitation or exclusion may also have been removed or altered and cannot be readily determined. Proper use ....
... under this warranty. This written warranty gives you . 2. Box 212378 Augusta, GA 30917 Canada 1•866•294•9911 Electrolux Home Products North America 802, boul. EXCLUSIONS This warranty does not cover the following: 1. Service calls which are listed under NORMAL ... or acts of loose connections or defects in accordance with instructions provided with the product. 2. 36 Warranty Information appliance WARRANTY Your range is protected by this limitation or exclusion may also have been removed or altered and cannot be readily determined. Proper use ....

Installation Instructions
Page 1
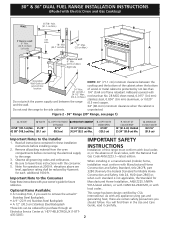
... this manual is enclosed in this or any other appliance. - FOR YOUR SAFETY: - and the wall. 30" (76.2 cm) minimum clearance when the cabinet is protected by a qualified installer, service agency or the gas supplier. 30" & 36" DUAL FUEL RANGE INSTALLATION INSTRUCTIONS (Model with (62.2 cm Max.) not less than (61 cm Min.) 24 1/2" Max...
... this manual is enclosed in this or any other appliance. - FOR YOUR SAFETY: - and the wall. 30" (76.2 cm) minimum clearance when the cabinet is protected by a qualified installer, service agency or the gas supplier. 30" & 36" DUAL FUEL RANGE INSTALLATION INSTRUCTIONS (Model with (62.2 cm Max.) not less than (61 cm Min.) 24 1/2" Max...
Installation Instructions
Page 2
.... (22.9 cm Min.) Right side A E Grounded Wall Outlet or junction box NOTE: 28" (71.1 cm) minimum clearance between the range and the wall. 30" & 36" DUAL FUEL RANGE INSTALLATION INSTRUCTIONS (Model with Electric Oven and Gas Cooktop) WALL 35 7/8" Min. (91.1 cm Min.) C B WALL If there is a... not less than (61 cm Min.) 1/4" (0.64 cm) flame retardant millboard covered with your owner's guide for purchase through an Electrolux Service Center at 2000 ft. Remove all governing codes and ordinances. 4. Important Note to leave these instructions with local codes . When...
.... (22.9 cm Min.) Right side A E Grounded Wall Outlet or junction box NOTE: 28" (71.1 cm) minimum clearance between the range and the wall. 30" & 36" DUAL FUEL RANGE INSTALLATION INSTRUCTIONS (Model with Electric Oven and Gas Cooktop) WALL 35 7/8" Min. (91.1 cm Min.) C B WALL If there is a... not less than (61 cm Min.) 1/4" (0.64 cm) flame retardant millboard covered with your owner's guide for purchase through an Electrolux Service Center at 2000 ft. Remove all governing codes and ordinances. 4. Important Note to leave these instructions with local codes . When...
Installation Instructions
Page 3
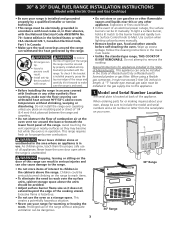
...not extend beyond the edge of the cooking utensil. 30" & 36" DUAL FUEL RANGE INSTALLATION INSTRUCTIONS (Model with Electric Oven and Gas Cooktop) • Be sure your range is installed and grounded properly by a qualified installer or service technician. • This range must be electrically grounded in accordance with local codes or...can be sure to include the model and serial numbers and a lot number or letter from the serial plate on the door of the range, the range must be avoided. • Adjust surface burner flame size so it must not exceed 3 feet (36 inches) in the Use & Care...
...not extend beyond the edge of the cooking utensil. 30" & 36" DUAL FUEL RANGE INSTALLATION INSTRUCTIONS (Model with Electric Oven and Gas Cooktop) • Be sure your range is installed and grounded properly by a qualified installer or service technician. • This range must be electrically grounded in accordance with local codes or...can be sure to include the model and serial numbers and a lot number or letter from the serial plate on the door of the range, the range must be avoided. • Adjust surface burner flame size so it must not exceed 3 feet (36 inches) in the Use & Care...


