
Owners Guide
Page 2
... the Ceramic Glass Cooktop 16 Care & ... Important Safety Instructions 3 Getting Start 6 Grounding Instructions 6 Liquefied Petroleum (Propane) Gas Conversion 6 Surface Cooking 7 Surface Cooking Utensils 7 Using the Griddle 7 Using the... and Caps 10 Placement of Discoloration on Ceramic Glass Cooktop Surface 19 Areas of Burner Grates 10 Flame Size ...Burner Grates, Burner Caps, Burner Heads 14 Cooktop Cleaning and Maintenance 16 Cleaning Recommendations for Future ...Cooktop Surface 19 Metal Marks on Ceramic Glass Cooktop Surface 19 Brown Streaks and Specks on Ceramic Glass Cooktop...
... the Ceramic Glass Cooktop 16 Care & ... Important Safety Instructions 3 Getting Start 6 Grounding Instructions 6 Liquefied Petroleum (Propane) Gas Conversion 6 Surface Cooking 7 Surface Cooking Utensils 7 Using the Griddle 7 Using the... and Caps 10 Placement of Discoloration on Ceramic Glass Cooktop Surface 19 Areas of Burner Grates 10 Flame Size ...Burner Grates, Burner Caps, Burner Heads 14 Cooktop Cleaning and Maintenance 16 Cleaning Recommendations for Future ...Cooktop Surface 19 Metal Marks on Ceramic Glass Cooktop Surface 19 Brown Streaks and Specks on Ceramic Glass Cooktop...

Owners Guide
Page 3
... or death. FOR YOUR SAFETY: - Do not store or use any other appliance. - Ask your gas cooktop, follow basic precautions including the following: ! Follow the gas supplier's instructions. • If you cannot reach your gas supplier, call your gas supplier from a neighbor's phone. Do not remove the model/serial plate attached to play with the... CSA Standard C22.1, Canadian Electrical Code, Part 1, and local code requirements. Safety 3 Important Safety Instructions Please read all tape and packaging before using your new Electrolux cooktop. !
... or death. FOR YOUR SAFETY: - Do not store or use any other appliance. - Ask your gas cooktop, follow basic precautions including the following: ! Follow the gas supplier's instructions. • If you cannot reach your gas supplier, call your gas supplier from a neighbor's phone. Do not remove the model/serial plate attached to play with the... CSA Standard C22.1, Canadian Electrical Code, Part 1, and local code requirements. Safety 3 Important Safety Instructions Please read all tape and packaging before using your new Electrolux cooktop. !
Owners Guide
Page 5
... are touched. Warning Do Not Use Stove Top Grills on Your Sealed Gas Burners-If you use Searing Grill on the cooktop. This can produce harmful fumes if applied to a hot surface. • Avoid Scratching the Cooktop Glass with Sharp Objects. Burns will become hot and possibly melt. If... unit is not designed for cooktop use. • Do not use a stove top grill on a sealed gas burner, it will blocked from the burner/unit and cause combustion problems. IMPORTANT INSTRUCTIONS FOR USING YOUR GLASS COOKTOP • Do Not Operate or Clean a Broken Cooktop Glass.-If glass top should ...
... are touched. Warning Do Not Use Stove Top Grills on Your Sealed Gas Burners-If you use Searing Grill on the cooktop. This can produce harmful fumes if applied to a hot surface. • Avoid Scratching the Cooktop Glass with Sharp Objects. Burns will become hot and possibly melt. If... unit is not designed for cooktop use. • Do not use a stove top grill on a sealed gas burner, it will blocked from the burner/unit and cause combustion problems. IMPORTANT INSTRUCTIONS FOR USING YOUR GLASS COOKTOP • Do Not Operate or Clean a Broken Cooktop Glass.-If glass top should ...
Owners Guide
Page 6
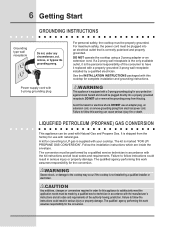
... performing this warning can be used with 3-prong grounding plug For personal safety, the cooktop must be performed by a qualified electrician. Warning Severe shock, or damage to LP gas is correctly polarized and properly grounded. Avoid fire hazard or electrical shock. Follow the ...are inside the envelope. caution Any additions, changes or conversions required in order for converting to the cooktop may occur if the cooktop is marked "FOR LP/ PROPANE GAS CONVERSION". DO NOT cut , remove, or bypass the grounding prong. Failure to satisfactorily meet the application...
... performing this warning can be used with 3-prong grounding plug For personal safety, the cooktop must be performed by a qualified electrician. Warning Severe shock, or damage to LP gas is correctly polarized and properly grounded. Avoid fire hazard or electrical shock. Follow the ...are inside the envelope. caution Any additions, changes or conversions required in order for converting to the cooktop may occur if the cooktop is marked "FOR LP/ PROPANE GAS CONVERSION". DO NOT cut , remove, or bypass the grounding prong. Failure to satisfactorily meet the application...

Owners Guide
Page 9
...are located on the simmer plate. a 18 000 BTU (natural gas) burner located at the left front position; - and a 18 000 BTU (natural gas) burner located at the right front position. 30" cooktop 36" cooktop and a 18 000 BTU (natural gas) burner located at the right front position. a 5 000 BTU ... (Figure 1) is equipped with different sized burners. a 14 000 BTU (natural gas) burner located at the center rear position; - a 5 000 BTU (natural gas) burner located at the center front position. - The 36" cooktop is intended to remove the simmer plate from the grate. a 14 000 BTU ...
...are located on the simmer plate. a 18 000 BTU (natural gas) burner located at the left front position; - and a 18 000 BTU (natural gas) burner located at the right front position. 30" cooktop 36" cooktop and a 18 000 BTU (natural gas) burner located at the right front position. a 5 000 BTU ... (Figure 1) is equipped with different sized burners. a 14 000 BTU (natural gas) burner located at the center rear position; - a 5 000 BTU (natural gas) burner located at the center front position. - The 36" cooktop is intended to remove the simmer plate from the grate. a 14 000 BTU ...

Owners Guide
Page 10
...GRATES Place grates on the stainless steel frame, doing so can damage the surface. ATTENTION: Do not slide the grates on the Ceramic Glass Cooktop. If the burner does not light, contact a Service Center. For all the burner caps and burner heads are right located inside the stainless...sealed burner yourself. Be careful not to damage the electrode while placing the burner head over the gas orifice (Figure 1). 10 Surface Cooking Placement of burner heads and caps Burner Cap Burner Head Gas Opening Burner Cap Electrode Burner Head Figure 1 Figure 2 For the 18 000 BTU burner : ...
...GRATES Place grates on the stainless steel frame, doing so can damage the surface. ATTENTION: Do not slide the grates on the Ceramic Glass Cooktop. If the burner does not light, contact a Service Center. For all the burner caps and burner heads are right located inside the stainless...sealed burner yourself. Be careful not to damage the electrode while placing the burner head over the gas orifice (Figure 1). 10 Surface Cooking Placement of burner heads and caps Burner Cap Burner Head Gas Opening Burner Cap Electrode Burner Head Figure 1 Figure 2 For the 18 000 BTU burner : ...

Owners Guide
Page 14
...instructions provided before turning OFF all packing tape from the cooktop until they have completely cooled and are cleaned up immediately. ! Before using your gas appliance be cleaned in the correct locations. Because the gas burner are sealed, cleanups are easy when spillovers are safe... to enter the gas orifice opening. ● The cooktop is not removable. IMPORTANT ● For proper gas flow and ignition of the...
...instructions provided before turning OFF all packing tape from the cooktop until they have completely cooled and are cleaned up immediately. ! Before using your gas appliance be cleaned in the correct locations. Because the gas burner are sealed, cleanups are easy when spillovers are safe... to enter the gas orifice opening. ● The cooktop is not removable. IMPORTANT ● For proper gas flow and ignition of the...
Owners Guide
Page 15
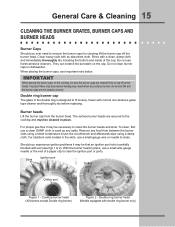
...burner heads. IMPORTANT When placing the burner caps on the cooktop, be sure the burner caps are secured to the cooktop and must be cleaned in place. The surface burner heads are seated firmly on the cap. For proper gas flow it may be necessary to clean the burner heads...burner cap off the burner head. Improper flame size and uneven heating may result when any spills. Double ring burner cap The glass in dishwasher. Cooktop burner head (All burners except Double ring burner) Figure 2 - General Care & Cleaning 15 CLEANING THE BURNER GRATES, BURNER CAPS and BURNER ...
...burner heads. IMPORTANT When placing the burner caps on the cooktop, be sure the burner caps are secured to the cooktop and must be cleaned in place. The surface burner heads are seated firmly on the cap. For proper gas flow it may be necessary to clean the burner heads...burner cap off the burner head. Improper flame size and uneven heating may result when any spills. Double ring burner cap The glass in dishwasher. Cooktop burner head (All burners except Double ring burner) Figure 2 - General Care & Cleaning 15 CLEANING THE BURNER GRATES, BURNER CAPS and BURNER ...

Owners Guide
Page 18
... and then turn control knob to salt air. Burners can be lit manually. Clean burners. Be sure cord is orange • Dust particles in your cooktop. See Cleaning the Burner Grates, Burner Caps,Burner Heads in the General Cleaning section. burner flame is securely plugged into the outlet. • Electrical power... Control knob to LITE until flame turns blue. • In coastal areas, a slightly orange flame is unavoidable due to desired flame size. • Be sure gas supply valve is full.
... and then turn control knob to salt air. Burners can be lit manually. Clean burners. Be sure cord is orange • Dust particles in your cooktop. See Cleaning the Burner Grates, Burner Caps,Burner Heads in the General Cleaning section. burner flame is securely plugged into the outlet. • Electrical power... Control knob to LITE until flame turns blue. • In coastal areas, a slightly orange flame is unavoidable due to desired flame size. • Be sure gas supply valve is full.

Owners Guide
Page 20
... it is in accordance with instructions provided with these features). Damages to obtain and keep all local plumbing, electrical and/or gas codes. 3. obtained from state to thermal breakage (not customer abuse). Products with all receipts. This written warranty gives you ...division of the appliance in your best interest to finish after installation. 6. 20 Warranty Information COOKTOP WARRANTY Your cooktop is protected by this warranty In the U.S.A., your appliance is warranted by Electrolux Canada Corp. Proper use . Replacement of God. 4. If service is performed, it was...
... it is in accordance with instructions provided with these features). Damages to obtain and keep all local plumbing, electrical and/or gas codes. 3. obtained from state to thermal breakage (not customer abuse). Products with all receipts. This written warranty gives you ...division of the appliance in your best interest to finish after installation. 6. 20 Warranty Information COOKTOP WARRANTY Your cooktop is protected by this warranty In the U.S.A., your appliance is warranted by Electrolux Canada Corp. Proper use . Replacement of God. 4. If service is performed, it was...

Installation Instructions
Page 1
...the proper installation of the cooktop. WIDTH DEPTH HEIGHT D** E** F DEPTH G H J. pages 1-8 Español - Follow the gas supplier's instructions. • If you cannot reach your gas supplier, call your building. • Immediately call the fire department. - C. HEIGHT BELOW COOKTOP 36 (91.4) 357/8 (91... (55.9) 11/8 (2.9) Max. 7½ (19.1) All dimensions are critical to the variation in the vicinity of the cooktop. B English - Min.* B Gas Cooktop Cutout Dimensions 2"(5.1cm) Dia. Seal opening to light any appliance. • Do not touch any phone in inches and ...
...the proper installation of the cooktop. WIDTH DEPTH HEIGHT D** E** F DEPTH G H J. pages 1-8 Español - Follow the gas supplier's instructions. • If you cannot reach your gas supplier, call your building. • Immediately call the fire department. - C. HEIGHT BELOW COOKTOP 36 (91.4) 357/8 (91... (55.9) 11/8 (2.9) Max. 7½ (19.1) All dimensions are critical to the variation in the vicinity of the cooktop. B English - Min.* B Gas Cooktop Cutout Dimensions 2"(5.1cm) Dia. Seal opening to light any appliance. • Do not touch any phone in inches and ...

Installation Instructions
Page 2
... inches and (cm). 2 D reflects the finished dimension. Protruding screws on the bottom of the cooktop. HEIGHT K. Opening to route gas supply. MODEL 36 (91.4) 30 (76.2) A. Due to the variation in case of the cooktop. WIDTH 357/8 (91.1) 297/8 (75.9) B. G Gas Cooktop Cutout Dimensions K*** 3"(7.6cm) 21/2" (6.4cm) H Do not slide unit into cabinet cutout. C 4" X 4" (10.2cm...
... inches and (cm). 2 D reflects the finished dimension. Protruding screws on the bottom of the cooktop. HEIGHT K. Opening to route gas supply. MODEL 36 (91.4) 30 (76.2) A. Due to the variation in case of the cooktop. WIDTH 357/8 (91.1) 297/8 (75.9) B. G Gas Cooktop Cutout Dimensions K*** 3"(7.6cm) 21/2" (6.4cm) H Do not slide unit into cabinet cutout. C 4" X 4" (10.2cm...

Installation Instructions
Page 3
...the burners should follow. IMPORTANT SAFETY INSTRUCTIONS Installation of this or any appliance using gas and generating heat, there are certain safety precautions you can be shut off while gas line connections are being made. You will be lit manually during an electrical ...can order a free filler kit by CSA International. However all instructions contained in cabinets above the cooktop. Read all cost related to replace existing unit. Prolonged use gasoline or other appliance. For 36" model: #903051-9010 For 30" model: #903051-9100 Optional Items Available: • A ...
...the burners should follow. IMPORTANT SAFETY INSTRUCTIONS Installation of this or any appliance using gas and generating heat, there are certain safety precautions you can be shut off while gas line connections are being made. You will be lit manually during an electrical ...can order a free filler kit by CSA International. However all instructions contained in cabinets above the cooktop. Read all cost related to replace existing unit. Prolonged use gasoline or other appliance. For 36" model: #903051-9010 For 30" model: #903051-9100 Optional Items Available: • A ...

Installation Instructions
Page 4
... (76.2cm) Min. C To eliminate the risk of Wood or Metal Cabinet is not recommended to use drawer underneath cooktop. Minimum Clearance from Right Side 9" (22.9 cm) 5" (12.7 cm) Figure 3 - It is Protected by ... Left Side 9" (22.9 cm) 5" (12.7 cm) C. MODEL 36" (91.4 cm) 30" (76.2 cm) A 36" (91.4 cm) 30" (76.2 cm) B. depth for cabinet installed above the cooktop should be reduced by Not Less Than 1/8" Flame Retardant Millboard Covered With ... rear edge of an Unprotected Wood or Metal Cabinet 24" (61cm) Min. GAS COOKTOP INSTALLATION INSTRUCTIONS 13" (33cm) max.
... (76.2cm) Min. C To eliminate the risk of Wood or Metal Cabinet is not recommended to use drawer underneath cooktop. Minimum Clearance from Right Side 9" (22.9 cm) 5" (12.7 cm) Figure 3 - It is Protected by ... Left Side 9" (22.9 cm) 5" (12.7 cm) C. MODEL 36" (91.4 cm) 30" (76.2 cm) A 36" (91.4 cm) 30" (76.2 cm) B. depth for cabinet installed above the cooktop should be reduced by Not Less Than 1/8" Flame Retardant Millboard Covered With ... rear edge of an Unprotected Wood or Metal Cabinet 24" (61cm) Min. GAS COOKTOP INSTALLATION INSTRUCTIONS 13" (33cm) max.

Installation Instructions
Page 5
... nipple 3. 1/2" (1.3cm) flare union adapter 4. Install Pressure Regulator Install the pressure regulator with your cooktop. Manual Shutoff Valve Flare Union GAS FLOW Pressure Flare Regulator Union On Nipple Off Flexible Connector Nipple Access Cap All connections must be wrench-... more than the regulator manifold pressure setting. flexible connector 5. 1/2" (1.3cm) flare union adapter 6. 1/2" (1.3cm) nipple 7. GAS COOKTOP INSTALLATION INSTRUCTIONS Wall Outlet Location 4" (10.2cm) The conversion must be performed by a qualified technician. Overtightening may crack the regulator...
... nipple 3. 1/2" (1.3cm) flare union adapter 4. Install Pressure Regulator Install the pressure regulator with your cooktop. Manual Shutoff Valve Flare Union GAS FLOW Pressure Flare Regulator Union On Nipple Off Flexible Connector Nipple Access Cap All connections must be wrench-... more than the regulator manifold pressure setting. flexible connector 5. 1/2" (1.3cm) flare union adapter 6. 1/2" (1.3cm) nipple 7. GAS COOKTOP INSTALLATION INSTRUCTIONS Wall Outlet Location 4" (10.2cm) The conversion must be performed by a qualified technician. Overtightening may crack the regulator...

Installation Instructions
Page 6
...circuit should be equipped with a flame may result in the gas supply line. Figure 7 Where a standard 2-prong wall receptacle is installed, it is the personal responsibility and obligation of this cooktop. GAS COOKTOP INSTALLATION INSTRUCTIONS The supply line should be checked by a qualified... electrician to make sure the receptacle is properly grounded. This valve should be located in the cooktop or supply line. Electrical Requirements 120 ...
...circuit should be equipped with a flame may result in the gas supply line. Figure 7 Where a standard 2-prong wall receptacle is installed, it is the personal responsibility and obligation of this cooktop. GAS COOKTOP INSTALLATION INSTRUCTIONS The supply line should be checked by a qualified... electrician to make sure the receptacle is properly grounded. This valve should be located in the cooktop or supply line. Electrical Requirements 120 ...

Installation Instructions
Page 7
...bladed screwdriver into the hollow valve stem and engage the slotted screw inside. Turn on the Surface Burner Valves (Figure 9): a. GAS COOKTOP INSTALLATION INSTRUCTIONS Check Operation Refer to the Use and Care Guide packaged with sealed burners as possible without extinguishing the flame. Adjust... located under the Dual Surface burner head. Remove all burner valves have been carefully checked for care and cleaning of your cooktop. NOTE: There are separate ignition devices for proper lighting: a. Note: Air mixture adjustment is properly aligned and leveled. ...
...bladed screwdriver into the hollow valve stem and engage the slotted screw inside. Turn on the Surface Burner Valves (Figure 9): a. GAS COOKTOP INSTALLATION INSTRUCTIONS Check Operation Refer to the Use and Care Guide packaged with sealed burners as possible without extinguishing the flame. Adjust... located under the Dual Surface burner head. Remove all burner valves have been carefully checked for care and cleaning of your cooktop. NOTE: There are separate ignition devices for proper lighting: a. Note: Air mixture adjustment is properly aligned and leveled. ...
Installation Instructions
Page 8
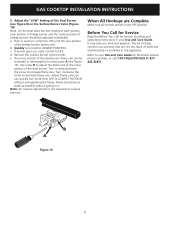
... the "LOW" Setting of the dual burner. Push in this appliance. c. Use screw B to your Use and Care Guide. GAS COOKTOP INSTALLATION INSTRUCTIONS 5. d. Refer to adjust the flame size of the outer portion of the Dual Burner (see Figure 19). If burner... Remove the surface burner control knob. Turn counterclockwise the screw to LOWEST POSITION. Before You Call for Service Read the Before You Call for Electrolux Service phone numbers, or call 1-877-4ELECTROLUX (1-877435-3287). b. Quickly turn knob from LITE to LOWEST POSITION without going out. e. When...
... the "LOW" Setting of the dual burner. Push in this appliance. c. Use screw B to your Use and Care Guide. GAS COOKTOP INSTALLATION INSTRUCTIONS 5. d. Refer to adjust the flame size of the outer portion of the Dual Burner (see Figure 19). If burner... Remove the surface burner control knob. Turn counterclockwise the screw to LOWEST POSITION. Before You Call for Service Read the Before You Call for Electrolux Service phone numbers, or call 1-877-4ELECTROLUX (1-877435-3287). b. Quickly turn knob from LITE to LOWEST POSITION without going out. e. When...

