

Complete Owner's Guide (English)
Page 4
...unpacked. HYDROGEN GAS IS EXPLOSIVE. If the hot water system has not been used near the washer. PROTECT CHILDREN • Do not allow children to the wash water. Close supervision of the washer. As children grow, teach them the proper, safe use them for several minutes. To prevent... personal injury, observe all hot water faucets and let the water flow from service or discarded, remove the washer door to prevent accidental entrapment. &#...
...unpacked. HYDROGEN GAS IS EXPLOSIVE. If the hot water system has not been used near the washer. PROTECT CHILDREN • Do not allow children to the wash water. Close supervision of the washer. As children grow, teach them the proper, safe use them for several minutes. To prevent... personal injury, observe all hot water faucets and let the water flow from service or discarded, remove the washer door to prevent accidental entrapment. &#...

Complete Owner's Guide (English)
Page 9
.... The door should not be more than half the total wash load. Combine large and small items in this guide for safe, successful stain removal instructions. 4. Add 1 or 2 similar items to washer. The washer can be fully loaded, but the items should close easily. Add laundry load to help balance the load. Operating Instructions 9 OPERATING YOUR WASHER, con't 3. Load large...
.... The door should not be more than half the total wash load. Combine large and small items in this guide for safe, successful stain removal instructions. 4. Add 1 or 2 similar items to washer. The washer can be fully loaded, but the items should close easily. Add laundry load to help balance the load. Operating Instructions 9 OPERATING YOUR WASHER, con't 3. Load large...

Complete Owner's Guide (English)
Page 13
The washer will not operate with the door open the door, add the item, close the door and press start to resume the cycle. To add a forgotten item to 14 hours if desired. When the door unlocks, open and DOOR OPEN will hear several beeps when the buttons are pressed. Excess wrinkling, color transfer ... the cycle once the cycle has begun, press cancel, select a new cycle, and press start to hang on the door or crawl inside the washer. DO NOT force open door could entice children to delay the beginning of the cycle, press pause. If there are attempted after the cycle has ended...
The washer will not operate with the door open the door, add the item, close the door and press start to resume the cycle. To add a forgotten item to 14 hours if desired. When the door unlocks, open and DOOR OPEN will hear several beeps when the buttons are pressed. Excess wrinkling, color transfer ... the cycle once the cycle has begun, press cancel, select a new cycle, and press start to hang on the door or crawl inside the washer. DO NOT force open door could entice children to delay the beginning of the cycle, press pause. If there are attempted after the cycle has ended...
Complete Owner's Guide (English)
Page 20
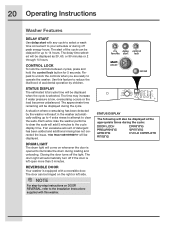
...any cycle to select a wash time convenient to operate the washer. Closing the door turns off peak energy hours. The door can be displayed as 30, 60, or 90 minutes or 2 through 14 hours. The start with a reversible door. The approximate time remaining will come on the right or ...ready to your schedule or during the cycle. STATUS DISPLAY The following will be displayed at the appropriate times during loading and unloading. 20 Operating Instructions Washer Features DELAY START Use delay start of the cycle can be displayed during off the light. STATUS DISPLAY The ...
...any cycle to select a wash time convenient to operate the washer. Closing the door turns off peak energy hours. The door can be displayed as 30, 60, or 90 minutes or 2 through 14 hours. The start with a reversible door. The approximate time remaining will come on the right or ...ready to your schedule or during the cycle. STATUS DISPLAY The following will be displayed at the appropriate times during loading and unloading. 20 Operating Instructions Washer Features DELAY START Use delay start of the cycle can be displayed during off the light. STATUS DISPLAY The ...

Complete Owner's Guide (English)
Page 26
...soap and water. Disconnect hoses from water supply and drain water from hoses. 3. Turn off drum interior and close door. 7. Replace drawer. 8. Store washer in an upright position. 9. They can occur or moved in freezing temperatures, follow these winterizing instructions to prevent damage ... under the front leveling legs to prevent damage to prevent pressure build-up in the hoses. • Clean the cabinet with clear water. • Remove glue residue from washer after storage, run empty washer through a complete cycle using detergent. Do not add wash load. 26 Care...
...soap and water. Disconnect hoses from water supply and drain water from hoses. 3. Turn off drum interior and close door. 7. Replace drawer. 8. Store washer in an upright position. 9. They can occur or moved in freezing temperatures, follow these winterizing instructions to prevent damage ... under the front leveling legs to prevent damage to prevent pressure build-up in the hoses. • Clean the cabinet with clear water. • Remove glue residue from washer after storage, run empty washer through a complete cycle using detergent. Do not add wash load. 26 Care...
Complete Owner's Guide (English)
Page 29
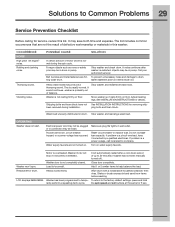
... not increase fuse capacity. Turn on floor. Washer motor will automatically restart after washer is probably out of defective workmanship or materials in drum. Close door completely. Washer won't spin. To return to 30 minutes (if washer has not been manually turned off). Foreign objects... sound. Thumping sound. ping bolts and foam block. It will stop if it becomes overheated. Washer door is usually normal. Washer has been programmed to help balance the load. Rattling and clanking noise. POSSIBLE CAUSE SOLUTION A certain amount of up to the factory default ...
... not increase fuse capacity. Turn on floor. Washer motor will automatically restart after washer is probably out of defective workmanship or materials in drum. Close door completely. Washer won't spin. To return to 30 minutes (if washer has not been manually turned off). Foreign objects... sound. Thumping sound. ping bolts and foam block. It will stop if it becomes overheated. Washer door is usually normal. Washer has been programmed to help balance the load. Rattling and clanking noise. POSSIBLE CAUSE SOLUTION A certain amount of up to the factory default ...

Product Specifications Sheet (English)
Page 1
...‡ For use 56% less water.5 27" ELECTRIC FRONT LOAD WASHER Capacity IEC 4.7 Cu. Vent Hoods Dishwashers / Kitchen Cleanup Refrigerators Freezers Wine Tower / Under Counter Washers / Dryers electroluxappliances.com Perfect Balance™ System No other washer has less vibration3. Ft. PN # 137098000 ... Floor Yes Accessories Luxury-Glide® Touch-2-Open™/ (Close) Pedestal - Height (Without 15" Pedestal) 38" (With 15" Pedestal) 53" Width 27" Depth (to wash. Features Signature Soft-Arc Door Design IQ-Touch™ Electronic Controls with LCD Display Perfect ...
...‡ For use 56% less water.5 27" ELECTRIC FRONT LOAD WASHER Capacity IEC 4.7 Cu. Vent Hoods Dishwashers / Kitchen Cleanup Refrigerators Freezers Wine Tower / Under Counter Washers / Dryers electroluxappliances.com Perfect Balance™ System No other washer has less vibration3. Ft. PN # 137098000 ... Floor Yes Accessories Luxury-Glide® Touch-2-Open™/ (Close) Pedestal - Height (Without 15" Pedestal) 38" (With 15" Pedestal) 53" Width 27" Depth (to wash. Features Signature Soft-Arc Door Design IQ-Touch™ Electronic Controls with LCD Display Perfect ...

Installation Instructions (All Languages)
Page 6
...Steam Models adds 3/4 in . (2 cm) to front of closed door water supply connection on rear of unit ¹ drain hose on rear of unit ² 27.00" (68.58cm) power cord on rear of unit ³ freestand washer on floor floor line washer mounted on optional pedestal floor line * To obtain ...dimensions, dryer must either be vented straight back or with a quick-turn 90° elbow. 6 Installation Requirements Installed washer dimensions 50.6" (128.53cm)* to clear open door 31.50" (80cm)* to front of closed door 27.00" (68.5cm) 38.00" (96.52cm) 53.00" (134.62cm) 75.75" (192.5cm) ...
...Steam Models adds 3/4 in . (2 cm) to front of closed door water supply connection on rear of unit ¹ drain hose on rear of unit ² 27.00" (68.58cm) power cord on rear of unit ³ freestand washer on floor floor line washer mounted on optional pedestal floor line * To obtain ...dimensions, dryer must either be vented straight back or with a quick-turn 90° elbow. 6 Installation Requirements Installed washer dimensions 50.6" (128.53cm)* to clear open door 31.50" (80cm)* to front of closed door 27.00" (68.5cm) 38.00" (96.52cm) 53.00" (134.62cm) 75.75" (192.5cm) ...

Installation Instructions (All Languages)
Page 7
Close door and reapply door tape. 4. CAUTION EXCESSIVE WEIGHT HAZARD To avoid back or other injury, have more than one person move the washer to within 4 feet (1 m) of cardboard to help prevent washer damage during any future moves. Temporarily remove door tape. 2. Using a rug, blanket or ... HAZARD Destroy the carton and plastic bags after the washer is unpacked. Children might use them aside. 6. Carefully move or lift the washer. 5. Open washer door and remove everything from the drum. 3. Carefully return the washer to children. 1. IMPORTANT Save styrofoam base and shipping...
Close door and reapply door tape. 4. CAUTION EXCESSIVE WEIGHT HAZARD To avoid back or other injury, have more than one person move the washer to within 4 feet (1 m) of cardboard to help prevent washer damage during any future moves. Temporarily remove door tape. 2. Using a rug, blanket or ... HAZARD Destroy the carton and plastic bags after the washer is unpacked. Children might use them aside. 6. Carefully move or lift the washer. 5. Open washer door and remove everything from the drum. 3. Carefully return the washer to children. 1. IMPORTANT Save styrofoam base and shipping...

Installation Instructions (All Languages)
Page 11
... display INSTAL CYCLE and show estimated time of cycle completion. If your washer has this console: 1.Empty washer's drum and close door. 2.After you plug in the washer the first time: wake up the washer by pressing any button, then immediately and simultaneously press and hold both the eco ...to use . The Installation Cycle will exit the Installation Cycle and return to normal operation the next time you wish to immediately run the washer through a washing cycle, press the cancel button to put the unit to continue the normal operating mode. 6.Please read the Use &...
... display INSTAL CYCLE and show estimated time of cycle completion. If your washer has this console: 1.Empty washer's drum and close door. 2.After you plug in the washer the first time: wake up the washer by pressing any button, then immediately and simultaneously press and hold both the eco ...to use . The Installation Cycle will exit the Installation Cycle and return to normal operation the next time you wish to immediately run the washer through a washing cycle, press the cancel button to put the unit to continue the normal operating mode. 6.Please read the Use &...

Installation Instructions (All Languages)
Page 12
...-thread, counter-sunk hinge screws from door. 3 Close the door. 4 Rotate the door trim approximately ¾" counter-clockwise and pull it away from the front of the door. 3 While supporting the weight of washer or floor near washer, with a soft cloth or towel. 4 Be sure washer is unplugged from power source! Removing door and hardware Tools needed: Screwdrivers with...
...-thread, counter-sunk hinge screws from door. 3 Close the door. 4 Rotate the door trim approximately ¾" counter-clockwise and pull it away from the front of the door. 3 While supporting the weight of washer or floor near washer, with a soft cloth or towel. 4 Be sure washer is unplugged from power source! Removing door and hardware Tools needed: Screwdrivers with...

Installation Instructions (All Languages)
Page 17
... Q) Plug in washer and continue operation. 3 Rotate the trim ring cover plate and move it clockwise approximately ¾". 3 Secure the door with 1 long, course- P) Reinstalling Trim Plug 1 Open the door to the left , pivot point is up. thread, panhead screw. 4 Close the door and test the ...operation of top center. The opening in the slots and rotate it to a 90 degree angle. 2 Install the door onto the hinge locating pins. Reversing Door 17 Reattaching door and hardware M) Reattaching Door Assembly 1 Open the hinge to...
... Q) Plug in washer and continue operation. 3 Rotate the trim ring cover plate and move it clockwise approximately ¾". 3 Secure the door with 1 long, course- P) Reinstalling Trim Plug 1 Open the door to the left , pivot point is up. thread, panhead screw. 4 Close the door and test the ...operation of top center. The opening in the slots and rotate it to a 90 degree angle. 2 Install the door onto the hinge locating pins. Reversing Door 17 Reattaching door and hardware M) Reattaching Door Assembly 1 Open the hinge to...

Wiring Diagram (All Languages)
Page 3
... (13). Refer to test (12). Refer to test (11). Refer to test (9). E32 Pressure sensor calibration problem. E45 Line door sensing failure. E49 Door incngruence between UI board and main control board. E55 Under speed. E5A High temperature on heater or fuse opened. E5F MC is open...to test (12). Refer to test (10). Refer to test (12). Refer to test (3). E31 Electronic pressure switch failure. E42 Door lock device failure E44 Door closed sensing failure. E5E Communication problem. EF2 Too much soap. EF5 Incorrect water temperature. Refer to test (11). Refer to test (8). ...
... (13). Refer to test (12). Refer to test (11). Refer to test (9). E32 Pressure sensor calibration problem. E45 Line door sensing failure. E49 Door incngruence between UI board and main control board. E55 Under speed. E5A High temperature on heater or fuse opened. E5F MC is open...to test (12). Refer to test (10). Refer to test (12). Refer to test (3). E31 Electronic pressure switch failure. E42 Door lock device failure E44 Door closed sensing failure. E5E Communication problem. EF2 Too much soap. EF5 Incorrect water temperature. Refer to test (11). Refer to test (8). ...

Wiring Diagram (All Languages)
Page 4
... water fill stop coming in the motor. Test 2 1. Test 4 Inspect the wiring between door lock and main control board 1. Yes. Check for restrictions. 2. No restriction. Go to enter the washer? 5. Replace the water valve assembly. No. Replace the main control board. Yes. Does ...level above (20) psi. 4. Go to step (6) No. Is the loading door closed? 2. Yes. Does the water stop ? 6. Test Check Test 1 1. Test 2. Is there an air leak in the air bell system? 3. Start the washer and check for blockage. Go to step (4). If this did not correct...
... water fill stop coming in the motor. Test 2 1. Test 4 Inspect the wiring between door lock and main control board 1. Yes. Check for restrictions. 2. No restriction. Go to enter the washer? 5. Replace the water valve assembly. No. Replace the main control board. Yes. Does ...level above (20) psi. 4. Go to step (6) No. Is the loading door closed? 2. Yes. Does the water stop ? 6. Test Check Test 1 1. Test 2. Is there an air leak in the air bell system? 3. Start the washer and check for blockage. Go to step (4). If this did not correct...


