Installation Instructions (All Languages)
Page 1
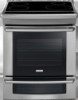
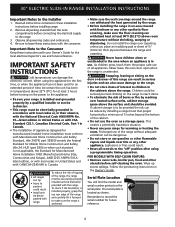
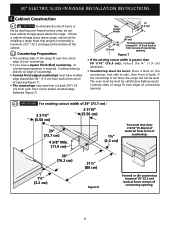
30" ELECTRIC SLIDE-IN RANGE INSTALLATION INSTRUCTIONS United States INSTALLATION AND SERVICE MUST BE PERFORMED BY A QUALIFIED INSTALLER. FOR YOUR SAFETY: Do not store or use gasoline or other flammable vapors and liquids in the cabinet before reading next two pages. G 30" Min....Grounded Junction Box or Wall Outlet Should Be Located 8" to 17" (20,3 - 43,2 cm) From Right Cabinet and 2" to 4" (5,1-10,2 cm) From Floor Do not install the unit in the vicinity of this or any other appliance. IMPORTANT: SAVE FOR LOCAL ELECTRICAL INSPECTOR'S USE. Shave Raised Edge To Clear 1 ½" Max...
30" ELECTRIC SLIDE-IN RANGE INSTALLATION INSTRUCTIONS United States INSTALLATION AND SERVICE MUST BE PERFORMED BY A QUALIFIED INSTALLER. FOR YOUR SAFETY: Do not store or use gasoline or other flammable vapors and liquids in the cabinet before reading next two pages. G 30" Min....Grounded Junction Box or Wall Outlet Should Be Located 8" to 17" (20,3 - 43,2 cm) From Right Cabinet and 2" to 4" (5,1-10,2 cm) From Floor Do not install the unit in the vicinity of this or any other appliance. IMPORTANT: SAVE FOR LOCAL ELECTRICAL INSPECTOR'S USE. Shave Raised Edge To Clear 1 ½" Max...
Installation Instructions (All Languages)
Page 2
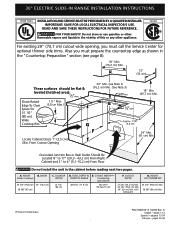
..." (61 cm) minimum clearance between the range and the wall. 2. IMPORTANT: Cabinet and countertop width should match the cutout width. 30" ELECTRIC SLIDE-IN RANGE INSTALLATION INSTRUCTIONS NOTE: 1.
..." (61 cm) minimum clearance between the range and the wall. 2. IMPORTANT: Cabinet and countertop width should match the cutout width. 30" ELECTRIC SLIDE-IN RANGE INSTALLATION INSTRUCTIONS NOTE: 1.
Installation Instructions (All Languages)
Page 3
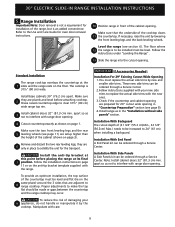
... center of the cabinet cut -out should NOT rest directly on the countertop (see hatched area on illustration 1). H4 Metal Flange After the installation, MAKE SURE that the height from the floor to the cooktop voiding the warranty. Illustration 1 4 Remove and discard the two rear leveling legs..., they are only in step 2. Before installing the unit, measure the heights of the two (2) 2 cabinet sides (H1-4), front and back (see illustration 2). Illustration 2 3 30" ELECTRIC SLIDE-IN...
... center of the cabinet cut -out should NOT rest directly on the countertop (see hatched area on illustration 1). H4 Metal Flange After the installation, MAKE SURE that the height from the floor to the cooktop voiding the warranty. Illustration 1 4 Remove and discard the two rear leveling legs..., they are only in step 2. Before installing the unit, measure the heights of the two (2) 2 cabinet sides (H1-4), front and back (see illustration 2). Illustration 2 3 30" ELECTRIC SLIDE-IN...
Installation Instructions (All Languages)
Page 4
...and future reference. When using a programmable timing operation. To check if the bracket(s), is not applicable, the Standard for Manufactured Home Installation 1982 (Manufactured Home Sites, Communities and Setups), ANSI Z225.1/NFPA 501Alatest edition, or with local codes in United States and with ...Important Note to the appliance. • Be sure your range for warming or heating the room. 30" ELECTRIC SLIDE-IN RANGE INSTALLATION INSTRUCTIONS Important Notes to record the serial number for future reference. 4 Follow the precleaning instructions in use the oven as shown. ...
...and future reference. When using a programmable timing operation. To check if the bracket(s), is not applicable, the Standard for Manufactured Home Installation 1982 (Manufactured Home Sites, Communities and Setups), ANSI Z225.1/NFPA 501Alatest edition, or with local codes in United States and with ...Important Note to the appliance. • Be sure your range for warming or heating the room. 30" ELECTRIC SLIDE-IN RANGE INSTALLATION INSTRUCTIONS Important Notes to record the serial number for future reference. 4 Follow the precleaning instructions in use the oven as shown. ...
Installation Instructions (All Languages)
Page 5
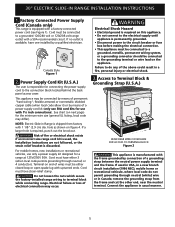
... (U.S.A.) BEND REAR WIRE COVER HERE FOR ACCESS TO TERMINAL BLOCK Figure 2 This appliance is used in USA, in a new branch circuit installation (1996 NEC), mobile home or recreational vehicule, where local code do any of permanent "hard wiring"; flexible armored or nonmetallic shielded copper ...for connecting the power supply cord to terminal block while connecting range. Power Supply Cord Kit (U.S.A.) The user is available, have one installed by means of electrical connection may differ). hole as shown on end of wires must be connected to a grounded, metallic, permanent wiring...
... (U.S.A.) BEND REAR WIRE COVER HERE FOR ACCESS TO TERMINAL BLOCK Figure 2 This appliance is used in USA, in a new branch circuit installation (1996 NEC), mobile home or recreational vehicule, where local code do any of permanent "hard wiring"; flexible armored or nonmetallic shielded copper ...for connecting the power supply cord to terminal block while connecting range. Power Supply Cord Kit (U.S.A.) The user is available, have one installed by means of electrical connection may differ). hole as shown on end of wires must be connected to a grounded, metallic, permanent wiring...
Installation Instructions (All Languages)
Page 6
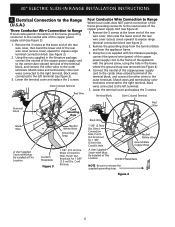
...) Grounding Strap 1 1/8" (2.9 cm) Dia. Punch Out Knockout for 1 3/8" (3.5cm) Dia. Terminal Block Silver Colored Terminal Terminal Block Black Wire A User Supplied Strain-relief Must Be Installed at This Location Neutral (White Wire) Ground (Bare Copper Wire) To 240 V Receptacle NOTE: Be sure to the neutral wire of the frame grounding conductor... Range (U.S.A.) Three Conductor Wire Connection to Range If local codes permit connection of the copper power supply cord (see figure 2). 2. 30" ELECTRIC SLIDE-IN RANGE INSTALLATION INSTRUCTIONS 4. A User Supplied Strain-relief Must Be...
...) Grounding Strap 1 1/8" (2.9 cm) Dia. Punch Out Knockout for 1 3/8" (3.5cm) Dia. Terminal Block Silver Colored Terminal Terminal Block Black Wire A User Supplied Strain-relief Must Be Installed at This Location Neutral (White Wire) Ground (Bare Copper Wire) To 240 V Receptacle NOTE: Be sure to the neutral wire of the frame grounding conductor... Range (U.S.A.) Three Conductor Wire Connection to Range If local codes permit connection of the copper power supply cord (see figure 2). 2. 30" ELECTRIC SLIDE-IN RANGE INSTALLATION INSTRUCTIONS 4. A User Supplied Strain-relief Must Be...
Installation Instructions (All Languages)
Page 7
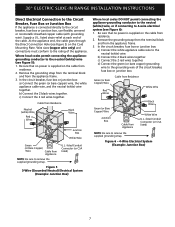
... supplied on the cable from residence. 2. d) Connect the green (or bare copper) grounding wire to the rating of the cable. 30" ELECTRIC SLIDE-IN RANGE INSTALLATION INSTRUCTIONS Direct Electrical Connection to the Circuit Breaker, Fuse Box or Junction Box If the appliance is connected directly to 4-wire electrical system (see Figure...
... supplied on the cable from residence. 2. d) Connect the green (or bare copper) grounding wire to the rating of the cable. 30" ELECTRIC SLIDE-IN RANGE INSTALLATION INSTRUCTIONS Direct Electrical Connection to the Circuit Breaker, Fuse Box or Junction Box If the appliance is connected directly to 4-wire electrical system (see Figure...
Installation Instructions (All Languages)
Page 8
...of burns or fire by reaching over the cutout edge of your countertop. • If you have cabinet storage space above range, reduce risk by installing a range hood that projects horizontally a minimum of 5" (12.7 cm) beyond the bottom of the cabinet. 4.2 Countertop Preparation • The ... width is required. If the countertop is not level, the range will not be level for satisfactory baking results. 30" ELECTRIC SLIDE-IN RANGE INSTALLATION INSTRUCTIONS 4. Place a level on edge of countertop. • Formed front-edged countertops must have molded edge shaved flat 3/4" (1.9 cm) from ...
...of burns or fire by reaching over the cutout edge of your countertop. • If you have cabinet storage space above range, reduce risk by installing a range hood that projects horizontally a minimum of 5" (12.7 cm) beyond the bottom of the cabinet. 4.2 Countertop Preparation • The ... width is required. If the countertop is not level, the range will not be level for satisfactory baking results. 30" ELECTRIC SLIDE-IN RANGE INSTALLATION INSTRUCTIONS 4. Place a level on edge of countertop. • Formed front-edged countertops must have molded edge shaved flat 3/4" (1.9 cm) from ...
Installation Instructions (All Languages)
Page 9
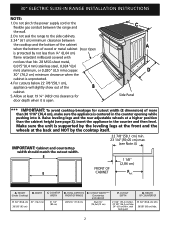
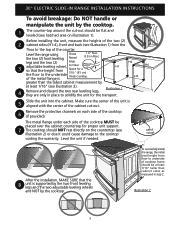
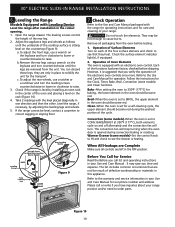
... or manipulate it by the cooktop. Make sure 2 they are setup higher than the height of the cabinet (shown on page 3). Follow the installation instructions on page 11 or on the 8 same plane) around the 3 sides that the underside of the countertop must be level. To provide ... through a Service Center. To reduce the risk of (21 3/4" (55.2 cm)Min., 22 1/8" (56.2cm) Max.) needs to be increased to be installed must replace the actual side trims by lowering the front leveling legs and the back leveling wheels. Manipulate with the range. The floor where 12...
... or manipulate it by the cooktop. Make sure 2 they are setup higher than the height of the cabinet (shown on page 3). Follow the installation instructions on page 11 or on the 8 same plane) around the 3 sides that the underside of the countertop must be level. To provide ... through a Service Center. To reduce the risk of (21 3/4" (55.2 cm)Min., 22 1/8" (56.2cm) Max.) needs to be increased to be installed must replace the actual side trims by lowering the front leveling legs and the back leveling wheels. Manipulate with the range. The floor where 12...
Installation Instructions (All Languages)
Page 10
...indicator light(s), if equipped. 2. c. Operation of the oven and placing a level on the leg base and turn . 30" ELECTRIC SLIDE-IN RANGE INSTALLATION INSTRUCTIONS 6. To adjust the front legs, use a ratchet or a nutdriver and turn counterclockwise until the underside of the rear leg. 2. Check Operation... screws control the height of the cooktop surface is set for operation. Take 2 readings with Leveling Device Level the range after installation in the OFF position. Please call list and operating instructions in the center of Oven Elements The oven is equipped with the ...
...indicator light(s), if equipped. 2. c. Operation of the oven and placing a level on the leg base and turn . 30" ELECTRIC SLIDE-IN RANGE INSTALLATION INSTRUCTIONS 6. To adjust the front legs, use a ratchet or a nutdriver and turn counterclockwise until the underside of the rear leg. 2. Check Operation... screws control the height of the cooktop surface is set for operation. Take 2 readings with Leveling Device Level the range after installation in the OFF position. Please call list and operating instructions in the center of Oven Elements The oven is equipped with the ...
Installation Instructions (All Languages)
Page 11
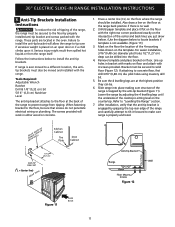
...draw a line on the floor at the range back position if there is not available. (Figure 11)) 3. Mark on the template. If attaching to install the anti-tip brackets. Be sure the 4 levelling legs are located in the oven. BRRAAEACNRKGWEEDLAIGNLLEE OOFR Kitchen Cabinet Toe Plate CL 10½" (26.7...liquids or from tipping. Draw a center line (CL) on floor. Remove template and place bracket on the floor where the range should be installed. pilot holes using masonry drill bit. 5. Lower the range by adjusting the 4 levelling legs until the underside of the center and back ...
...draw a line on the floor at the range back position if there is not available. (Figure 11)) 3. Mark on the template. If attaching to install the anti-tip brackets. Be sure the 4 levelling legs are located in the oven. BRRAAEACNRKGWEEDLAIGNLLEE OOFR Kitchen Cabinet Toe Plate CL 10½" (26.7...liquids or from tipping. Draw a center line (CL) on floor. Remove template and place bracket on the floor where the range should be installed. pilot holes using masonry drill bit. 5. Lower the range by adjusting the 4 levelling legs until the underside of the center and back ...

Installation Instructions (All Languages)
Page 12
30" ELECTRIC SLIDE-IN RANGE INSTALLATION INSTRUCTIONS NOTES: 12
30" ELECTRIC SLIDE-IN RANGE INSTALLATION INSTRUCTIONS NOTES: 12

Product Specifications Sheet (English)
Page 1
...Legs Yes Sabbath Mode (Star-K® Certified) Yes A.D.A. Specifications subject to a quick boil. Use both simultaneously to Product Installation Guide for the utmost cooking capacity. Compliant* Yes Accessories Porcelain Broiler Pan and Insert Cleaning Sponge 2" Rear Filler Kit, Side... local and national electric codes. Wall Ovens Warmer Drawers Cooktops Built-In Ranges Freestanding Ranges Microwaves Induction Built-In Range EW30IS65J S Featuring Wave-Touch™ Controls & Induction Cooktop Exceptional Temperature Control Adjust heat with greater accuracy than gas or ...
...Legs Yes Sabbath Mode (Star-K® Certified) Yes A.D.A. Specifications subject to a quick boil. Use both simultaneously to Product Installation Guide for the utmost cooking capacity. Compliant* Yes Accessories Porcelain Broiler Pan and Insert Cleaning Sponge 2" Rear Filler Kit, Side... local and national electric codes. Wall Ovens Warmer Drawers Cooktops Built-In Ranges Freestanding Ranges Microwaves Induction Built-In Range EW30IS65J S Featuring Wave-Touch™ Controls & Induction Cooktop Exceptional Temperature Control Adjust heat with greater accuracy than gas or ...

Product Specifications Sheet (English)
Page 2
... L5V 3E4 • 1-800-265-8352 • electroluxappliances.ca EW30IS65J 01/10 © 2010 Electrolux Home Products, Inc. for cutout width of 29", replace actual side trim panels with smaller side trim panels, available with optional Side Trim Kit (refer to detailed kit installation instructions). Countertop Preparation For detailed preparation instructions, refer to...
... L5V 3E4 • 1-800-265-8352 • electroluxappliances.ca EW30IS65J 01/10 © 2010 Electrolux Home Products, Inc. for cutout width of 29", replace actual side trim panels with smaller side trim panels, available with optional Side Trim Kit (refer to detailed kit installation instructions). Countertop Preparation For detailed preparation instructions, refer to...

Complete Owner's Guide (English)
Page 4
... Destroy the carton and plastic bags after unpacking the appliance. Never allow children to play with packaging material. • Proper Installation-Be sure your appliance is in the literature package for this unit does cause harmful interference to recommend a qualified technician and... reception, which the receiver is engaged. However there is no guarantee that the anti-tip bracket (s) is connected. Install only per installation instructions provided in operation, as the electromagnetic field may cause harmful interference to radio communications. Know how to disconnect the...
... Destroy the carton and plastic bags after unpacking the appliance. Never allow children to play with packaging material. • Proper Installation-Be sure your appliance is in the literature package for this unit does cause harmful interference to recommend a qualified technician and... reception, which the receiver is engaged. However there is no guarantee that the anti-tip bracket (s) is connected. Install only per installation instructions provided in operation, as the electromagnetic field may cause harmful interference to radio communications. Know how to disconnect the...

Complete Owner's Guide (English)
Page 10
... Vent Warm Air Rack positions 7 6 5 4 3 2 1 (Non-SLIDING rack only) 10 Feature Overview Oven rack supports & Oven Vents Installing Oven Rack Supports Always install oven rack support before turning on the oven (when the oven is equipped with ladder rack supports with 7 positions to disengage them downward... into the two brackets on each door. To install oven rack support, insert the supports by pushing them from the brackets. Oven Vents Location The oven is released through the vents. ...
... Vent Warm Air Rack positions 7 6 5 4 3 2 1 (Non-SLIDING rack only) 10 Feature Overview Oven rack supports & Oven Vents Installing Oven Rack Supports Always install oven rack support before turning on the oven (when the oven is equipped with ladder rack supports with 7 positions to disengage them downward... into the two brackets on each door. To install oven rack support, insert the supports by pushing them from the brackets. Oven Vents Location The oven is released through the vents. ...
Complete Owner's Guide (English)
Page 48
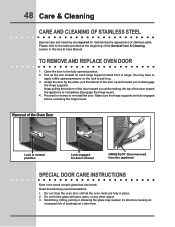
... you while rotating the top of the General Care & Cleaning section in reverse to pull it up the lock located on the lock to re-install the door. You may weaken its structure causing an increased risk of the Oven Door Lock in place. 2. Do not close the oven door until...
... you while rotating the top of the General Care & Cleaning section in reverse to pull it up the lock located on the lock to re-install the door. You may weaken its structure causing an increased risk of the Oven Door Lock in place. 2. Do not close the oven door until...

Complete Owner's Guide (English)
Page 52
... too frequently. • Place a marked glass measuring cup filled with water on the bottom. Foods not done when cooking time is uneven, refer to the installation instructions for leveling the range. • Be sure to allow 5.1 cm to 10.2 cm (2" to 4") of clearance on all sides of each pan in the...
... too frequently. • Place a marked glass measuring cup filled with water on the bottom. Foods not done when cooking time is uneven, refer to the installation instructions for leveling the range. • Be sure to allow 5.1 cm to 10.2 cm (2" to 4") of clearance on all sides of each pan in the...
Complete Owner's Guide (English)
Page 53
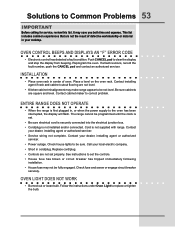
... clear the display and stop the display from beeping. This list includes common experiences that are square and level. Contact your dealer, installing agent or authorized servicer. • Service wiring not complete. Contact cabinet maker to Common Problems 53 Important Before calling for service,...may not be programmed until the clock is set the controls. • House fuse has blown or circuit breaker has tripped immediately following installation. • House fuse may save you both time and expense. Replace cord/plug. • Controls are not level. • Kitchen...
... clear the display and stop the display from beeping. This list includes common experiences that are square and level. Contact your dealer, installing agent or authorized servicer. • Service wiring not complete. Contact cabinet maker to Common Problems 53 Important Before calling for service,...may not be programmed until the clock is set the controls. • House fuse has blown or circuit breaker has tripped immediately following installation. • House fuse may save you both time and expense. Replace cord/plug. • Controls are not level. • Kitchen...

Complete Owner's Guide (English)
Page 57
... a one year from persons other than authorized service companies; Products with the provided instructions. Electrolux authorizes no person to be defective in materials or workmanship when such appliance is installed, used in the USA, Puerto Rico and Canada. For one year limited warranty. Pickup ...or cannot be obtained by unauthorized service companies; Service calls to correct the installation of your original date of God. Surcharges including, but not limited to use of parts other than genuine Electrolux parts or parts obtained from your appliance or to instruct you how to...
... a one year from persons other than authorized service companies; Products with the provided instructions. Electrolux authorizes no person to be defective in materials or workmanship when such appliance is installed, used in the USA, Puerto Rico and Canada. For one year limited warranty. Pickup ...or cannot be obtained by unauthorized service companies; Service calls to correct the installation of your original date of God. Surcharges including, but not limited to use of parts other than genuine Electrolux parts or parts obtained from your appliance or to instruct you how to...

