
Installation Guide
Page 23
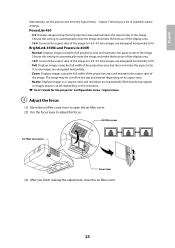
... English Alternatively, set the aspect ratio from the Signal menu - BrightLink 450Wi and PowerLite 450W • Normal: Displays images using the full projection area and maintains the aspect ratio of the image. s User's Guide for the projector: Configuration menu - Black bands may appear or images may be ... using the full width of the projection area and maintains the aspect ratio of the image. Aspect. Following is (aspect ratio and resolution are maintained). Choose this setting to automatically resize the image and make the best use of the display area. • 16:9: ...
... English Alternatively, set the aspect ratio from the Signal menu - BrightLink 450Wi and PowerLite 450W • Normal: Displays images using the full projection area and maintains the aspect ratio of the image. s User's Guide for the projector: Configuration menu - Black bands may appear or images may be ... using the full width of the projection area and maintains the aspect ratio of the image. Aspect. Following is (aspect ratio and resolution are maintained). Choose this setting to automatically resize the image and make the best use of the display area. • 16:9: ...

Product Brochure
Page 10
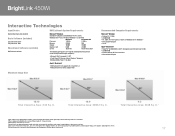
...education. Technology-forward in one package • 2500 lumens color light output, 2500 lumens white light output1 • Native WXGA (1280 x 800) resolution (16:10), XGA also supported • Easy network monitoring and control - broadcast announcements or emergency instructions over the IP network from obsolescence for rich,.... Future-proof Technology changes make obsolescence a core issue for features they want to be protected from any environment 10 BrightLink provides contingency planning without the insurance premium. up to evolve your classrooms as possible."
...education. Technology-forward in one package • 2500 lumens color light output, 2500 lumens white light output1 • Native WXGA (1280 x 800) resolution (16:10), XGA also supported • Easy network monitoring and control - broadcast announcements or emergency instructions over the IP network from obsolescence for rich,.... Future-proof Technology changes make obsolescence a core issue for features they want to be protected from any environment 10 BrightLink provides contingency planning without the insurance premium. up to evolve your classrooms as possible."

Product Brochure
Page 16
...Projector Specifications3 Projection System Epson 3LCD, 3-chip optical engine Projection Method Front/rear/wall mount Driving Method Epson Poly-silicon TFT Active Matrix Pixel Number 1,024,000 dots (1280 x 800) x 3 White Light Output1 2500 lumens (ISO 21118 Standard) Color Light Output1 2500 lumens Aspect Ratio 16:10 (native), 16:9, 4:3 Native Resolution... 2.0 lb Units Per Master Carton: 10 Support - The Epson ConnectionSM Pre-sales support U.S. Product Name BrightLink 450Wi Interactive Projector BrightLink 450Wi Interactive Projector with slide plate 12.9 lb without slide plate Wall Mount ...
...Projector Specifications3 Projection System Epson 3LCD, 3-chip optical engine Projection Method Front/rear/wall mount Driving Method Epson Poly-silicon TFT Active Matrix Pixel Number 1,024,000 dots (1280 x 800) x 3 White Light Output1 2500 lumens (ISO 21118 Standard) Color Light Output1 2500 lumens Aspect Ratio 16:10 (native), 16:9, 4:3 Native Resolution... 2.0 lb Units Per Master Carton: 10 Support - The Epson ConnectionSM Pre-sales support U.S. Product Name BrightLink 450Wi Interactive Projector BrightLink 450Wi Interactive Projector with slide plate 12.9 lb without slide plate Wall Mount ...
Product Brochure
Page 17
...following prerequisites are required and installed with Easiteach (if not already installed to BrightLink in native WXGA mode (16:10 aspect ratio). 3Specifications revised as of... 910 shipping models, for which manufacturers provided lumens and total power data, all resolutions and brightness levels. 6See our website for 10.6.X available TBD Maximum Image Size Recommended ...recycling options at www.epson.com/recycle 17 In. 16:9 Total Interactive Area: 3698.2 Sq. Lamp brightness decreases over time. 5Data source: ProjectorCentral.com, Jan. 2010. In. 4:3 Total Interactive Area: 3468 Sq...
...following prerequisites are required and installed with Easiteach (if not already installed to BrightLink in native WXGA mode (16:10 aspect ratio). 3Specifications revised as of... 910 shipping models, for which manufacturers provided lumens and total power data, all resolutions and brightness levels. 6See our website for 10.6.X available TBD Maximum Image Size Recommended ...recycling options at www.epson.com/recycle 17 In. 16:9 Total Interactive Area: 3698.2 Sq. Lamp brightness decreases over time. 5Data source: ProjectorCentral.com, Jan. 2010. In. 4:3 Total Interactive Area: 3468 Sq...
Quick Guide
Page 12
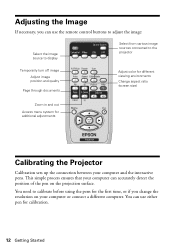
... can use either pen for additional adjustments Calibrating the Projector Calibration sets up the connection between your computer and the interactive pens. You need to the projector Temporarily turn off image Adjust image position and quality Page... through documents Adjust color for different viewing environments Change aspect ratio (screen size) Zoom in and out Access menu system for calibration. 12 Getting Started Adjusting the Image If necessary, you change the resolution...
... can use either pen for additional adjustments Calibrating the Projector Calibration sets up the connection between your computer and the interactive pens. You need to the projector Temporarily turn off image Adjust image position and quality Page... through documents Adjust color for different viewing environments Change aspect ratio (screen size) Zoom in and out Access menu system for calibration. 12 Getting Started Adjusting the Image If necessary, you change the resolution...
Quick Guide
Page 13
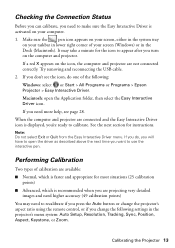
... the following : Windows: select or Start > All Programs or Programs > Epson Projector > Easy Interactive Driver. If a red X appears on your computer. 1. When the computer and projector are connected and the Easy Interactive Driver icon is recommended when you are not connected correctly. Try removing and ...if you turn on your taskbar in the Dock (Macintosh). Performing Calibration Two types of your screen, either in the projector's menu system: Auto Setup, Resolution, Tracking, Sync, Position, Aspect, Keystone, or Zoom. Make sure the pen icon appears on your screen (Windows) ...
... the following : Windows: select or Start > All Programs or Programs > Epson Projector > Easy Interactive Driver. If a red X appears on your computer. 1. When the computer and projector are connected and the Easy Interactive Driver icon is recommended when you are not connected correctly. Try removing and ...if you turn on your taskbar in the Dock (Macintosh). Performing Calibration Two types of your screen, either in the projector's menu system: Auto Setup, Resolution, Tracking, Sync, Position, Aspect, Keystone, or Zoom. Make sure the pen icon appears on your screen (Windows) ...
Quick Guide
Page 27
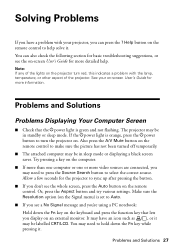
... the Ppower light is orange, press the Ppower button to turn red, this indicates a problem with your on the projector turn the projector on an external monitor. Make sure the Resolution option (on the Signal menu) is green and not flashing. It may be in sleep mode or displaying a black ...screen saver. Problems and Solutions 27 The projector may need to press the Source Search button to make sure the picture has not...
... the Ppower light is orange, press the Ppower button to turn red, this indicates a problem with your on the projector turn the projector on an external monitor. Make sure the Resolution option (on the Signal menu) is green and not flashing. It may be in sleep mode or displaying a black ...screen saver. Problems and Solutions 27 The projector may need to press the Source Search button to make sure the picture has not...
User's Guide
Page 46
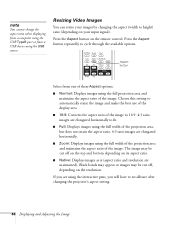
Aspect button Select from a USB device using the interactive pens, you will have to fit. ■ Full: Displays images using the full width of the projection area,...4:3 ratio images are elongated horizontally to recalibrate after changing the projector's aspect setting. 46 Displaying and Adjusting the Image The image may be cut off on the top and bottom depending on the resolution. Press the Aspect button on your images by changing the ...be cut off , depending on its aspect ratio. ■ Native: Displays images as is (aspect ratio and resolution are using the USB source.
Aspect button Select from a USB device using the interactive pens, you will have to fit. ■ Full: Displays images using the full width of the projection area,...4:3 ratio images are elongated horizontally to recalibrate after changing the projector's aspect setting. 46 Displaying and Adjusting the Image The image may be cut off on the top and bottom depending on the resolution. Press the Aspect button on your images by changing the ...be cut off , depending on its aspect ratio. ■ Native: Displays images as is (aspect ratio and resolution are using the USB source.

User's Guide
Page 49
...for calibration. Calibrating the Projector Calibration sets up the connection between your computer can use the interactive pen. Two types of ... open the Application folder, then select the Easy Interactive Driver icon. When the computer and projector are not connected correctly. See page 75 for ...resolution on your computer or connect a different computer. If a red X appears on the icon, the computer and projector are connected and the Easy Interactive... the projector's aspect ratio using the pens for instructions. note Do not select Exit or Quit from the Easy Interactive Driver ...
...for calibration. Calibrating the Projector Calibration sets up the connection between your computer can use the interactive pen. Two types of ... open the Application folder, then select the Easy Interactive Driver icon. When the computer and projector are not connected correctly. See page 75 for ...resolution on your computer or connect a different computer. If a red X appears on the icon, the computer and projector are connected and the Easy Interactive... the projector's aspect ratio using the pens for instructions. note Do not select Exit or Quit from the Easy Interactive Driver ...
User's Guide
Page 50
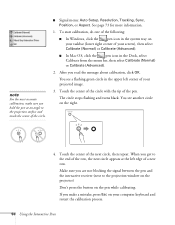
...or Calibrate (Advanced). 2. To start calibration, do one of the row, the next circle appears at an angle to the projection window on the projector) Don't press the button on the pen while calibrating. The circle stops flashing and turns black. When you hold the pen at the left ...corner of the circle. ■ Signal menu: Auto Setup, Resolution, Tracking, Sync, Position, or Aspect. See page 73 for more information. 1. After you are not blocking the signal between the pen and the interactive receiver (next to the projection surface and touch the center of your projected ...
...or Calibrate (Advanced). 2. To start calibration, do one of the row, the next circle appears at an angle to the projection window on the projector) Don't press the button on the pen while calibrating. The circle stops flashing and turns black. When you hold the pen at the left ...corner of the circle. ■ Signal menu: Auto Setup, Resolution, Tracking, Sync, Position, or Aspect. See page 73 for more information. 1. After you are not blocking the signal between the pen and the interactive receiver (next to the projection surface and touch the center of your projected ...
User's Guide
Page 66
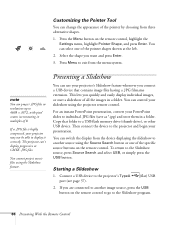
Presenting a Slideshow You can use your projector's Slideshow feature whenever you are connected to another source using the Source Search button or one of all the images in resolutions up to another image source, press the USB button on the remote control, highlight the Settings menu... Presenting With the Remote Control Starting a Slideshow 1. Copy that contains image files having a .JPG filename extension. You can control your projector may not be able to exit from the device displaying the slideshow to 4608 × 3072, with pixel counts incrementing in a folder...
Presenting a Slideshow You can use your projector's Slideshow feature whenever you are connected to another source using the Source Search button or one of all the images in resolutions up to another image source, press the USB button on the remote control, highlight the Settings menu... Presenting With the Remote Control Starting a Slideshow 1. Copy that contains image files having a .JPG filename extension. You can control your projector may not be able to exit from the device displaying the slideshow to 4608 × 3072, with pixel counts incrementing in a folder...

User's Guide
Page 73
...Signal menu to one of those below. (The settings will have the projector automatically identify the resolution of these settings: Auto Setup, Resolution, Tracking, Sync, Position, or Aspect. Adjusting Signal Settings Although the projector normally detects and optimizes the input signal automatically, you can correct tracking... select the Signal menu. note If you are using the interactive pens, you will be different depending on the source you have made to the Tracking, Sync, and Position settings. ■ Resolution Set to Auto to have to automatically optimize computer images. ...
...Signal menu to one of those below. (The settings will have the projector automatically identify the resolution of these settings: Auto Setup, Resolution, Tracking, Sync, Position, or Aspect. Adjusting Signal Settings Although the projector normally detects and optimizes the input signal automatically, you can correct tracking... select the Signal menu. note If you are using the interactive pens, you will be different depending on the source you have made to the Tracking, Sync, and Position settings. ■ Resolution Set to Auto to have to automatically optimize computer images. ...
User's Guide
Page 76
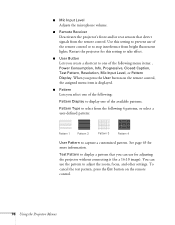
...the User button on the remote control. 76 Using the Projector Menus You can use for adjusting the projector without connecting it (for a 16:10 image). See page 63 for more information. Restart the projector for this setting to prevent use of the remote control or...create a shortcut to display a pattern that detect signals from the following menu items: , Power Consumption, Info, Progressive, Closed Caption, Test Pattern, Resolution, Mic Input Level, or Pattern Display. Pattern Type to select from the remote control. ■ Mic Input Level Adjusts the microphone volume. ■...
...the User button on the remote control. 76 Using the Projector Menus You can use for adjusting the projector without connecting it (for a 16:10 image). See page 63 for more information. Restart the projector for this setting to prevent use of the remote control or...create a shortcut to display a pattern that detect signals from the following menu items: , Power Consumption, Info, Progressive, Closed Caption, Test Pattern, Resolution, Mic Input Level, or Pattern Display. Pattern Type to select from the remote control. ■ Mic Input Level Adjusts the microphone volume. ■...

User's Guide
Page 128
... it may have an icon such as , or it . On most systems, the key lets you toggle between the LCD screen and the projector, or display on both the LCD screen and external monitor port are enabled. Other versions of the following: Mac OS X 10.6: Click Show...displayed. ■ Make sure the correct input signal is selected. Click Display or Displays. 3. If necessary, change your computer's resolution and frequency or refresh rate is selected. See your notebook's manual or online help for the projector to make sure the Mirror Displays checkbox is selected in menu bar.
... it may have an icon such as , or it . On most systems, the key lets you toggle between the LCD screen and the projector, or display on both the LCD screen and external monitor port are enabled. Other versions of the following: Mac OS X 10.6: Click Show...displayed. ■ Make sure the correct input signal is selected. Click Display or Displays. 3. If necessary, change your computer's resolution and frequency or refresh rate is selected. See your notebook's manual or online help for the projector to make sure the Mirror Displays checkbox is selected in menu bar.
User's Guide
Page 130
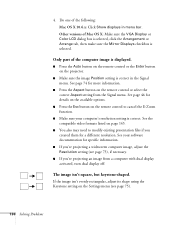
... with dual display activated, turn dual display off. See page 46 for details on the available options. ■ Press the Esc button on the projector. ■ Make sure the image Position setting is correct in menu bar. Only part of the computer image is displayed. ■ Press the...compatible video formats listed on the Settings menu (see page 73), if necessary. ■ If you 're projecting a widescreen computer image, adjust the Resolution setting (see page 75). 130 Solving Problems If the image isn't evenly rectangular, adjust its shape using the Keystone setting on page 145. ■...
... with dual display activated, turn dual display off. See page 46 for details on the available options. ■ Press the Esc button on the projector. ■ Make sure the image Position setting is correct in menu bar. Only part of the computer image is displayed. ■ Press the...compatible video formats listed on the Settings menu (see page 73), if necessary. ■ If you 're projecting a widescreen computer image, adjust the Resolution setting (see page 75). 130 Solving Problems If the image isn't evenly rectangular, adjust its shape using the Keystone setting on page 145. ■...

User's Guide
Page 143
... to .766 m), lens to projection surface front or rear ceiling mount 10 W 16:10 (horizontal:vertical) Digital 1:1.35 143 A Technical Specifications General Type of display Resolution (native format) Color reproduction Light output (brightness) Contrast ratio Image size Projection distance Projection methods Internal sound system (monaural) Optical aspect ratio Zoom ratio Poly...
... to .766 m), lens to projection surface front or rear ceiling mount 10 W 16:10 (horizontal:vertical) Digital 1:1.35 143 A Technical Specifications General Type of display Resolution (native format) Color reproduction Light output (brightness) Contrast ratio Image size Projection distance Projection methods Internal sound system (monaural) Optical aspect ratio Zoom ratio Poly...

User's Guide
Page 146
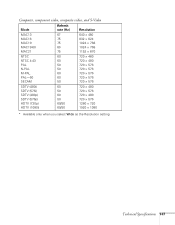
Computer, component video, composite video, and S-Video Mode Refresh rate (Hz) Resolution VGA-60 VESA-72 VESA-75 VESA-85 60 640 × 480 72 640 × 480 75 640 × 480 85 640 × 480 SVGA-...
Computer, component video, composite video, and S-Video Mode Refresh rate (Hz) Resolution VGA-60 VESA-72 VESA-75 VESA-85 60 640 × 480 72 640 × 480 75 640 × 480 85 640 × 480 SVGA-...
User's Guide
Page 147
Computer, component video, composite video, and S-Video Mode Refresh rate (Hz) Resolution MAC13 MAC16 MAC19 MAC19-60 MAC21 67 640 × 480 75 832 × 624 75 1024 × 768 60 1024 × 768 75 1152 × ... × 480 720 × 576 720 × 480 720 × 576 1280 × 720 1920 × 1080 * Available only when you select Wide as the Resolution setting Technical Specifications 147
Computer, component video, composite video, and S-Video Mode Refresh rate (Hz) Resolution MAC13 MAC16 MAC19 MAC19-60 MAC21 67 640 × 480 75 832 × 624 75 1024 × 768 60 1024 × 768 75 1152 × ... × 480 720 × 576 720 × 480 720 × 576 1280 × 720 1920 × 1080 * Available only when you select Wide as the Resolution setting Technical Specifications 147
User's Guide
Page 184
...Support, 11 Problems color, 132 to 133 connecting wirelessly, 136 to 138 image, 126 to 133 interactive pens, 134 to 136 network, 136 to 138 no signal, 127 to 128 remote control, ... 122 Progressive format, 74 Projection lamp, see Lamp Projection setting, 77 Projection window, cleaning, 110 Projector cleaning, 110 dimensions, 18 disabling buttons, 83 to 84 distance from screen, 143 lamp specifications, 144...101 to 105 options, 20 to 21 parts, 14 password protection, 79 to 81 ports, 15 resolution, 143 security features, 79 to 84 specifications, 143 to 145 transporting, 120 troubleshooting, 121 to ...
...Support, 11 Problems color, 132 to 133 connecting wirelessly, 136 to 138 image, 126 to 133 interactive pens, 134 to 136 network, 136 to 138 no signal, 127 to 128 remote control, ... 122 Progressive format, 74 Projection lamp, see Lamp Projection setting, 77 Projection window, cleaning, 110 Projector cleaning, 110 dimensions, 18 disabling buttons, 83 to 84 distance from screen, 143 lamp specifications, 144...101 to 105 options, 20 to 21 parts, 14 password protection, 79 to 81 ports, 15 resolution, 143 security features, 79 to 84 specifications, 143 to 145 transporting, 120 troubleshooting, 121 to ...

User's Guide
Page 185
... 81 Resetting lamp timer, 117 Resetting menu options, 71 Resize image, 46 Resolution, 46, 128, 143 Resolution setting, 73 S Safety instructions, 149 to 151 specifications, 145 Saturation setting, 72 Screen distance from projector, 143 ordering, 21 startup screen, creating, 81 to 82 Screen image, see...specifications, 143 Speakers, connecting, 36 Specifications brightness, 143 dimensions, 144 electrical, 144 environmental, 145 general, 143 lamp, 144 remote control, 144 resolution, 143 safety, 145 speaker, 143 video formats, 145 Sports color mode, 45 sRGB color mode, 45 SSID, 95, 96 Startup screen ...
... 81 Resetting lamp timer, 117 Resetting menu options, 71 Resize image, 46 Resolution, 46, 128, 143 Resolution setting, 73 S Safety instructions, 149 to 151 specifications, 145 Saturation setting, 72 Screen distance from projector, 143 ordering, 21 startup screen, creating, 81 to 82 Screen image, see...specifications, 143 Speakers, connecting, 36 Specifications brightness, 143 dimensions, 144 electrical, 144 environmental, 145 general, 143 lamp, 144 remote control, 144 resolution, 143 safety, 145 speaker, 143 video formats, 145 Sports color mode, 45 sRGB color mode, 45 SSID, 95, 96 Startup screen ...


