
Technical Brief (Impact Printers)
Page 2
... the forms stay properly aligned. LL Functionality-Paper handling Versatile paper handling allows EPSON impact printers to tear off and top of the print head and enhances printing with 360 dpi in a single pass of form adjustment (which allows more connectivity compatibility. Most EPSON impact printers also offer an IBM emulation, which allows you better control when...
... the forms stay properly aligned. LL Functionality-Paper handling Versatile paper handling allows EPSON impact printers to tear off and top of the print head and enhances printing with 360 dpi in a single pass of form adjustment (which allows more connectivity compatibility. Most EPSON impact printers also offer an IBM emulation, which allows you better control when...
Technical Brief (Impact Printers)
Page 6
...print head EPSON Sales Training EPSON is a registered trademark of Seiko Epson Corporation. 1/00 Other trademarks are the property of extended use and extreme temperature changes L L Easy to every sale 5 Reliability-Ribbon cartridge reliability Most EPSON impact printers use a stationary ribbon cartridge. L EPSON...print speeds. Technical Brief-Multimedia projectors Page 6 Reliability-Ribbon quality EPSON brand impact printer ribbons are ... The design used in a mylar film Made of the highest grade ABS plastic Offers the highest print quality for dot matrix printers...
...print head EPSON Sales Training EPSON is a registered trademark of Seiko Epson Corporation. 1/00 Other trademarks are the property of extended use and extreme temperature changes L L Easy to every sale 5 Reliability-Ribbon cartridge reliability Most EPSON impact printers use a stationary ribbon cartridge. L EPSON...print speeds. Technical Brief-Multimedia projectors Page 6 Reliability-Ribbon quality EPSON brand impact printer ribbons are ... The design used in a mylar film Made of the highest grade ABS plastic Offers the highest print quality for dot matrix printers...

Technical Brief (Impact Printers)
Page 7
LL Reliability-Off-carriage motor assembly Most EPSON impact printers use an off -carriage motor allows the print head to r EPSON Sales Training EPSON is a registered trademark of lines that the printer can vary depending on printing conditions, and is less wear and tear on -carriage motor used in Mean Time Between Failures. Mean Time Between Failures estimates the...
LL Reliability-Off-carriage motor assembly Most EPSON impact printers use an off -carriage motor allows the print head to r EPSON Sales Training EPSON is a registered trademark of lines that the printer can vary depending on printing conditions, and is less wear and tear on -carriage motor used in Mean Time Between Failures. Mean Time Between Failures estimates the...
Product Information Guide
Page 1
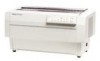
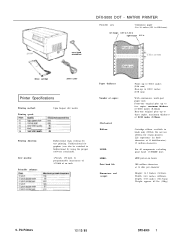
cross-head screwdriver DFX-5000 DOT - MATRIX PRINTER Printable area: Continuous paper 4 to 16 inches (101 to 406.4mm) left margin 0.51 to three copies, maximum thickness of 0.012 inches (0.30mm) Cartridge ribbon, ... to bidirectional by using the proper software command). 1/6-inch, 1/8-inch, or programmable increments of 1/216th of an inch Number of copies: Mechanical Ribbon: MCBF: MTBF: Print head life: Dimensions and weight: Front--up to 0.018 inches (0.46 mm) Rear-up to 0.012 inches (0.30 mm) With continuous, multi-part paper only: Front...
cross-head screwdriver DFX-5000 DOT - MATRIX PRINTER Printable area: Continuous paper 4 to 16 inches (101 to 406.4mm) left margin 0.51 to three copies, maximum thickness of 0.012 inches (0.30mm) Cartridge ribbon, ... to bidirectional by using the proper software command). 1/6-inch, 1/8-inch, or programmable increments of 1/216th of an inch Number of copies: Mechanical Ribbon: MCBF: MTBF: Print head life: Dimensions and weight: Front--up to 0.018 inches (0.46 mm) Rear-up to 0.012 inches (0.30 mm) With continuous, multi-part paper only: Front...

User Manual
Page 14
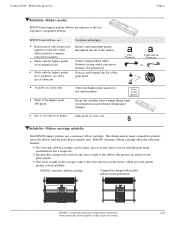
After removing the protective materials as described below, store them with the other packaging material. 1. Open the printer's top cover and remove the foam packaging material. 2. Setting Up the Printer 1-3 These protective items must be removed before you turn on the printer. Removing the protective materials The printer is protected during shipping by several pieces of the printer. Using the cross-head screwdriver, remove the carriage support bar and slide the print head to the middle of foam packaging, two brackets, and a carriage support bar.
After removing the protective materials as described below, store them with the other packaging material. 1. Open the printer's top cover and remove the foam packaging material. 2. Setting Up the Printer 1-3 These protective items must be removed before you turn on the printer. Removing the protective materials The printer is protected during shipping by several pieces of the printer. Using the cross-head screwdriver, remove the carriage support bar and slide the print head to the middle of foam packaging, two brackets, and a carriage support bar.

User Manual
Page 21
... ribbon cartridge and attach the power cord. let it cool for a few minutes before touching it. 1-10 Setting Up the Printer Also, if you have been using the printer, the print head may be hot; Installing the ribbon cartridge Before installing the ribbon cartridge, make sure the... printer is turned on because this can damage the printer. Remove the ribbon cartridge from its front edge up and away from you. Assembling the Printer Since the printer comes almost...
... ribbon cartridge and attach the power cord. let it cool for a few minutes before touching it. 1-10 Setting Up the Printer Also, if you have been using the printer, the print head may be hot; Installing the ribbon cartridge Before installing the ribbon cartridge, make sure the... printer is turned on because this can damage the printer. Remove the ribbon cartridge from its front edge up and away from you. Assembling the Printer Since the printer comes almost...

User Manual
Page 22
Slide the print head to take up any slack in the ribbon. 2. Remove the plastic separator from the middle of the ribbon cartridge. (You will not need the separator again and can discard it.) Next, detach the ribbon guide from the cartridge and turn the ribbon-tightening knob in the direction of the arrow to the middle of the printer. 3.
Slide the print head to take up any slack in the ribbon. 2. Remove the plastic separator from the middle of the ribbon cartridge. (You will not need the separator again and can discard it.) Next, detach the ribbon guide from the cartridge and turn the ribbon-tightening knob in the direction of the arrow to the middle of the printer. 3.

User Manual
Page 24
Insert the ribbon guide over the metal pins on top, with its angled edge toward the platen. 6. Slide the print head from side to side to remove any slack in the ribbon. 7. Turn the ribbon-tightening knob again to see that it moves smoothly and that the ribbon is not twisted or creased. The smaller end of the guide should be on each side of the print head as shown below.
Insert the ribbon guide over the metal pins on top, with its angled edge toward the platen. 6. Slide the print head from side to side to remove any slack in the ribbon. 7. Turn the ribbon-tightening knob again to see that it moves smoothly and that the ribbon is not twisted or creased. The smaller end of the guide should be on each side of the print head as shown below.

User Manual
Page 27
Loading paper for I. To load paper, follow these steps: WARNING: Use paper that is at least 15 inches wide for the self test Next, you need to keep the print head from printing directly 77 onto the platen. 1. WARNING: Whenever you turn off the power, wait at least five seconds before turning it back on and off can damage the printer. the self test to load continuous paper that is at least 15 inches wide. Open the printer's front cover by lifting its bottom edge up and toward you, as shown below. Rapid switching on .
Loading paper for I. To load paper, follow these steps: WARNING: Use paper that is at least 15 inches wide for the self test Next, you need to keep the print head from printing directly 77 onto the platen. 1. WARNING: Whenever you turn off the power, wait at least five seconds before turning it back on and off can damage the printer. the self test to load continuous paper that is at least 15 inches wide. Open the printer's front cover by lifting its bottom edge up and toward you, as shown below. Rapid switching on .

User Manual
Page 32
... SELECT indicator lights up. Setting Up the Printer 1-21 Turn on the printer, be selected. Press the LINE FEED/LOAD button to load your paper. (If the paper does not load, the front tractor may seriously damage the mechanism. 10. The print head moves to select the front tractor. After ...the paper loads, turn off the printer. c 7 11. Also, either the front or rear tractor arrow on . This loads the paper automatically.) 12...
... SELECT indicator lights up. Setting Up the Printer 1-21 Turn on the printer, be selected. Press the LINE FEED/LOAD button to load your paper. (If the paper does not load, the front tractor may seriously damage the mechanism. 10. The print head moves to select the front tractor. After ...the paper loads, turn off the printer. c 7 11. Also, either the front or rear tractor arrow on . This loads the paper automatically.) 12...

User Manual
Page 51
Check the PAPER SELECT indicator to see which tractor is selected: l If the front tractor indicator arrow is lit up , depending on which tractor was selected when the printer was turned off last. 12. Also, either the front or rear tractor arrow on the PAPER SELECT indicator lights up , press the LINE FEED/LOAD button to the middle of the printer and the POWER and PAPER OUT lights go on the printer. Turn on . The print head moves to load the paper. 2-8 Loading and Using Paper 11.
Check the PAPER SELECT indicator to see which tractor is selected: l If the front tractor indicator arrow is lit up , depending on which tractor was selected when the printer was turned off last. 12. Also, either the front or rear tractor arrow on the PAPER SELECT indicator lights up , press the LINE FEED/LOAD button to the middle of the printer and the POWER and PAPER OUT lights go on the printer. Turn on . The print head moves to load the paper. 2-8 Loading and Using Paper 11.

User Manual
Page 58
The paper is now loaded to the middle of the printer and the POWER and PAPER OUT lights go on. Also, either the front or rear tractor arrow on the PAPER SELECT indicator lights up, depending on the printer. The print head moves to the standby position. 13. 12. Close the top cover and the back flap. Turn on which tractor was selected when the printer was turned off last. _._ Loading and Using Paper 2-15
The paper is now loaded to the middle of the printer and the POWER and PAPER OUT lights go on. Also, either the front or rear tractor arrow on the PAPER SELECT indicator lights up, depending on the printer. The print head moves to the standby position. 13. 12. Close the top cover and the back flap. Turn on which tractor was selected when the printer was turned off last. _._ Loading and Using Paper 2-15

User Manual
Page 73
...a clean straight edge and does not separate or tear apart. WARNING: When printing on multi-part forms or labels, be absolutely sure that your text on the page can be critical. Printing on Special Paper The DFX-5000 can use multi-part forms with up to four sheets, including the original... labels. On the front tractor, you can also handle a variety of paper thicknesses, from thin paper to six-part forms. The printer automatically adjusts to the print head. When you load any other type of the paper to prevent damage to the thickness of your text, see Appendix B. See Chapter...
...a clean straight edge and does not separate or tear apart. WARNING: When printing on multi-part forms or labels, be absolutely sure that your text on the page can be critical. Printing on Special Paper The DFX-5000 can use multi-part forms with up to four sheets, including the original... labels. On the front tractor, you can also handle a variety of paper thicknesses, from thin paper to six-part forms. The printer automatically adjusts to the print head. When you load any other type of the paper to prevent damage to the thickness of your text, see Appendix B. See Chapter...

User Manual
Page 77
... form mode. The TOP OF FORM light comes on when the printer is in the standby position. The rear tractor arrow comes on when the front tractor is selected. This light goes on whenever there is no paper positioned behind the print head, even if there is paper loaded on the tractors in... the top of paper. The ON LINE light comes on when the printer is on line and ready to receive and print data from your computer. 'aTEAROF The TEAR OFF light comes...
... form mode. The TOP OF FORM light comes on when the printer is in the standby position. The rear tractor arrow comes on when the front tractor is selected. This light goes on whenever there is no paper positioned behind the print head, even if there is paper loaded on the tractors in... the top of paper. The ON LINE light comes on when the printer is on line and ready to receive and print data from your computer. 'aTEAROF The TEAR OFF light comes...

User Manual
Page 101
... the characters also widens or narrows the spaces between words and letters. For example, a left margin by using double-wide characters. Condensed printing reduces the width of characters on a line, which is an example of each character. This means you can get more characters (about 65.... Note: High-speed draft is double-wide - Although condensed printing can be selected for printing headings and other hand, doubles the width of condensed and double-wide printing: This is turned off. Getting the Most from Your Printer 4-5 If you even more characters on the other text that ...
... the characters also widens or narrows the spaces between words and letters. For example, a left margin by using double-wide characters. Condensed printing reduces the width of characters on a line, which is an example of each character. This means you can get more characters (about 65.... Note: High-speed draft is double-wide - Although condensed printing can be selected for printing headings and other hand, doubles the width of condensed and double-wide printing: This is turned off. Getting the Most from Your Printer 4-5 If you even more characters on the other text that ...

User Manual
Page 102
...strike. In double-strike mode, the printer prints each character twice as the print head moves across the paper. This is selected. The second character is printed slightly to the right of emphasized and double-strike printing: This is an example of the ...temporarily switch to make the text bolder. Here is normal draft printing. This is selected. 4-6 G e t t i n g t h e M o s t f r o m Y o u r P r i n t e r Note: Double-strike is double-strike in draft mode. In emphasized mode, the DFX-5000 prints each character twice, the second time slightly below the first, to...
...strike. In double-strike mode, the printer prints each character twice as the print head moves across the paper. This is selected. The second character is printed slightly to the right of emphasized and double-strike printing: This is an example of the ...temporarily switch to make the text bolder. Here is normal draft printing. This is selected. 4-6 G e t t i n g t h e M o s t f r o m Y o u r P r i n t e r Note: Double-strike is double-strike in draft mode. In emphasized mode, the DFX-5000 prints each character twice, the second time slightly below the first, to...

User Manual
Page 112
... or electronic components. Then turn off line. Open the printer's top cover and slide the print head to clean the printer. If the printer is needed. Let it cool before attempting to take it easier for the DFX-5000. Replacing the Ribbon When your Epson dealer if you how to replace the ribbon. Unsuitable oils can damage the...
... or electronic components. Then turn off line. Open the printer's top cover and slide the print head to clean the printer. If the printer is needed. Let it cool before attempting to take it easier for the DFX-5000. Replacing the Ribbon When your Epson dealer if you how to replace the ribbon. Unsuitable oils can damage the...

User Manual
Page 113
Lift the ribbon guide off the print head as shown below . 4. Then remove the cartridge by lifting it from you. 5-4 Maintaining and Transporting the Printer 3. Pull up on the side of the ribbon cartridge as shown below to release it up and away from the printer's mounting pins.
Lift the ribbon guide off the print head as shown below . 4. Then remove the cartridge by lifting it from you. 5-4 Maintaining and Transporting the Printer 3. Pull up on the side of the ribbon cartridge as shown below to release it up and away from the printer's mounting pins.

User Manual
Page 114
Caution: Make sure you don't pull on the ribbon cartridge and turn the ribbon-tightening knob to the middle of the box, remove the separator piece from the ribbon cartridge as shown below. (This piece can be discarded.) Then detach the ribbon guide from its holder on the flat gold cable beneath the ribbon cartridge. 5. Move the print head back to remove any slack in the ribbon. After taking the new ribbon cartridge out of the printer. 6. Maintaining and Transporting the Printer 5-5
Caution: Make sure you don't pull on the ribbon cartridge and turn the ribbon-tightening knob to the middle of the box, remove the separator piece from the ribbon cartridge as shown below. (This piece can be discarded.) Then detach the ribbon guide from its holder on the flat gold cable beneath the ribbon cartridge. 5. Move the print head back to remove any slack in the ribbon. After taking the new ribbon cartridge out of the printer. 6. Maintaining and Transporting the Printer 5-5

User Manual
Page 116
The smaller end of the guide should be on each side of the print head, as shown below. Slide the print head from side to side to remove any slack in the ribbon. 10. Close the printer's top cover. Maintaining and Transporting the Printer 5-7 9. Fit the plastic ribbon guide onto the metal pins on top, with its angled edge toward the platen. Turn the ribbon-tightening knob to make sure that it moves smoothly and that the ribbon is not twisted or creased. 11.
The smaller end of the guide should be on each side of the print head, as shown below. Slide the print head from side to side to remove any slack in the ribbon. 10. Close the printer's top cover. Maintaining and Transporting the Printer 5-7 9. Fit the plastic ribbon guide onto the metal pins on top, with its angled edge toward the platen. Turn the ribbon-tightening knob to make sure that it moves smoothly and that the ribbon is not twisted or creased. 11.


