
Technical Brief (Impact Printers)
Page 1
...Reliability M Ribbon quality M Ribbon cartridge reliability M Total Print Volume vs. These printers have paper loaded and waiting. These printers have 3 numbers in fonts M Computer-based set-up to Near Letter Quality Twenty-four-pin impact printers - Reliability - EPSON impact printers are ...printers are the property of printing. or a 24-pin printer, and whether it is a registered trademark of an EPSON's impact printer tells you if it has a narrow or wide carriage: LLL L Nine-pin printers all begin with FX, LX, or DFX Twenty-four pin printers all EPSON impact printers...
...Reliability M Ribbon quality M Ribbon cartridge reliability M Total Print Volume vs. These printers have paper loaded and waiting. These printers have 3 numbers in fonts M Computer-based set-up to Near Letter Quality Twenty-four-pin impact printers - Reliability - EPSON impact printers are ...printers are the property of printing. or a 24-pin printer, and whether it is a registered trademark of an EPSON's impact printer tells you if it has a narrow or wide carriage: LLL L Nine-pin printers all begin with FX, LX, or DFX Twenty-four pin printers all EPSON impact printers...
Product Information Guide
Page 1
... copies, maximum thickness of 0.012 inches (0.30mm) Cartridge ribbon, available in black only (#8766). cross-head screwdriver DFX-5000 DOT - Do not use ribbons for text printing. Pin Printers 12/12/88 DFX-5000 1 Life expectancy (in \ \ ribbon cartridge power cable Paper thickness: Printer Specifications Printing method: Printing speed: 9-pin Impact dot matrix Printing direction: Line spacing: Printable columns: Bidirectional logic seeking...
... copies, maximum thickness of 0.012 inches (0.30mm) Cartridge ribbon, available in black only (#8766). cross-head screwdriver DFX-5000 DOT - Do not use ribbons for text printing. Pin Printers 12/12/88 DFX-5000 1 Life expectancy (in \ \ ribbon cartridge power cable Paper thickness: Printer Specifications Printing method: Printing speed: 9-pin Impact dot matrix Printing direction: Line spacing: Printable columns: Bidirectional logic seeking...

User Manual
Page 112
... damage the printer components as well as the case. Replacing the Ribbon When your Epson dealer if you to replace the ribbon. 1. Use only the #8766 Epson replacement cartridge for you think lubrication is on line, press the ON LINE button to get water on the printer mechanism or ...cool before attempting to replace the ribbon. l Be careful not to take it off the printer. 2. WARNING: If the printer has been used recently, the print head may be hot. Then turn off line. Maintaining and Transporting the Printer 5-3 Let it easier for the DFX-5000. WARNING: l Never use a...
... damage the printer components as well as the case. Replacing the Ribbon When your Epson dealer if you to replace the ribbon. 1. Use only the #8766 Epson replacement cartridge for you think lubrication is on line, press the ON LINE button to get water on the printer mechanism or ...cool before attempting to replace the ribbon. l Be careful not to take it off the printer. 2. WARNING: If the printer has been used recently, the print head may be hot. Then turn off line. Maintaining and Transporting the Printer 5-3 Let it easier for the DFX-5000. WARNING: l Never use a...

Service Manual
Page 10
A Product Description DFX-5000+ Service Manual Table 1-1. q *A simple serial interface card has no CPU; the printer processes the data from the card. 1-2 Rev. Options and Consumables I I Model Description #8309 Pull tractor unit #8766 Ribbon cartridge t #8767 , Ribbon pack I C82305* I Serial I/Fcard, simple serial interface** (SSi), inch screw I C82306* Serial I/F card, SSI, mm screw 1 I C82307' I 32KB intelligent...
A Product Description DFX-5000+ Service Manual Table 1-1. q *A simple serial interface card has no CPU; the printer processes the data from the card. 1-2 Rev. Options and Consumables I I Model Description #8309 Pull tractor unit #8766 Ribbon cartridge t #8767 , Ribbon pack I C82305* I Serial I/Fcard, simple serial interface** (SSi), inch screw I C82306* Serial I/F card, SSI, mm screw 1 I C82307' I 32KB intelligent...

Service Manual
Page 29
... information has been saved properly. Then press the PAUSE button to turn on the ribbon mask with one of the printer cover under these steps: (1) Open the printer cover. (2) Align the pointer on the printer. 6. The simple serial interface card takes precedence over the currently selected interface, it...for at the same time. When the tear off function is not being used . DFX-5000+ Service Manual 4. When the pnnthead or cooling fan is ready to print. 1.4.11 Automatic Interface Selection When the printer does not receive any data tbr the set the paper type. A 1-21 Hold down...
... information has been saved properly. Then press the PAUSE button to turn on the ribbon mask with one of the printer cover under these steps: (1) Open the printer cover. (2) Align the pointer on the printer. 6. The simple serial interface card takes precedence over the currently selected interface, it...for at the same time. When the tear off function is not being used . DFX-5000+ Service Manual 4. When the pnnthead or cooling fan is ready to print. 1.4.11 Automatic Interface Selection When the printer does not receive any data tbr the set the paper type. A 1-21 Hold down...

Service Manual
Page 35
... paper feeding mechanism uses fanfold paper, and an automatic mechanism is a 9-pin, serial, dot matrix printer mechanism developed for the DFX-5000+. Ll The DFX-5000+ includes a paper jam sensor. the ribbon mask is not attached to reduce noise. Cl To prevent paper jams, the DFX-5000+ includes a tractor wire at the front and rear tractors. The structural differences between...
... paper feeding mechanism uses fanfold paper, and an automatic mechanism is a 9-pin, serial, dot matrix printer mechanism developed for the DFX-5000+. Ll The DFX-5000+ includes a paper jam sensor. the ribbon mask is not attached to reduce noise. Cl To prevent paper jams, the DFX-5000+ includes a tractor wire at the front and rear tractors. The structural differences between...
Service Manual
Page 40
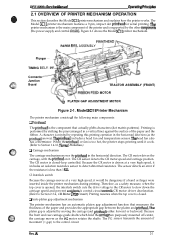
DFx-5tW(h Sewka Manual Oparathg Prfncipka 2.1 OVERVIEW OF PRINTER MECHANISM OPERATION This section describes the Model 3C11 printer mechanism and explains how the printer works. The Model 3C11 printer mechanism features a 9-pin, impact dot printhead for serial printing. A control circuit controIs CR motor driver...cools. (Refer to the control circuit. LI Auto platen gap adjustment mechanism The printer mechanism has an automatic platen gap adjustment function that actually pMts characters (dot matrix patterns). A character is closed . The CR motor drives the carriage, with ...
DFx-5tW(h Sewka Manual Oparathg Prfncipka 2.1 OVERVIEW OF PRINTER MECHANISM OPERATION This section describes the Model 3C11 printer mechanism and explains how the printer works. The Model 3C11 printer mechanism features a 9-pin, impact dot printhead for serial printing. A control circuit controIs CR motor driver...cools. (Refer to the control circuit. LI Auto platen gap adjustment mechanism The printer mechanism has an automatic platen gap adjustment function that actually pMts characters (dot matrix patterns). A character is closed . The CR motor drives the carriage, with ...

Service Manual
Page 41
... or ejected or when the tear off function is equipped with a paper jam sensor. Operating Principles DFX-5000+ Service Manual Cl Ribbon feed mechanism The printer's ribbon cartridge contains an endless ribbon. The front, rear, and top PE sensors detect whether paper is conveyed via a series of ...the ribbon feed mechanism. The control circuit reads the signals from the PF motor is present in the vertical...
... or ejected or when the tear off function is equipped with a paper jam sensor. Operating Principles DFX-5000+ Service Manual Cl Ribbon feed mechanism The printer's ribbon cartridge contains an endless ribbon. The front, rear, and top PE sensors detect whether paper is conveyed via a series of ...the ribbon feed mechanism. The control circuit reads the signals from the PF motor is present in the vertical...

Service Manual
Page 77
... itfrom the botiom. Because the DFX-5000+ weighs 29.0 kg (63.8 lb) and is much larger and heavier than most printers, you disassemble, assemble, or transport the printer. Attaching the Packing Materials 0,. ..-,.. Never lifi the printer by holding the front cover, because it . Before transporting the printer, remove the paper and ribbon cartridge. Then attach the following...
... itfrom the botiom. Because the DFX-5000+ weighs 29.0 kg (63.8 lb) and is much larger and heavier than most printers, you disassemble, assemble, or transport the printer. Attaching the Packing Materials 0,. ..-,.. Never lifi the printer by holding the front cover, because it . Before transporting the printer, remove the paper and ribbon cartridge. Then attach the following...

Service Manual
Page 78
..., and then remove the paper and ribbon cartridge. Figure 3-2. Discomect the printer from the printer and the wall outlet. If you may be damaged during maintenance or repair work.) Also, be sure to turn it may need to clean the printer as shown in Chapter 6. 3-2 Rev. Disassembly and Assembly DFX-5000+ Service Manual After attaching the...
..., and then remove the paper and ribbon cartridge. Figure 3-2. Discomect the printer from the printer and the wall outlet. If you may be damaged during maintenance or repair work.) Also, be sure to turn it may need to clean the printer as shown in Chapter 6. 3-2 Rev. Disassembly and Assembly DFX-5000+ Service Manual After attaching the...

Service Manual
Page 84
Cl Tighten the screws while pulling the printhead backward to the bottom plate of the printer mechanism. 6. Disengage the printhead with the PW sensor and the masldess holder. Removing the Printhead Q When you install the printhead... Remove the 2 CPN (M3 x 8) screws securing the FPC cover to secure the printheadjirmly. Ribbon Fee BOARD TRACTOR ASSEMBLY (REAR) Figure 3-8. When you install the printhead, torque the screws to the carriage. Disassembly and Assembly DFX-5000+ Service Manual 5. Remove the 2 FPC printhead cables from the connector junction board on the bottom...
Cl Tighten the screws while pulling the printhead backward to the bottom plate of the printer mechanism. 6. Disengage the printhead with the PW sensor and the masldess holder. Removing the Printhead Q When you install the printhead... Remove the 2 CPN (M3 x 8) screws securing the FPC cover to secure the printheadjirmly. Ribbon Fee BOARD TRACTOR ASSEMBLY (REAR) Figure 3-8. When you install the printhead, torque the screws to the carriage. Disassembly and Assembly DFX-5000+ Service Manual 5. Remove the 2 FPC printhead cables from the connector junction board on the bottom...

Service Manual
Page 100
...damper from the front/rear tractor select lever assembly. RIBBON FEED MOTOR FRAME ,. ,/" " = "'~.' '>. ., 2 CPN (M3x6) k z•• Figure 3-31. Release the 3 hooks securing the RF motor gear cover to disassemble the printer mechanism. On the connector junction board assembly, disconnect... 5. Then remove the lever assembly from the printer as described in Section 3.2.6. 3.2.7.1 Removing the Front/Rear Tractor Select Lever Assembly 1. Disassembly and Assembly DFX-5000+ Service Manual 3.2.7 Printer Mechanism Disassembly This section describes how to the ...
...damper from the front/rear tractor select lever assembly. RIBBON FEED MOTOR FRAME ,. ,/" " = "'~.' '>. ., 2 CPN (M3x6) k z•• Figure 3-31. Release the 3 hooks securing the RF motor gear cover to disassemble the printer mechanism. On the connector junction board assembly, disconnect... 5. Then remove the lever assembly from the printer as described in Section 3.2.6. 3.2.7.1 Removing the Front/Rear Tractor Select Lever Assembly 1. Disassembly and Assembly DFX-5000+ Service Manual 3.2.7 Printer Mechanism Disassembly This section describes how to the ...

Service Manual
Page 134
... by pressing the TEAR OFF and MICRO FEED (v) switches simultaneously. (At this time, the buzzer beeps the 2 sounds.) 5. Turn the printer on while pressing the TEAR OFF, MICRO FEED (v), and FRONT/REAR switches. (At this time, the adjustment state shifts to decrement the ...) 11. Press the MICRO FEED (v) switch to the BETA value adjustment. ) Remove the ribbon cartridge. 8. Adjustment DFX-5000+ Sewice Manual print 1. Remove the ribbon cartridge, and the paper from the printer. Then remove the head for confirm the ALPHA value written on the printhead into the space ...
... by pressing the TEAR OFF and MICRO FEED (v) switches simultaneously. (At this time, the buzzer beeps the 2 sounds.) 5. Turn the printer on while pressing the TEAR OFF, MICRO FEED (v), and FRONT/REAR switches. (At this time, the adjustment state shifts to decrement the ...) 11. Press the MICRO FEED (v) switch to the BETA value adjustment. ) Remove the ribbon cartridge. 8. Adjustment DFX-5000+ Sewice Manual print 1. Remove the ribbon cartridge, and the paper from the printer. Then remove the head for confirm the ALPHA value written on the printhead into the space ...

Service Manual
Page 136
...it can not pe?form the Bi-D adjustment. Write the Bi-D value into the memory. - Adjustment DFX-5000+ Service Manual 1. Press the PAUSE switch and then press the LF/FF switch to 12) for adjust ... to feed the continuous paper. 4. Press the MJCRO FEED(A) switch to the paper. Mount the ribbon cartridge. 2. Press the PAUSE switch and then press the LF/FF switch to print the current ...then press the LF/FF switch to print the current BETA value automatically. 5. Since this time, the printer shifts the standby mode and the no paper state.) 3. Due to shift an even number toward right...
...it can not pe?form the Bi-D adjustment. Write the Bi-D value into the memory. - Adjustment DFX-5000+ Service Manual 1. Press the PAUSE switch and then press the LF/FF switch to 12) for adjust ... to feed the continuous paper. 4. Press the MJCRO FEED(A) switch to the paper. Mount the ribbon cartridge. 2. Press the PAUSE switch and then press the LF/FF switch to print the current ...then press the LF/FF switch to print the current BETA value automatically. 5. Since this time, the printer shifts the standby mode and the no paper state.) 3. Due to shift an even number toward right...

Service Manual
Page 162
....) Replace the printhead. Printer Mechanism Repair (continued) Symptom A particular dot does not print. Printing is defective. Check backlash between PF motor pinion gear and paper feed reduction gear. DFX-5000+ Service Manual Troubleshooting Table 5-7. Check whether a dot wire is not driving the gear properly. The PF motor is worn. Check whether the ribbon driving gear rotates...
....) Replace the printhead. Printer Mechanism Repair (continued) Symptom A particular dot does not print. Printing is defective. Check backlash between PF motor pinion gear and paper feed reduction gear. DFX-5000+ Service Manual Troubleshooting Table 5-7. Check whether a dot wire is not driving the gear properly. The PF motor is worn. Check whether the ribbon driving gear rotates...


