
Technical Brief (Impact Printers)
Page 1
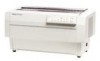
...handling - Impact printers are the property of an EPSON's impact printer tells you if it has a narrow or wide carriage: LLL L Nine-pin printers all begin with FX, LX, or DFX Twenty-four pin printers all have 3 numbers in their respective owners. These printers have finer printhead...-based set-up to Letter Quality LLL The name of their names EPSON Sales Training EPSON is a 9- only impact printers can all begin with tireless printheads and superior quality ribbons. Reliability - These printers have the sturdiest printhead pins which : Hit the paper less hard to...
...handling - Impact printers are the property of an EPSON's impact printer tells you if it has a narrow or wide carriage: LLL L Nine-pin printers all begin with FX, LX, or DFX Twenty-four pin printers all have 3 numbers in their respective owners. These printers have finer printhead...-based set-up to Letter Quality LLL The name of their names EPSON Sales Training EPSON is a 9- only impact printers can all begin with tireless printheads and superior quality ribbons. Reliability - These printers have the sturdiest printhead pins which : Hit the paper less hard to...
Technical Brief (Impact Printers)
Page 6
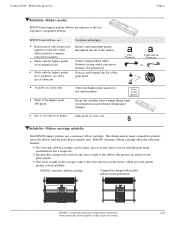
... dot matrix printers Ultra Letter Quality Keeps the cartridge from warping during times of extended use a stationary ribbon cartridge. This lower weight on the carriage reduces the wear and tear on the print head EPSON Sales Training EPSON is a registered trademark of Seiko Epson .... Technical Brief-Multimedia projectors Page 6 Reliability-Ribbon quality EPSON brand impact printer ribbons are ... Because the carriage does not have to the less expensive compatible ribbons. L EPSON brand ribbons are superior to move the ribbon with smaller ribbon on the motor, which can jam or ...
... dot matrix printers Ultra Letter Quality Keeps the cartridge from warping during times of extended use a stationary ribbon cartridge. This lower weight on the carriage reduces the wear and tear on the print head EPSON Sales Training EPSON is a registered trademark of Seiko Epson .... Technical Brief-Multimedia projectors Page 6 Reliability-Ribbon quality EPSON brand impact printer ribbons are ... Because the carriage does not have to the less expensive compatible ribbons. L EPSON brand ribbons are superior to move the ribbon with smaller ribbon on the motor, which can jam or ...
Product Information Guide
Page 1
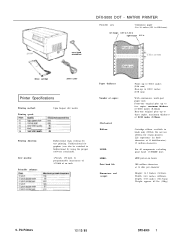
...) left margin 0.51 to three copies, maximum thickness of 0.012 inches (0.30mm) Cartridge ribbon, available in black only (#8766). Pin Printers 12/12/88 DFX-5000 1 Life expectancy (in \ \ ribbon cartridge power cable Paper thickness: Printer Specifications Printing method: Printing speed: 9-pin Impact dot matrix Printing direction: Line spacing: Printable columns: Bidirectional logic seeking for text printing. Do...
...) left margin 0.51 to three copies, maximum thickness of 0.012 inches (0.30mm) Cartridge ribbon, available in black only (#8766). Pin Printers 12/12/88 DFX-5000 1 Life expectancy (in \ \ ribbon cartridge power cable Paper thickness: Printer Specifications Printing method: Printing speed: 9-pin Impact dot matrix Printing direction: Line spacing: Printable columns: Bidirectional logic seeking for text printing. Do...

User Manual
Page 7
Maintaining and Transporting the Printer 5-1 Cleaning the Printer 5-2 Replacing the Ribbon 5-3 Transporting the Printer 5-8 Using the Printer Options 6-1 Using the Pull Tractor 6-2 Using Interface Boards 6-16 Troubleshooting 7-1 Problems and Solutions 7-2 Data Dump Mode 7-6 Command Summary 8-1 Using the Command Summary 8-2 Commands in Numerical ...
Maintaining and Transporting the Printer 5-1 Cleaning the Printer 5-2 Replacing the Ribbon 5-3 Transporting the Printer 5-8 Using the Printer Options 6-1 Using the Pull Tractor 6-2 Using Interface Boards 6-16 Troubleshooting 7-1 Problems and Solutions 7-2 Data Dump Mode 7-6 Command Summary 8-1 Using the Command Summary 8-2 Commands in Numerical ...

User Manual
Page 12
... the parts 1-2 Removing the protective materials 1-3 Choosing a Place for the Printer 1-4 A Look at Your Printer 1-6 The printer parts 1-7 Control panel indicator lights 1-8 Control panel buttons 1-9 Assembling the Printer 1-10 Installing the ribbon cartridge 1-10 Attaching the power cable 1-14 Testing the Printer 1-15 Plugging in the printer 1-15 Loading paper for the self test 1-16 Running the...
... the parts 1-2 Removing the protective materials 1-3 Choosing a Place for the Printer 1-4 A Look at Your Printer 1-6 The printer parts 1-7 Control panel indicator lights 1-8 Control panel buttons 1-9 Assembling the Printer 1-10 Installing the ribbon cartridge 1-10 Attaching the power cable 1-14 Testing the Printer 1-15 Plugging in the printer 1-15 Loading paper for the self test 1-16 Running the...

User Manual
Page 13
Checking the parts Check to transport the printer. 1-2 Setting Up the Printer cross-head screwdriver connector lock nuts ribbon cartridge power cable After you unpack the printer, store the packaging materials in case you ever need to see that you should carry it by the bottom. Unpacking the Printer Because the printer weighs approximately 65 pounds, you have the parts shown below and that nothing has been damaged during transportation. Two people should not lift or carry it by yourself.
Checking the parts Check to transport the printer. 1-2 Setting Up the Printer cross-head screwdriver connector lock nuts ribbon cartridge power cable After you unpack the printer, store the packaging materials in case you ever need to see that you should carry it by the bottom. Unpacking the Printer Because the printer weighs approximately 65 pounds, you have the parts shown below and that nothing has been damaged during transportation. Two people should not lift or carry it by yourself.

User Manual
Page 21
...on because this can damage the printer. let it cool for a few minutes before touching it. 1-10 Setting Up the Printer Assembling the Printer Since the printer comes almost completely assembled from you. Also, if you need to install the ribbon cartridge: 1. WARNING: Never ...move the print head while the printer is install the ribbon cartridge and attach the power cord. Installing the ribbon cartridge Before installing the ribbon cartridge, make sure the printer is turned off. Remove the ribbon cartridge from its front...
...on because this can damage the printer. let it cool for a few minutes before touching it. 1-10 Setting Up the Printer Assembling the Printer Since the printer comes almost completely assembled from you. Also, if you need to install the ribbon cartridge: 1. WARNING: Never ...move the print head while the printer is install the ribbon cartridge and attach the power cord. Installing the ribbon cartridge Before installing the ribbon cartridge, make sure the printer is turned off. Remove the ribbon cartridge from its front...

User Manual
Page 22
Slide the print head to the middle of the arrow to take up any slack in the ribbon. Remove the plastic separator from the middle of the ribbon cartridge. (You will not need the separator again and can discard it.) Next, detach the ribbon guide from the cartridge and turn the ribbon-tightening knob in the direction of the printer. 3. 2.
Slide the print head to the middle of the arrow to take up any slack in the ribbon. Remove the plastic separator from the middle of the ribbon cartridge. (You will not need the separator again and can discard it.) Next, detach the ribbon guide from the cartridge and turn the ribbon-tightening knob in the direction of the printer. 3. 2.

User Manual
Page 23
Hold the ribbon cartridge with both sides of the cartridge to make sure the hooks are properly inserted. 1-12 Setting Up the Printer Press lightly on both hands and lower it into place over the corresponding two pins in the printer. 5. Then push the cartridge down into position until the other two hooks snap into the printer as shown below. 4. Pulling the cartridge toward you, slide the hooks nearest you over the mounting pins in the printer.
Hold the ribbon cartridge with both sides of the cartridge to make sure the hooks are properly inserted. 1-12 Setting Up the Printer Press lightly on both hands and lower it into place over the corresponding two pins in the printer. 5. Then push the cartridge down into position until the other two hooks snap into the printer as shown below. 4. Pulling the cartridge toward you, slide the hooks nearest you over the mounting pins in the printer.

User Manual
Page 24
The smaller end of the print head as shown below. Slide the print head from side to side to remove any slack in the ribbon. 7. Insert the ribbon guide over the metal pins on each side of the guide should be on top, with its angled edge toward the platen. 6. Turn the ribbon-tightening knob again to see that it moves smoothly and that the ribbon is not twisted or creased.
The smaller end of the print head as shown below. Slide the print head from side to side to remove any slack in the ribbon. 7. Insert the ribbon guide over the metal pins on each side of the guide should be on top, with its angled edge toward the platen. 6. Turn the ribbon-tightening knob again to see that it moves smoothly and that the ribbon is not twisted or creased.

User Manual
Page 60
... change the top of form position by adjusting the position when you are loaded in the middle of a page (see the next section). Also, the printer advances the paper so that the top of form position is lined up ). Labels must never be lit up with the red line on the... clear plastic ribbon mask. The printer beeps once, and the TOP OF FORM light starts flashing. The following the steps outlined below. Press the TOP OF FORM button to reset...
... change the top of form position by adjusting the position when you are loaded in the middle of a page (see the next section). Also, the printer advances the paper so that the top of form position is lined up ). Labels must never be lit up with the red line on the... clear plastic ribbon mask. The printer beeps once, and the TOP OF FORM light starts flashing. The following the steps outlined below. Press the TOP OF FORM button to reset...

User Manual
Page 61
... the MICRO FEED buttons to feed the paper to the desired top of form position. 00i Note: The red line on the ribbon mask can be used as a reference only when you want to exit the top of form mode and save your new top of form position. (...If you are in the top of form position is based on the ribbon mask shows you where the bottom edge of your software inserts a top margin of the TOP OF FORM button.) 2-18 Loading and Using Paper At...
... the MICRO FEED buttons to feed the paper to the desired top of form position. 00i Note: The red line on the ribbon mask can be used as a reference only when you want to exit the top of form mode and save your new top of form position. (...If you are in the top of form position is based on the ribbon mask shows you where the bottom edge of your software inserts a top margin of the TOP OF FORM button.) 2-18 Loading and Using Paper At...

User Manual
Page 62
...to adjust your printing. For example, if you adjust the printing in the middle of form position even after the printer is turned off, reset, or initialized. When you use a slower printing speed. See the section in the ...these steps to stop printing. Start printing your text is normally hidden behind the ribbon. Note: You may find it falls a half-inch lower, the next page will fall based on the ...clear plastic ribbon mask. Press the ON LINE button to position your printing position: 1. When you move the ...
...to adjust your printing. For example, if you adjust the printing in the middle of form position even after the printer is turned off, reset, or initialized. When you use a slower printing speed. See the section in the ...these steps to stop printing. Start printing your text is normally hidden behind the ribbon. Note: You may find it falls a half-inch lower, the next page will fall based on the ...clear plastic ribbon mask. Press the ON LINE button to position your printing position: 1. When you move the ...

User Manual
Page 110
Chapter 5 Maintaining and Transporting the Printer Cleaning the Printer 5-2 Replacing the Ribbon 5-3 Transporting the Printer 5-8 Maintaining and Transporting the Printer 5-1
Chapter 5 Maintaining and Transporting the Printer Cleaning the Printer 5-2 Replacing the Ribbon 5-3 Transporting the Printer 5-8 Maintaining and Transporting the Printer 5-1

User Manual
Page 112
... Epson replacement cartridge for you need to replace the ribbon. WARNING: If the printer has been used recently, the print head may be hot. l Do not use alcohols or thinners to replace the ribbon. 1. This widens the gap between the print head and the platen, making it easier for the DFX-5000. Maintaining and Transporting the Printer...
... Epson replacement cartridge for you need to replace the ribbon. WARNING: If the printer has been used recently, the print head may be hot. l Do not use alcohols or thinners to replace the ribbon. 1. This widens the gap between the print head and the platen, making it easier for the DFX-5000. Maintaining and Transporting the Printer...

User Manual
Page 113
Pull up on the side of the ribbon cartridge as shown below to release it up and away from the printer's mounting pins. Then remove the cartridge by lifting it from you. 5-4 Maintaining and Transporting the Printer Lift the ribbon guide off the print head as shown below . 4. 3.
Pull up on the side of the ribbon cartridge as shown below to release it up and away from the printer's mounting pins. Then remove the cartridge by lifting it from you. 5-4 Maintaining and Transporting the Printer Lift the ribbon guide off the print head as shown below . 4. 3.

User Manual
Page 114
Move the print head back to remove any slack in the ribbon. Maintaining and Transporting the Printer 5-5 Caution: Make sure you don't pull on the ribbon cartridge and turn the ribbon-tightening knob to the middle of the box, remove the separator piece from the ribbon cartridge as shown below. (This piece can be discarded.) Then detach the ribbon guide from its holder on the flat gold cable beneath the ribbon cartridge. 5. After taking the new ribbon cartridge out of the printer. 6.
Move the print head back to remove any slack in the ribbon. Maintaining and Transporting the Printer 5-5 Caution: Make sure you don't pull on the ribbon cartridge and turn the ribbon-tightening knob to the middle of the box, remove the separator piece from the ribbon cartridge as shown below. (This piece can be discarded.) Then detach the ribbon guide from its holder on the flat gold cable beneath the ribbon cartridge. 5. After taking the new ribbon cartridge out of the printer. 6.

User Manual
Page 115
Pulling the cartridge toward you, slide the hooks nearest you over the mounting pins in the printer. Hold the ribbon cartridge with both sides of the cartridge to make sure the hooks are properly inserted. 5-6 Maintaining and Transporting the Printer Press lightly on both hands and lower it into place over the corresponding two pins in the printer. 8. Then push the cartridge down into position so that the remaining two hooks snap into the printer as shown below. 7.
Pulling the cartridge toward you, slide the hooks nearest you over the mounting pins in the printer. Hold the ribbon cartridge with both sides of the cartridge to make sure the hooks are properly inserted. 5-6 Maintaining and Transporting the Printer Press lightly on both hands and lower it into place over the corresponding two pins in the printer. 8. Then push the cartridge down into position so that the remaining two hooks snap into the printer as shown below. 7.

User Manual
Page 116
Turn the ribbon-tightening knob to make sure that it moves smoothly and that the ribbon is not twisted or creased. 11. Maintaining and Transporting the Printer 5-7 Fit the plastic ribbon guide onto the metal pins on each side of the guide should be on top, with its angled edge toward the platen. Slide the print head from side to side to remove any slack in the ribbon. 10. 9. Close the printer's top cover. The smaller end of the print head, as shown below.
Turn the ribbon-tightening knob to make sure that it moves smoothly and that the ribbon is not twisted or creased. 11. Maintaining and Transporting the Printer 5-7 Fit the plastic ribbon guide onto the metal pins on each side of the guide should be on top, with its angled edge toward the platen. Slide the print head from side to side to remove any slack in the ribbon. 10. 9. Close the printer's top cover. The smaller end of the print head, as shown below.

User Manual
Page 118
4. Detach the ribbon guide from the print head as shown below, and then remove the ribbon cartridge. 5. Using a cross-head screwdriver, reattach the carriage guide support bar Maintaining and Transporting the Printer 5-9 Open the printer's top cover and slide the print head to the far right.
4. Detach the ribbon guide from the print head as shown below, and then remove the ribbon cartridge. 5. Using a cross-head screwdriver, reattach the carriage guide support bar Maintaining and Transporting the Printer 5-9 Open the printer's top cover and slide the print head to the far right.


