Quick Start
Page 1
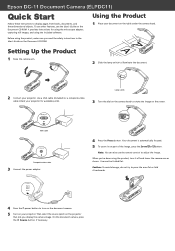
...To avoid damage, do not try to rotate the image on the projector that lets you 're done using the product, turn on the document camera. 5 Turn on the table under the camera head. Epson DC-11 Document Camera (ELPDC11) Quick Start Follow these instructions to adjust the image. Before using ...the included software. Lamp switch 3 Turn the dial on the camera head to press the arm flat ...
...To avoid damage, do not try to rotate the image on the projector that lets you 're done using the product, turn on the document camera. 5 Turn on the table under the camera head. Epson DC-11 Document Camera (ELPDC11) Quick Start Follow these instructions to adjust the image. Before using ...the included software. Lamp switch 3 Turn the dial on the camera head to press the arm flat ...

Quick Start
Page 2
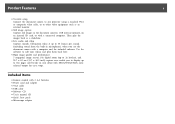
...STATEMENTS OR REPRESENTATIONS MADE BY ANY OTHER PERSON OR FIRM ARE VOID. Wash hands after handling. (This notice is subject to your projector with a VGA cable. 3 If you're using a laptop, make time-lapse movies, annotate captured images, and upload your computer... item replaced becomes Epson property. IN THE EVENT THE REMEDIES ABOVE FAIL, EPSON'S ENTIRE LIABILITY SHALL BE LIMITED TO A REFUND OF THE PRICE PAID FOR THE EPSON PRODUCT COVERED BY THIS LIMITED WARRANTY. Epson is not responsible for Epson Document Camera. 5 Use the application's capture buttons to : Epson America, Inc., ...
...STATEMENTS OR REPRESENTATIONS MADE BY ANY OTHER PERSON OR FIRM ARE VOID. Wash hands after handling. (This notice is subject to your projector with a VGA cable. 3 If you're using a laptop, make time-lapse movies, annotate captured images, and upload your computer... item replaced becomes Epson property. IN THE EVENT THE REMEDIES ABOVE FAIL, EPSON'S ENTIRE LIABILITY SHALL BE LIMITED TO A REFUND OF THE PRICE PAID FOR THE EPSON PRODUCT COVERED BY THIS LIMITED WARRANTY. Epson is not responsible for Epson Document Camera. 5 Use the application's capture buttons to : Epson America, Inc., ...

User's Guide
Page 6
.../Rear 10 Camera Head 11 Base 12 Remote Control Buttons 13 Remote Control 13 Storing the Document Camera 15 Securing the Document Camera 16 Basic Setup and Use Plugging In and Turning On 18 Connecting to a Projector 19 Connecting to a Computer 20 Connect to Use the Document Camera Software 20 Connect Without Using the Document Camera Software 21 Displaying a Document or Other...
.../Rear 10 Camera Head 11 Base 12 Remote Control Buttons 13 Remote Control 13 Storing the Document Camera 15 Securing the Document Camera 16 Basic Setup and Use Plugging In and Turning On 18 Connecting to a Projector 19 Connecting to a Computer 20 Connect to Use the Document Camera Software 20 Connect Without Using the Document Camera Software 21 Displaying a Document or Other...
User's Guide
Page 9
... 5 megapixel image sensor, 10x digital zoom (up to two pages side-by-side in the document camera's 1GB internal memory, on an inserted SD card, or with a connected computer. Product Features 9 • Versatile setup Connect the document camera to any projector using a standard VGA or composite video cable, or to other video equipment such as... up to 30 frames per second (including sound from the built-in microphone), when you to display up to 2x lossless), and 29.7 x 42 cm (11.7 x 16.5 inch) capture area enable you use the document camera with a computer and the included software.
... 5 megapixel image sensor, 10x digital zoom (up to two pages side-by-side in the document camera's 1GB internal memory, on an inserted SD card, or with a connected computer. Product Features 9 • Versatile setup Connect the document camera to any projector using a standard VGA or composite video cable, or to other video equipment such as... up to 30 frames per second (including sound from the built-in microphone), when you to display up to 2x lossless), and 29.7 x 42 cm (11.7 x 16.5 inch) capture area enable you use the document camera with a computer and the included software.

User's Guide
Page 11
... A Microphone B [ ] Lamp switch C Image rotation dial D LED lamp E Camera lens Function Captures sound when you save and display images on an SD card. Turns the displayed image ±90˚. Document Camera Parts 11 Name P Composite port Q Display Out port R Security bar S SD card slot Function Outputs composite video signals to a projector or external monitor.
... A Microphone B [ ] Lamp switch C Image rotation dial D LED lamp E Camera lens Function Captures sound when you save and display images on an SD card. Turns the displayed image ±90˚. Document Camera Parts 11 Name P Composite port Q Display Out port R Security bar S SD card slot Function Outputs composite video signals to a projector or external monitor.
User's Guide
Page 13
... button moves to the previous menu level. You cannot operate a projector with an Epson projector, turns the projector on or off . The unit cannot focus on or off . When the menu is displayed, pressing these buttons selects menu items and setting values. Turns the document camera on objects that are approximately 10 cm (4 inches) or less...
... button moves to the previous menu level. You cannot operate a projector with an Epson projector, turns the projector on or off . The unit cannot focus on or off . When the menu is displayed, pressing these buttons selects menu items and setting values. Turns the document camera on objects that are approximately 10 cm (4 inches) or less...

User's Guide
Page 14
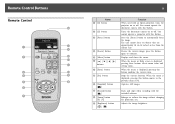
When used with an Epson projector, changes the input source connected to the projector. Outputs remote control signals. Turns the video and audio on or off when you are connecting the document camera when used with an Epson projector. Remote Control Buttons 14 Name M [Source] button [ ][ ] N [A/V Mute] button O [Source Search] button P Remote control light emitting area Function [ ] Projects images from a computer. [ ] Projects images from the document camera.
When used with an Epson projector, changes the input source connected to the projector. Outputs remote control signals. Turns the video and audio on or off when you are connecting the document camera when used with an Epson projector. Remote Control Buttons 14 Name M [Source] button [ ][ ] N [A/V Mute] button O [Source Search] button P Remote control light emitting area Function [ ] Projects images from a computer. [ ] Projects images from the document camera.

User's Guide
Page 18
d Select the appropriate "source" on the projector (such as shown. Your projector may use different names for the document camera to output an image. a When you connected. It takes about 10 seconds for the sources. Plugging In and Turning On 18 a Connect the...power adapter as Computer or Video), depending on port to which you 're done using the document camera, press the [t] power button twice to turn on the document camera. Plug the adapter into a wall outlet. s p.15 c Turn on your projector. b Press the [t] power button to turn it off, disconnect any cables, and fold ...
d Select the appropriate "source" on the projector (such as shown. Your projector may use different names for the document camera to output an image. a When you connected. It takes about 10 seconds for the sources. Plugging In and Turning On 18 a Connect the...power adapter as Computer or Video), depending on port to which you 're done using the document camera, press the [t] power button twice to turn on the document camera. Plug the adapter into a wall outlet. s p.15 c Turn on your projector. b Press the [t] power button to turn it off, disconnect any cables, and fold ...

User's Guide
Page 19
... connection VGA cable (included) Composite video cable A Display Out port B VGA cable Composite video connection A Composite port B Composite video cable a You can connect the document camera to a projector using a standard VGA cable or composite video cable, or to other video equipment: VGA port (computer monitor style) Composite video port (yellow "RCA" style) b Connect...
... connection VGA cable (included) Composite video cable A Display Out port B VGA cable Composite video connection A Composite port B Composite video cable a You can connect the document camera to a projector using a standard VGA cable or composite video cable, or to other video equipment: VGA port (computer monitor style) Composite video port (yellow "RCA" style) b Connect...

User's Guide
Page 20
...cable, as display PowerPoint slides or images from another application on your computer. s p.39 a Connect the document camera to a computer also lets you plan to use: • To use the software or it's not ...installed on your computer, see "Connect to Use the Document Camera Software" below. • If you 've already installed the software. s p.38 Connecting to your computer depends... software, see "Connect Without Using the Document Camera Software" p.21. A USB cable B VGA cable b Connect your projector using a VGA cable.
...cable, as display PowerPoint slides or images from another application on your computer. s p.39 a Connect the document camera to a computer also lets you plan to use: • To use the software or it's not ...installed on your computer, see "Connect to Use the Document Camera Software" below. • If you 've already installed the software. s p.38 Connecting to your computer depends... software, see "Connect Without Using the Document Camera Software" p.21. A USB cable B VGA cable b Connect your projector using a VGA cable.

User's Guide
Page 21
b Connect a VGA cable from the document camera's Display Out port to your projector. If you connected a laptop but the image doesn't appear on your computer, but you can't use the Composite port to display your computer image in ...this configuration. s p.50 A Computer In port B VGA cable C VGA cable D Display Out port c Connect a second VGA cable from your computer's monitor-out port to the document camera...
b Connect a VGA cable from the document camera's Display Out port to your projector. If you connected a laptop but the image doesn't appear on your computer, but you can't use the Composite port to display your computer image in ...this configuration. s p.50 A Computer In port B VGA cable C VGA cable D Display Out port c Connect a second VGA cable from your computer's monitor-out port to the document camera...

User's Guide
Page 27
...On-screen Menu 27 Press the [Menu] button on the document camera or remote control to open the Image menu: • White...the image settings to navigate the menu and adjust the settings. To show a photographic negative in "Displaying a Document or Other Materials" p.22. Use if you rotate an upside-down image. Making Image Adjustments Basic image ... or Incandescent (to lessen yellow tones). • Focus Lets you manually select XGA, WXGA, or SXGA when the projector's format cannot be automatically detected. s p.22 • Output Resolution Lets you manually adjust the focus if the auto...
...On-screen Menu 27 Press the [Menu] button on the document camera or remote control to open the Image menu: • White...the image settings to navigate the menu and adjust the settings. To show a photographic negative in "Displaying a Document or Other Materials" p.22. Use if you rotate an upside-down image. Making Image Adjustments Basic image ... or Incandescent (to lessen yellow tones). • Focus Lets you manually select XGA, WXGA, or SXGA when the projector's format cannot be automatically detected. s p.22 • Output Resolution Lets you manually adjust the focus if the auto...

User's Guide
Page 30
... your projector. • Language Changes the on-screen menu language. • Sleep Mode/Sleep Mode Timer By default, sleep mode turns the document camera off after which the camera turns off sleep mode or change the following camera settings: • USB Mode Changes how the document camera functions when connected with different electrical systems (using the document camera software...
... your projector. • Language Changes the on-screen menu language. • Sleep Mode/Sleep Mode Timer By default, sleep mode turns the document camera off after which the camera turns off sleep mode or change the following camera settings: • USB Mode Changes how the document camera functions when connected with different electrical systems (using the document camera software...

User's Guide
Page 35
... inserted SD card. Caution Before disconnecting the USB cable, make sure your files have to the document camera or SD card, they must be damaged. d Disconnect the projector from your computer, they won't show the actual time they may experience problems copying or moving ...computer to change the function of its USB port as an external drive on the document camera and projector. a The document camera does not have a built-in clock. Otherwise, they were created. A USB cable The document camera's internal memory appears as described below. s p.19 b Turn on your computer with...
... inserted SD card. Caution Before disconnecting the USB cable, make sure your files have to the document camera or SD card, they must be damaged. d Disconnect the projector from your computer, they won't show the actual time they may experience problems copying or moving ...computer to change the function of its USB port as an external drive on the document camera and projector. a The document camera does not have a built-in clock. Otherwise, they were created. A USB cable The document camera's internal memory appears as described below. s p.19 b Turn on your computer with...

User's Guide
Page 36
Change the setting back to see a live camera image when you don't change the setting back. If you don't plan to use the document camera software. a If you use the software, you don't need to change the setting back, you won't be able to Application. Viewing and Managing Files from Your Computer 36 h Reconnect the projector. i Press the [Menu] button and select Function > USB Mode.
Change the setting back to see a live camera image when you don't change the setting back. If you don't plan to use the document camera software. a If you use the software, you don't need to change the setting back, you won't be able to Application. Viewing and Managing Files from Your Computer 36 h Reconnect the projector. i Press the [Menu] button and select Function > USB Mode.

User's Guide
Page 42
... screen. Your captured image(s) appear in the Capture album on the left side of images, click the Burst button. To display a captured image through your projector, double-click the image or right-click it and select Preview. a If necessary, select the settings you want to 10, that will be captured with...
... screen. Your captured image(s) appear in the Capture album on the left side of images, click the Burst button. To display a captured image through your projector, double-click the image or right-click it and select Preview. a If necessary, select the settings you want to 10, that will be captured with...

User's Guide
Page 43
b Click the Start Time Lapse button to close the Settings screen. Click OK to begin capturing images. To display the movie through your projector, double-click the icon or right-click it and select Preview. When the process is done, the time-lapse movie or image appears as an ...
b Click the Start Time Lapse button to close the Settings screen. Click OK to begin capturing images. To display the movie through your projector, double-click the icon or right-click it and select Preview. When the process is done, the time-lapse movie or image appears as an ...

User's Guide
Page 44
... select ELPDC11 from Audio Device. Click Record Video again to stop recording. To display the movie through your presentation. Never unplug the USB cable while you connect two document cameras, unplug all the cables and reconnect them. You can make an audio/video recording of your projector, doubleclick... the icon or right-click it will use two document cameras at the same time. When you connect with the...
... select ELPDC11 from Audio Device. Click Record Video again to stop recording. To display the movie through your presentation. Never unplug the USB cable while you connect two document cameras, unplug all the cables and reconnect them. You can make an audio/video recording of your projector, doubleclick... the icon or right-click it will use two document cameras at the same time. When you connect with the...

User's Guide
Page 49
...; After you press the [t] Power button, wait a few moments for the document camera to output an image. • Make sure your projector is connected. First disconnect the USB cable, then reconnect to the projector using a projector to display the image, check its picture has not been "muted" or turned...] button on the document camera or remote control to display the live camera image. • Select the correct source on your document, slide the lamp switch on and not in sleep mode. s p.27 • Make sure the lens is at least 10 cm (4 inches) away from your projector is fuzzy or out...
...; After you press the [t] Power button, wait a few moments for the document camera to output an image. • Make sure your projector is connected. First disconnect the USB cable, then reconnect to the projector using a projector to display the image, check its picture has not been "muted" or turned...] button on the document camera or remote control to display the live camera image. • Select the correct source on your document, slide the lamp switch on and not in sleep mode. s p.27 • Make sure the lens is at least 10 cm (4 inches) away from your projector is fuzzy or out...

User's Guide
Page 50
On most systems, the or CRT/LCD key lets you toggle between the LCD screen and the projector, or display on the document camera don't work with the software When you installed the software, the Button Manager wasn't installed. Click the Settings tab, then click Advanced. The method for ...
On most systems, the or CRT/LCD key lets you toggle between the LCD screen and the projector, or display on the document camera don't work with the software When you installed the software, the Button Manager wasn't installed. Click the Settings tab, then click Advanced. The method for ...


