
Instruction Manual
Page 3
... distance details Projecting Images Connecting with different devices and projecting and adjusting images What You Can Do Functions to get the most out of your projector Menu Functions (Remote Control Only) Basic menu functions and settings Troubleshooting Troubleshooting projection failure, bad projection, and other problems Maintenance Performing...
... distance details Projecting Images Connecting with different devices and projecting and adjusting images What You Can Do Functions to get the most out of your projector Menu Functions (Remote Control Only) Basic menu functions and settings Troubleshooting Troubleshooting projection failure, bad projection, and other problems Maintenance Performing...

Instruction Manual
Page 5
Menu Functions (Remote Control Only) Learning Basic Operations 42 Video Menu 43 Audio Menu 45 Effect Menu 46 Setting Menu 47 Advanced Menu 49 About Menu 50 Reset All Menu 51 Troubleshooting Possible Failures 54 When Indicators Do Not Help 57 Maintenance Projector Cleaning, Lens Replacement, Air Inlet Cleaning 64 Lamp Replacement 66 General Notes Optional Accessories 70 Glossary 71 Specifications 73 External Dimensions 75 Index 76 3
Menu Functions (Remote Control Only) Learning Basic Operations 42 Video Menu 43 Audio Menu 45 Effect Menu 46 Setting Menu 47 Advanced Menu 49 About Menu 50 Reset All Menu 51 Troubleshooting Possible Failures 54 When Indicators Do Not Help 57 Maintenance Projector Cleaning, Lens Replacement, Air Inlet Cleaning 64 Lamp Replacement 66 General Notes Optional Accessories 70 Glossary 71 Specifications 73 External Dimensions 75 Index 76 3
Instruction Manual
Page 10
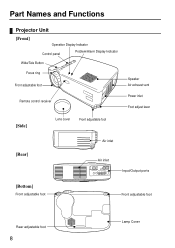
Part Names and Functions Projector Unit [Front] Operation Display Indicator Control panel Problem/Alarm Display Indicator Wide/Tele Button Focus ring Front adjustable foot Remote control receiver Speaker Air exhaust vent Power inlet Foot adjust lever [Side] Lens cover Front adjustable foot [Rear] Air inlet Air inlet Input/Output ports [Bottom] Front adjustable foot Front adjustable foot Rear adjustable foot 8 Lamp Cover
Part Names and Functions Projector Unit [Front] Operation Display Indicator Control panel Problem/Alarm Display Indicator Wide/Tele Button Focus ring Front adjustable foot Remote control receiver Speaker Air exhaust vent Power inlet Foot adjust lever [Side] Lens cover Front adjustable foot [Rear] Air inlet Air inlet Input/Output ports [Bottom] Front adjustable foot Front adjustable foot Rear adjustable foot 8 Lamp Cover

Instruction Manual
Page 33
Press the Power button. Projector Remote control 2. Or, if no action is pulled out of the outlet, the operation display indicator will go out. 31 Check that cool-down * is ... display indicator indicates that the operation display indicator lights orange. Tip: If you do not wish to steady orange. Ending After the Projection Ending 1. The projector lamp goes out, the operation display indicator flashes orange, and after 7 seconds.
Press the Power button. Projector Remote control 2. Or, if no action is pulled out of the outlet, the operation display indicator will go out. 31 Check that cool-down * is ... display indicator indicates that the operation display indicator lights orange. Tip: If you do not wish to steady orange. Ending After the Projection Ending 1. The projector lamp goes out, the operation display indicator flashes orange, and after 7 seconds.

Instruction Manual
Page 34
...R/C switch to the remote control and exhaust the batteries. Foot adjust levers 1. Attach the lens cover. 32 This may cause a malfunction or shorten the projector lamp life. 5. If the remote control will be used for a long period or you are moving the unit, set the remote control R/C switch to Off.... Pull the power cord plug out of current will not be supplied to Off. Support the projector unit with your hands, pull upward on the foot adjust levers with your fingers, and lower the unit slowly. 2. Storage When you are ...
...R/C switch to the remote control and exhaust the batteries. Foot adjust levers 1. Attach the lens cover. 32 This may cause a malfunction or shorten the projector lamp life. 5. If the remote control will be used for a long period or you are moving the unit, set the remote control R/C switch to Off.... Pull the power cord plug out of current will not be supplied to Off. Support the projector unit with your hands, pull upward on the foot adjust levers with your fingers, and lower the unit slowly. 2. Storage When you are ...

Instruction Manual
Page 52
...on time. Use this function when replacing the lamp. H: Displays the horizontal scanning frequency. Displays a computer/component video input signal. Computer/Component Video Projection Video Projection Menu Lamp Reset Lamp Timer Video Source Input Signal Frequency SYNC Polarity... Rate Video Signal 50 D-Sub15: Computer/Component video Video: Video image Content Video Projection D-Sub15 Video Displays cumulative lamp-on screen. Displays refresh rate (vertical frequency). Displays input resolution. Displays sync polarity. Displays an A/V device signal...
...on time. Use this function when replacing the lamp. H: Displays the horizontal scanning frequency. Displays a computer/component video input signal. Computer/Component Video Projection Video Projection Menu Lamp Reset Lamp Timer Video Source Input Signal Frequency SYNC Polarity... Rate Video Signal 50 D-Sub15: Computer/Component video Video: Video image Content Video Projection D-Sub15 Video Displays cumulative lamp-on screen. Displays refresh rate (vertical frequency). Displays input resolution. Displays sync polarity. Displays an A/V device signal...
Instruction Manual
Page 53
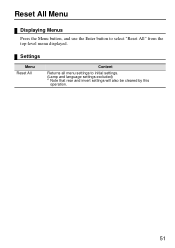
Reset All Menu Displaying Menus Press the Menu button, and use the Enter button to initial settings. (Lamp and language settings excluded) * Note that rear and invert settings will also be cleared by this operation. 51 Settings Menu Reset All Content Returns all menu settings to select "Reset All" from the top-level menu displayed.
Reset All Menu Displaying Menus Press the Menu button, and use the Enter button to initial settings. (Lamp and language settings excluded) * Note that rear and invert settings will also be cleared by this operation. 51 Settings Menu Reset All Content Returns all menu settings to select "Reset All" from the top-level menu displayed.
Instruction Manual
Page 56
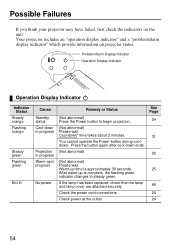
... replaced, check that the lamp and lamp cover are attached securely. Check the power cord connections. Cool-down ends. (Not abnormal) (Not abnormal) Please wait. See Page 24 31 25 25 66 24 24 54 You cannot operate the Power button during cooldown. Your projector includes an "operation display ... Cool-down in progress Projection in progress Warm-up is approximately 30 seconds. Possible Failures If you think your projector may have failed, first check the indicators on projector status. After warm-up in progress No power Remedy or Status (Not abnormal) Press the Power button to ...
... replaced, check that the lamp and lamp cover are attached securely. Check the power cord connections. Cool-down ends. (Not abnormal) (Not abnormal) Please wait. See Page 24 31 25 25 66 24 24 54 You cannot operate the Power button during cooldown. Your projector includes an "operation display ... Cool-down in progress Projection in progress Warm-up is approximately 30 seconds. Possible Failures If you think your projector may have failed, first check the indicators on projector status. After warm-up in progress No power Remedy or Status (Not abnormal) Press the Power button to ...

Instruction Manual
Page 57
..." included in the package for about 5 minutes without operating the projector. Problem with lamp Replace with dust? Model No: ELPLP16 If the lamp is broken, handle pieces carefully to switch on , stop . If the projector overheats, check the following two points. • Is the setting... red (1-second intervals) Flashing red (2-second intervals) Cause Remedy or Status High internal temperature The lamp will turn off automatically and projection will stop using the projector, disconnect the power cord from the electrical outlet, and contact your dealer or the nearest address ...
..." included in the package for about 5 minutes without operating the projector. Problem with lamp Replace with dust? Model No: ELPLP16 If the lamp is broken, handle pieces carefully to switch on , stop . If the projector overheats, check the following two points. • Is the setting... red (1-second intervals) Flashing red (2-second intervals) Cause Remedy or Status High internal temperature The lamp will turn off automatically and projection will stop using the projector, disconnect the power cord from the electrical outlet, and contact your dealer or the nearest address ...

Instruction Manual
Page 59
... is Displayed] • Is the lens cover still on an LCD screen even when a video signal is output externally. 57 Display shows "NoSignal". • Is the resolution of the video signal output from your computer instruction manual for 30 minutes, the projector lamp shuts off automatically. • Is video brightness adjusted correctly? See...
... is Displayed] • Is the lens cover still on an LCD screen even when a video signal is output externally. 57 Display shows "NoSignal". • Is the resolution of the video signal output from your computer instruction manual for 30 minutes, the projector lamp shuts off automatically. • Is video brightness adjusted correctly? See...

Instruction Manual
Page 62
...should be active. See page 23 • Have you selected the video whose audio you wish to a computer monitor or LCD may also be replaced with a fresh lamp. • Is image brightness adjusted correctly? Image Color is No Sound • Are audio inputs connected correctly? See page...Video > Input Signal. RGB: Computer images YUV*: Color difference images YCbCr*: DVD images YPbPr*: HDTV images Images Are Dark • Does the lamp need replacement? See pages 44 There is Poor • Is image brightness adjusted correctly? See pages 20, 21 • Is contrast* adjusted correctly...
...should be active. See page 23 • Have you selected the video whose audio you wish to a computer monitor or LCD may also be replaced with a fresh lamp. • Is image brightness adjusted correctly? Image Color is No Sound • Are audio inputs connected correctly? See page...Video > Input Signal. RGB: Computer images YUV*: Color difference images YCbCr*: DVD images YPbPr*: HDTV images Images Are Dark • Does the lamp need replacement? See pages 44 There is Poor • Is image brightness adjusted correctly? See pages 20, 21 • Is contrast* adjusted correctly...

Instruction Manual
Page 66
...183; Wait approximately 60 minutes after switching off power to remove the lamp immediately after use. · Heat may cause burns or other volatile substances. For internal checks, repairs and cleaning, contact your projector when it is easily scratched and should only be rubbed or struck ... handling may degrade the cabinet or strip the finish. Warning: • The projector cabinet should not be opened by trained service personnel. Switch off power and remove the lamp after the projector has cooled completely. • When performing operations, pull the power plug and connector...
...183; Wait approximately 60 minutes after switching off power to remove the lamp immediately after use. · Heat may cause burns or other volatile substances. For internal checks, repairs and cleaning, contact your projector when it is easily scratched and should only be rubbed or struck ... handling may degrade the cabinet or strip the finish. Warning: • The projector cabinet should not be opened by trained service personnel. Switch off power and remove the lamp after the projector has cooled completely. • When performing operations, pull the power plug and connector...

Instruction Manual
Page 68
... opened, the abnormal warning display indicator flashes red, and the projector lamp goes out. After the replacement of the lamp breaking becomes greater. When the lamp replacement message appears, replace the lamp with a new lamp in the user's manual."] A message will not light. 66 Lamp Replacement Replace the lamp with a new one as soon as possible, even if...
... opened, the abnormal warning display indicator flashes red, and the projector lamp goes out. After the replacement of the lamp breaking becomes greater. When the lamp replacement message appears, replace the lamp with a new lamp in the user's manual."] A message will not light. 66 Lamp Replacement Replace the lamp with a new one as soon as possible, even if...

Instruction Manual
Page 69
1. Insert the cover diagonally and press it into place. Install the lamp cover. Tip: After lamp replacement, use a screwdriver to tighten the two lamp retaining screws firmly. 5. Install a new lamp. Align the lamp properly, insert the lamp until you hear the catches click into the projector until it contacts the rear of the housing, and use the About...
1. Insert the cover diagonally and press it into place. Install the lamp cover. Tip: After lamp replacement, use a screwdriver to tighten the two lamp retaining screws firmly. 5. Install a new lamp. Align the lamp properly, insert the lamp until you hear the catches click into the projector until it contacts the rear of the housing, and use the About...

Instruction Manual
Page 72
... the connector shapes are current as a replacement for storing a laptop computer) Use this case if you need to carry the projector by hand. Soft carrying case ELPKS16 (type for spent lamps. Spare lamp ELPLP16 Use as of optional accessories listed here are different. Optional Accessories The following optional accessories are subject to change...
... the connector shapes are current as a replacement for storing a laptop computer) Use this case if you need to carry the projector by hand. Soft carrying case ELPKS16 (type for spent lamps. Spare lamp ELPLP16 Use as of optional accessories listed here are different. Optional Accessories The following optional accessories are subject to change...

Instruction Manual
Page 73
...aspect ratio for an IBM PC/AT-compatible (DOS/V) computer. After the lamp goes out, a cooling fan spins, and operational buttons become inactive. If the frequency of characters and images. Your projector provides this manual but are not explained in color lightness and darkness that ...button is pressed again or audio volume is adjusted, this function is not achieved, a projected image displays jitters, blurring, and horizontal noise. 71 If synchronization is released. For details, refer to a 1280-pixel (Pix) horizontal x 1024-pixel (Pix) vertical display signal for an IBM...
...aspect ratio for an IBM PC/AT-compatible (DOS/V) computer. After the lamp goes out, a cooling fan spins, and operational buttons become inactive. If the frequency of characters and images. Your projector provides this manual but are not explained in color lightness and darkness that ...button is pressed again or audio volume is adjusted, this function is not achieved, a projected image displays jitters, blurring, and horizontal noise. 71 If synchronization is released. For details, refer to a 1280-pixel (Pix) horizontal x 1024-pixel (Pix) vertical display signal for an IBM...

Instruction Manual
Page 75
Specifications Product Name Dimensions Panel Size Display Format Pixel Count Focus Adjustment Zoom Adjustment Lamp (Light Source) Maximum Audio Output Speaker Power Supply Power Consumption Usage Temperature Range Storage Temperature Range Weight Connectors Multi-Media Projector EMP-71/51 11.81(W) x 3.15(H) x 8.46(D)inches (300(W) x 80(H) x 220(D)mm) (not including protruding parts) 0.7 Polysilicon TFT 786...
Specifications Product Name Dimensions Panel Size Display Format Pixel Count Focus Adjustment Zoom Adjustment Lamp (Light Source) Maximum Audio Output Speaker Power Supply Power Consumption Usage Temperature Range Storage Temperature Range Weight Connectors Multi-Media Projector EMP-71/51 11.81(W) x 3.15(H) x 8.46(D)inches (300(W) x 80(H) x 220(D)mm) (not including protruding parts) 0.7 Polysilicon TFT 786...

Instruction Manual
Page 78
... Bar 38, 46 [I] Indicator 10 Initial Settings 52 Input Signal 44, 50 Input/Output Ports 8 Inserting Batteries 12 [K] Keystone 47 Keystone (Select) Button 9, 29, 40 [L] Lamp 50 Lamp Cover 8 Lamp Replacement 66 Language 49 Laptop 27 Lens Cover 8
... Bar 38, 46 [I] Indicator 10 Initial Settings 52 Input Signal 44, 50 Input/Output Ports 8 Inserting Batteries 12 [K] Keystone 47 Keystone (Select) Button 9, 29, 40 [L] Lamp 50 Lamp Cover 8 Lamp Replacement 66 Language 49 Laptop 27 Lens Cover 8

Instruction Manual
Page 79
...Projection 49 Refresh Rate 50 Remote Control 10, 11 Remote Control Receiver . . . . 8 Reset 44, 45, 46, 48, 49 Reset All Menu 51 Reset Lamp Timer 50 Resolution 50 [S] Screen Size 16 Setting Menu 47 Setup Instructions 15 Sharpness 44 Sleep Mode 48 Source (Enter) Button . .9, 26, 40 Speaker 8 ... Setup . . . . . .14 Specifications 73 Storage 32 S-Video Button 10, 26 S-Video Port 9, 21 SYNC Mode 50 SYNC Polarity 50 Sync 43 [T] Term 71 Tint 44 Tone 45 Tracking 43 [U] USB mouse Cable 35 USB mouse Port 9, 35 [V] Video Button 10, 26 Video Menu 43 Video Source 50 Video...
...Projection 49 Refresh Rate 50 Remote Control 10, 11 Remote Control Receiver . . . . 8 Reset 44, 45, 46, 48, 49 Reset All Menu 51 Reset Lamp Timer 50 Resolution 50 [S] Screen Size 16 Setting Menu 47 Setup Instructions 15 Sharpness 44 Sleep Mode 48 Source (Enter) Button . .9, 26, 40 Speaker 8 ... Setup . . . . . .14 Specifications 73 Storage 32 S-Video Button 10, 26 S-Video Port 9, 21 SYNC Mode 50 SYNC Polarity 50 Sync 43 [T] Term 71 Tint 44 Tone 45 Tracking 43 [U] USB mouse Cable 35 USB mouse Port 9, 35 [V] Video Button 10, 26 Video Menu 43 Video Source 50 Video...


